Walls and Cornerstone files
A wall is a group of displays, usually a video wall. SiteManager holds the layout of a wall and writes the Cornerstone configuration files from it, so you do not have to write screen.xml and config.txt by hand.
For step-by-step help, see Walls, rooms and the Cornerstone files (the ideas), Set up a wall and Bring in an existing wall.
The workflow is:
- Make a wall and put displays on it, real or planned.
- Arrange them in the wall designer.
- Preview the generated files, then apply them.
- Restart Canvus or Showcase to load them.
The list of walls
Open Walls in the menu. Each wall is a card with its number of displays, how many are planned, its model and grid, and its size. Select Open wall to open the designer.
Make a new wall
Under New wall, fill in:
- Wall name.
- Display model: MT557D, MT556XNB, MT556UNB, or Custom. A model fills in the display size, the pixel pitch and the bezel, so you can type gaps in millimetres. See The model catalogue.
- Columns and Rows, from 1 to 64.
- Orientation: landscape (0°), portrait (270°), portrait (90°) or upside down (180°).
- Start with a planned display in every slot, ticked by default.
Select Make the wall. The wall opens in the designer. A new wall is placed beside the walls that already exist, so it does not land on top of them.
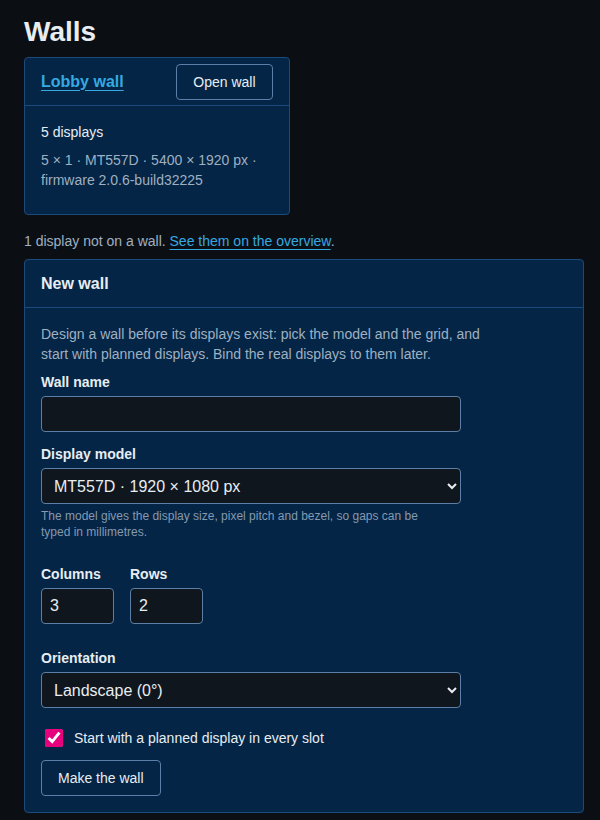
You can design a wall before its displays exist. Start with planned displays, and bind the real displays to them later. See Planned displays.
Import a wall makes a wall from a file exported from another wall's page. See Export and import.
The model catalogue
The catalogue holds three models: MT557D, MT556XNB and MT556UNB. Choosing one copies its resolution, pixel pitch and panel bezel into the wall. The catalogue is not a live link: nothing follows it later, and the wall page tells you when the wall's values differ from the catalogue.
The figures come from the data sheets. The bezel on each side is worked out from the sheet's physical size and active area. The bezels are calculated, not measured, so the catalogue marks them as unverified. Where a data sheet gives no figure, the field is empty, and gaps in millimetres are not offered for that model.
From the command line, sitemanager walls models lists the catalogue.
The wall designer
Select a wall to open its designer.
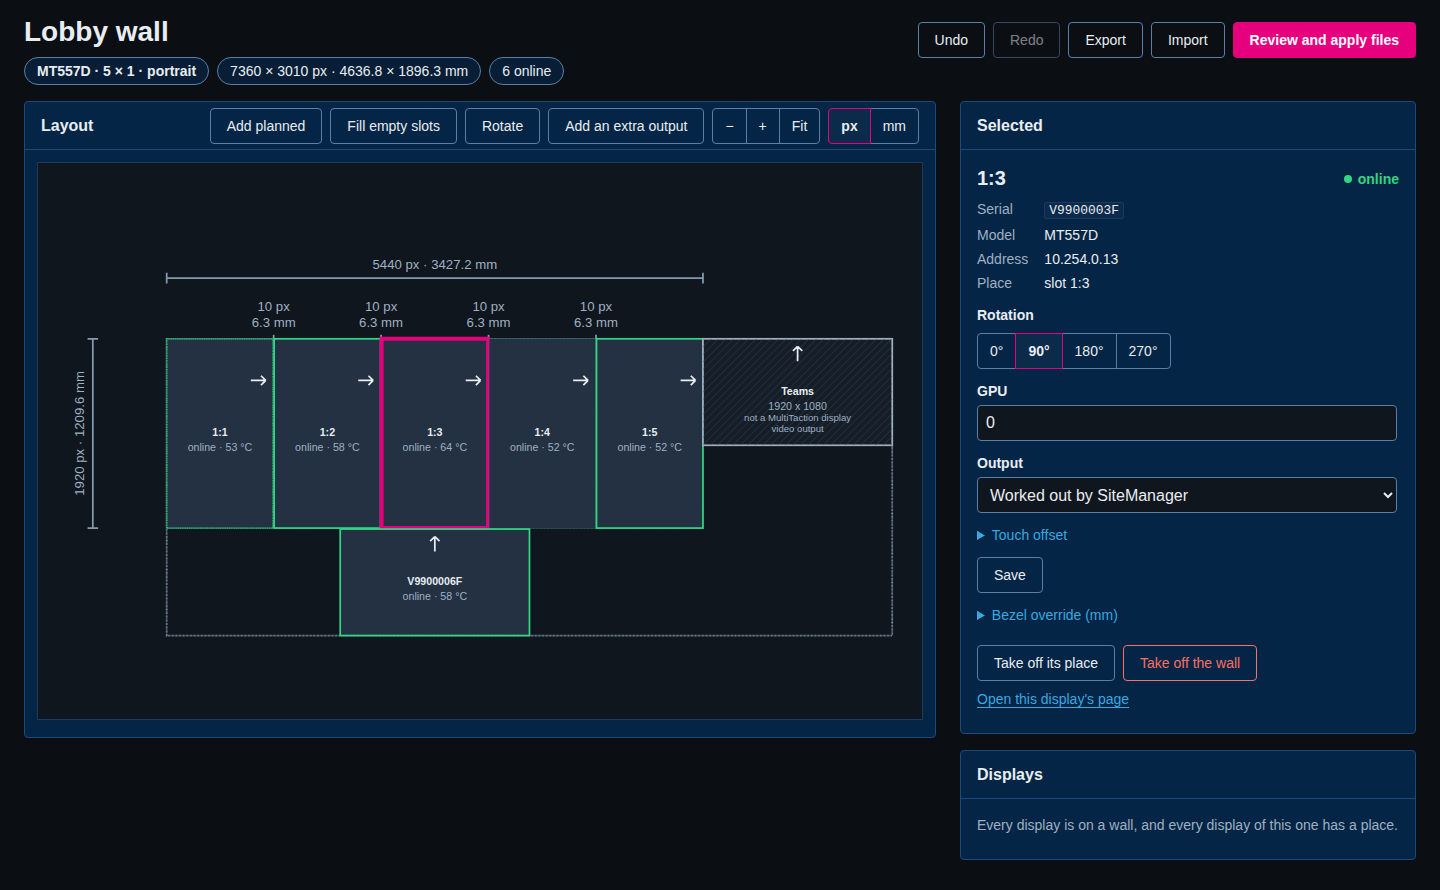
The page has:
- a title, and chips for the model, the grid, the size in pixels and millimetres, and how many displays are online. The size is the size of the generated wall, with the gaps and any extra outputs included. The overview and the list of walls show the same figure;
- Undo, Redo, Export, Import, and Review and apply files;
- the Layout: the wall drawn as a canvas, with a toolbar;
- Selected: the inspector for the display you chose;
- Displays: displays that are not on a wall, and displays on this wall without a place;
- tabs for Problems, screen.xml, Desktop map and Layout settings.
Changes made by other people appear live. Every change you make in the designer is saved to the site at once. It reaches the Cornerstone files only when you preview and apply them. Until then, the Drift page shows the files as differs.
The canvas
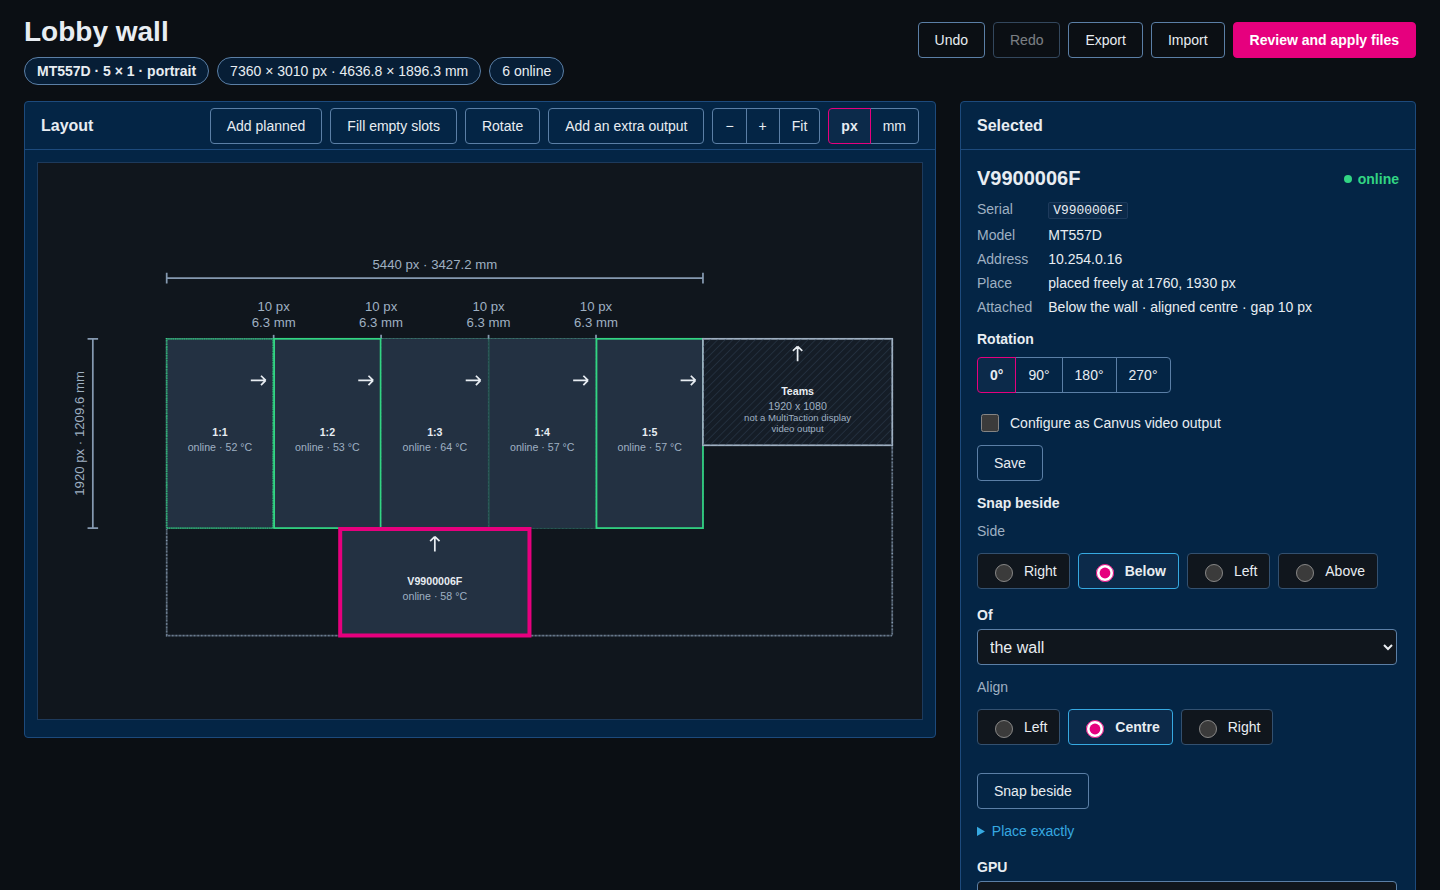
Each display is a tile, drawn in its real proportions on the wall's grid. A tile shows its label, its state and its temperature. An arrow points to the top edge of the display as it is mounted. A planned display is drawn dashed. The dimension lines show the size of the grid in pixels and millimetres, and the gaps between displays.
The toolbar has:
- Add planned: select it, then select an empty slot.
- Fill empty slots: plan a display in every empty slot.
- Rotate: turn the selected display by 90 degrees.
- Add an extra output: see Extra outputs beside a wall.
- −, + and Fit: zoom out, zoom in, and fit the wall to the canvas.
- px and mm: show positions and sizes in pixels or in millimetres. A wall without a pixel pitch shows pixels only. SiteManager stores pixels. The two units show the same layout.
Move displays
Drag a display to move it. Dropping a display on an occupied slot swaps the two. On a wall without a grid, positions snap to 10 pixels, and a move that overlaps another display is refused.
While you drag, a live readout shows:
- the display's position in pixels and in millimetres;
- the slot it would land in, and the display it would swap with;
- any gaps the move would open.
A drop that would be refused is shown before you let go. A refusal is in plain words that name the displays, for example Teams would overlap planned display 1:2. Move it or choose another side. The readout asks the service, but a preview changes nothing. The page sends at most one request every 50 milliseconds.
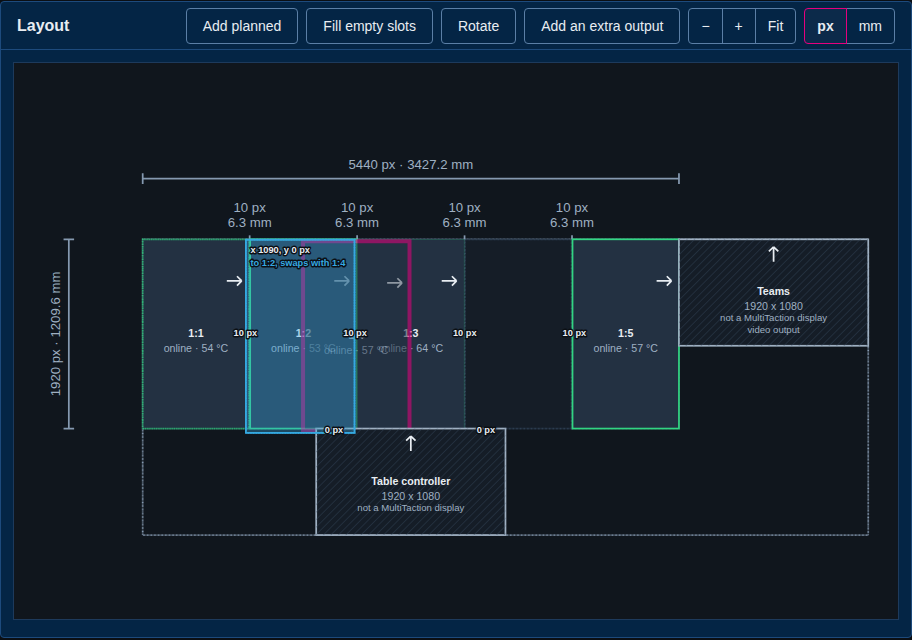
On a screen narrower than 901 pixels, or on a touch screen, you tap a tile and then tap a slot instead of dragging.
Keyboard shortcuts:
- Tab and Enter, or a click, select a display.
- The arrow keys move a freely placed display by 10 pixels, and a display on the grid by one slot. Hold Shift to move by one pixel.
Rturns the display by 90 degrees.- Delete takes it off the wall.
- Escape deselects, or cancels a drag.
- Ctrl+Z undoes. Ctrl+Shift+Z or Ctrl+Y redoes.
The inspector
Select a display to change it in Selected.
- Rotation: 0°, 90°, 180° or 270°. Rotation turns the display. The wall's own rotation is its default for new displays.
- GPU: the render group, which is the X screen on Linux.
- Output: the name of the video output the display is connected to. Worked out by SiteManager is the default.
- Touch offset: an adjustment added to the display's touch mapping.
- Bezel override (mm): the display's own bezel as mounted. SiteManager uses it when the wall takes its gaps from the bezel. Use the wall's bezel goes back to the wall's panel bezel.
- Take off its place unplaces the display. Take off the wall removes it from the wall.
- Open this display's page opens the display page.
Undo and redo
Every change to a wall made in the designer is a step. Undo takes it back, 50 steps deep. Adding every free display at once is one step. The history is kept in memory. It is lost when the service restarts, and it belongs to the wall, not to a user.
Planned displays
A wall can hold displays that are not on the site yet. Select Add planned and then a slot, or Fill empty slots. In the inspector of a planned display you can set its Name, its Expected serial (offered first when you bind) and its GPU.
A planned display is laid out, drawn and written into the generated files like a real one. It is labelled by its position, or by its name. Problems about a planned display say planned 2:1, not an internal id.
To turn a planned display into a real one, bind it:
- Choose a display under Bind to a display and select Bind. Displays on no wall are listed, and the expected serial comes first.
- Or select Identify to bind. SiteManager lights each unplaced display in turn. Select the planned slot when the right one is lit. First add the displays to the wall with Add all under Not on a wall.
You cannot apply the files while a planned display is unbound, because the files would carry a placeholder for a display that does not exist. The Problems tab says so as a warning.
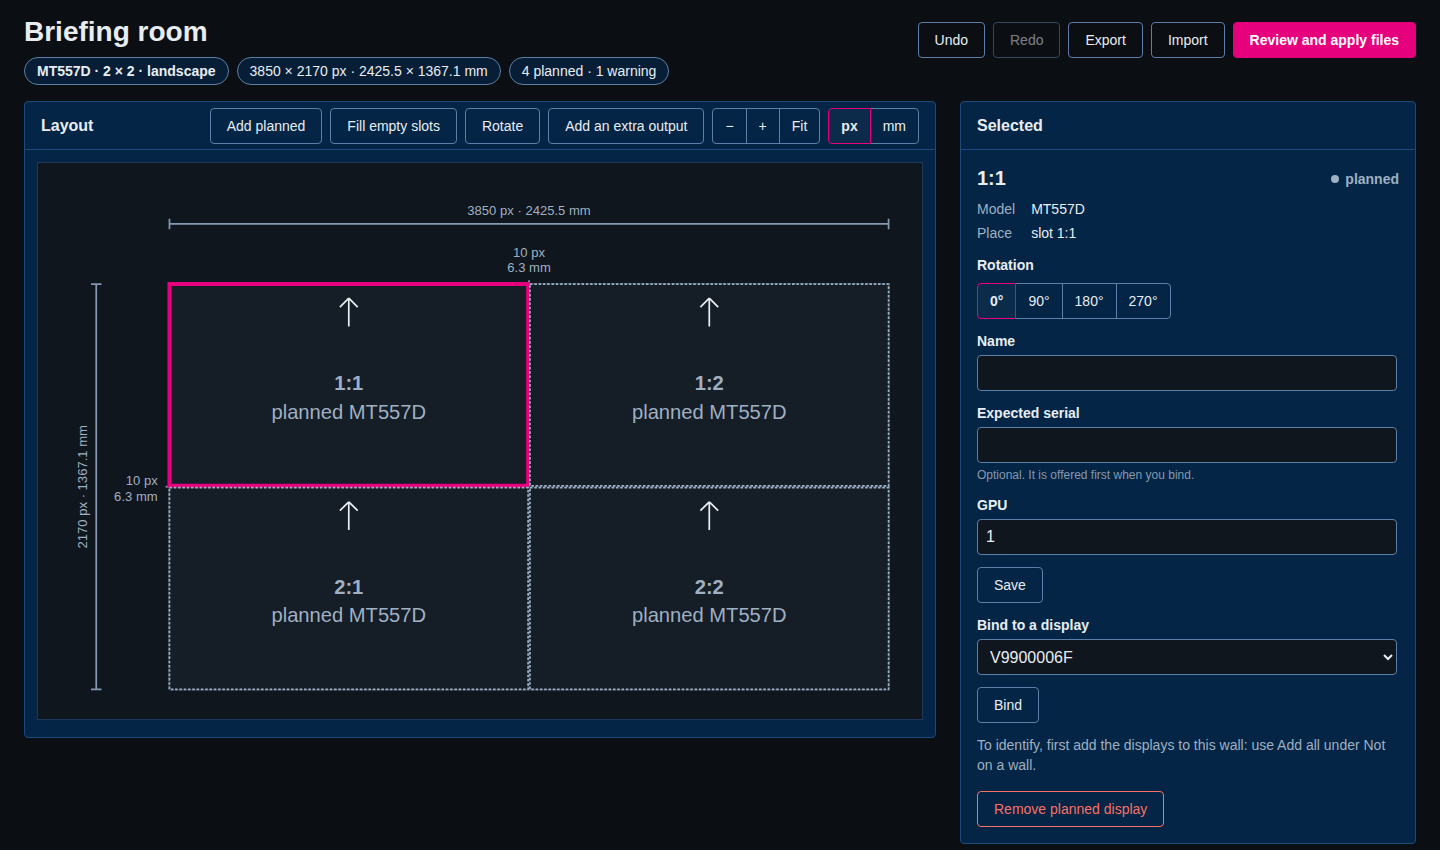
Add displays to the wall
Under Displays, Not on a wall lists the enrolled displays that are on no wall. Select Add to this wall and then a slot, or Add all to add them unplaced. A planned slot binds the display. Displays on this wall without a place are listed as Unplaced here. Use Place, or Identify to place.
Identify to place saves you from working out serial numbers. SiteManager shows an identify message on one display at a time. Select the slot on the layout where you see that message. Skip this display leaves one for later. This runs as a job. It is the only thing the designer writes to a display.
The tabs
- Problems lists what SiteManager found wrong or worth knowing. Each finding is an error (shown as critical) or a warning. An error, such as two displays in one place, blocks generating and applying the files until you fix it. Warnings do not.
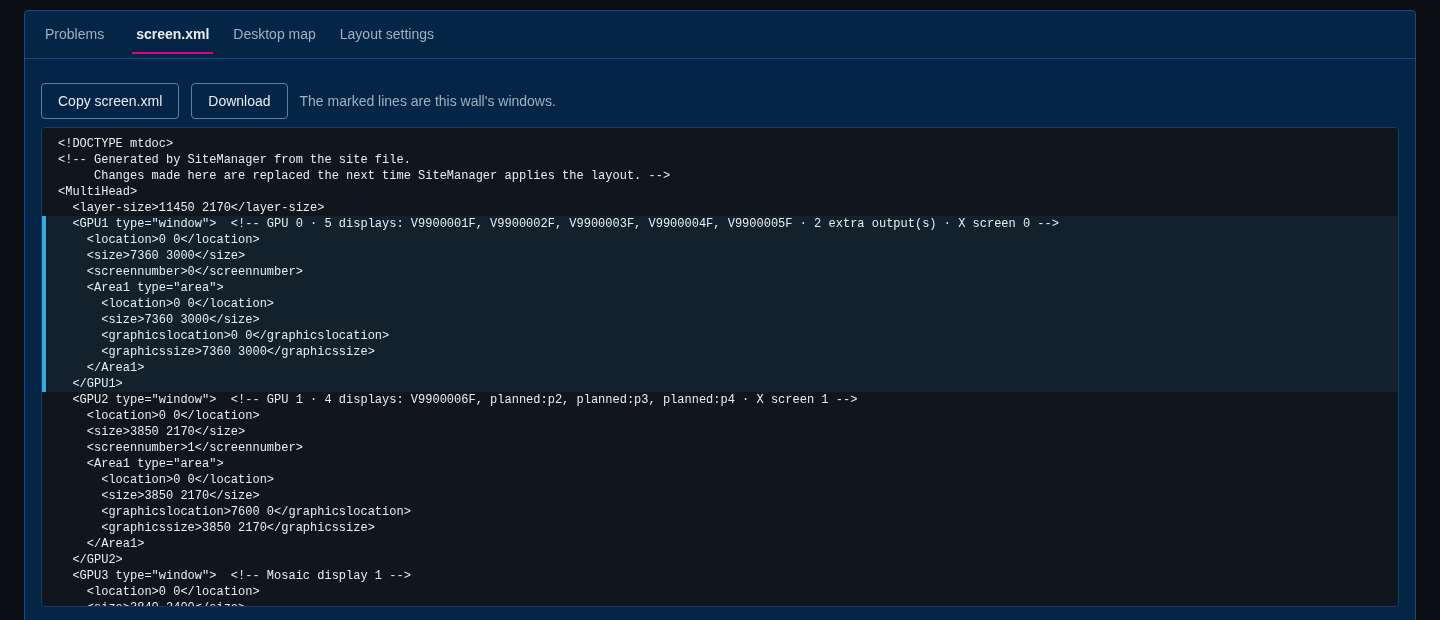
- screen.xml shows the
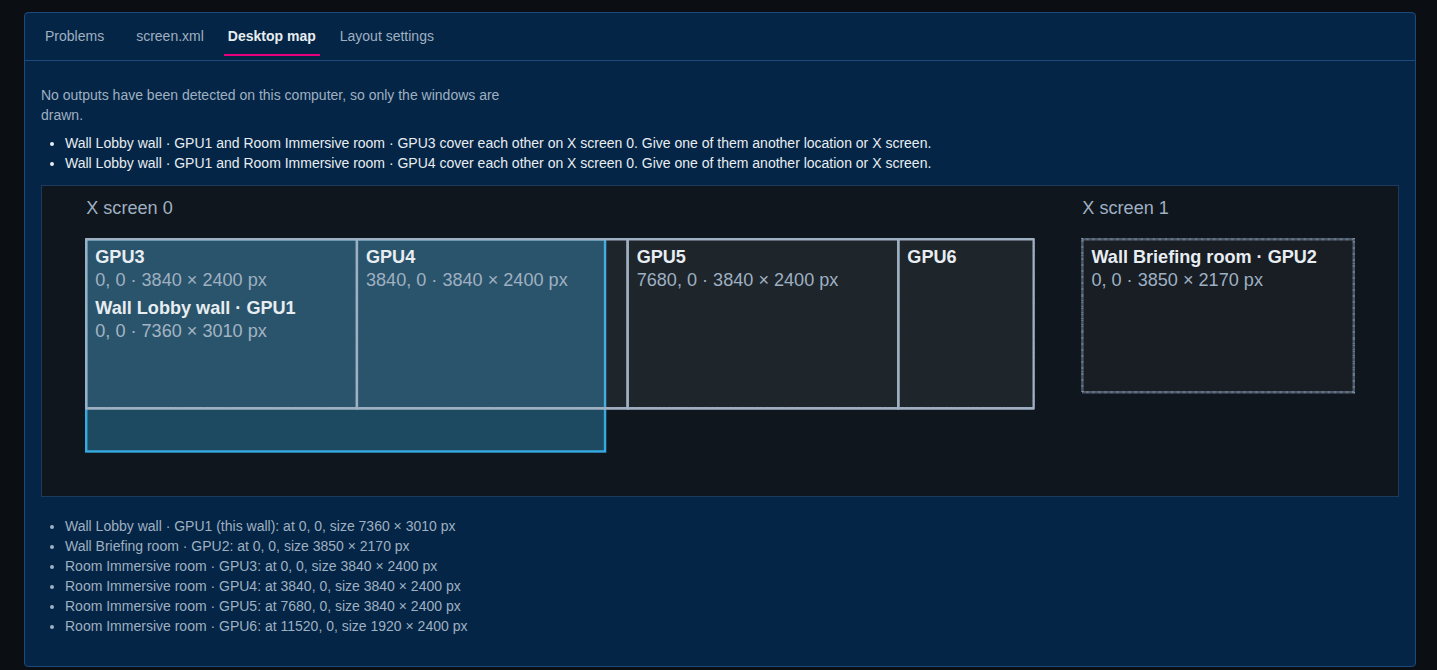
screen.xmlgenerated from the site as it is now, with this wall's windows marked. Copy screen.xml and Download are on the tab. It follows each change without reading the disk. - Desktop map draws the windows on the desktop, by X screen and GPU, with a list of each window's position and size. It shows the windows of the whole site, not only this wall. Each window is named by what it renders, for example Wall Lobby wall · GPU1 or Room Immersive room · GPU3. The windows of this wall are solid and blue. Another wall's windows are dashed. A room's windows are dotted. If two windows cover each other on one X screen, the tab says so in words above the drawing, for example Wall Lobby wall · GPU1 and Room Immersive room · GPU3 cover each other on X screen 0. Give one of them another location or X screen. If the service detected outputs on this computer, they are drawn too.
- Layout settings holds the model, grid and gaps. See Layout settings.
Layout settings
Open the Layout settings tab, change what you need, and select Save layout.
- Display model copies the model's values into the wall. Custom means you type every value.
- Display width and Display height (px, landscape): the size of one display in graphics pixels.
- Pixel pitch (mm per px): the size of one graphics pixel on the display.
- Columns and Rows: the size of the grid, up to 64 each.
0and0means no grid, and displays are placed freely. If you make the grid smaller, displays whose slot no longer exists are taken off the layout. - Wall rotation: the default rotation for displays you place. Tick Turn every display to this rotation too to turn the displays already on the wall. When displays are turned differently from the wall, the page offers to turn them for you, and Undo puts them back.
- Gaps come from: the gap values below, the displays' bezel in millimetres, or none (displays touch).
- Gap between columns and Gap between rows: the fixed gap, in pixels or millimetres. A gap in millimetres is turned into whole pixels at the pixel pitch.
- Panel bezel (mm, landscape panel): the bezel on each side. The inspector can override it for one display.
- Origin X and Origin Y (px): the wall's left and top edge in graphics pixels.
A layout save is refused if someone else changed the layout after you opened it.
Millimetres and pixels
SiteManager stores pixels. The wall's pixel pitch (millimetres per pixel) and its panel bezel are typed in millimetres. The px and mm buttons on the toolbar show positions and sizes in either unit. What you see in the designer and what the files contain are the same numbers.
Export and import
Export downloads the wall's design as a file. Import reads a file onto this wall. It starts as Check only: show what would change, save nothing. Untick it to import for real. To make a new wall from a file, use Import a wall on the Walls page.
A wall imported as new is placed beside the existing walls, on the next free GPU. A serial number the site does not know, or that belongs to another wall, becomes a planned display that expects it.
A window that would span the empty space between two walls on one GPU raises a warning. Give one of the walls another GPU.
From the command line, use sitemanager walls export and sitemanager walls import.
Touch preview
The touch preview checks that touch input is mapped correctly before anyone starts Canvus. Under the designer, choose how long to watch (1, 2, 5 or 10 minutes) and select Preview touch. Touch a display and its tile lights up on the wall page.
The preview only reads. Where Canvus or Showcase is already connected to a display, SiteManager reads the traffic counters of that connection. For a display that no application is connected to, it opens its own read-only connection to the touch port. If this computer cannot read the connection counters at all, for example on macOS, SiteManager would be a second touch client on a live wall. It then does not start until you tick the box that acknowledges it. A preview covers at most 64 placed displays. The Cornerstone files page has the same preview, which watches for 2 minutes by default, and a Stop the touch preview button.
Starting and stopping the preview needs a user who may change the site. Everyone can see a preview that is running.
Next to the preview, a wall can have a Profile for the whole wall. See Profiles and drift.
Extra outputs beside a wall
An extra output is a screen beside the wall's grid that is not one of its grid displays. There are two kinds:
- an enrolled MultiTaction display that is on no wall;
- an output that SiteManager does not manage, such as a Teams screen or a table controller.
The grid stays one model of equal cells. Extra outputs sit outside it, so a five-by-one portrait wall with a landscape screen below it is normal. Mixed orientation is allowed. An extra output never takes a slot in the grid. One wall holds up to 64 of them.
Add an extra output
On the wall page, select Add an extra output. The form opens in the inspector.
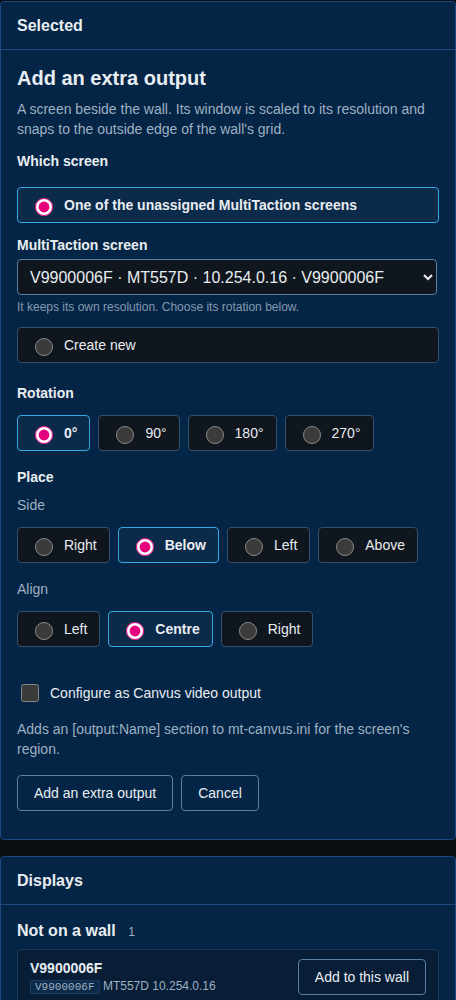
- Under Which screen, choose One of the unassigned MultiTaction screens and pick one, or choose Create new. A MultiTaction screen keeps the resolution of its model, or 1920 × 1080 when its model is unknown. Create new needs a Name and a resolution in pixels.
- Choose a Rotation: 0°, 90°, 180° or 270°.
- Under Place, choose a Side of the grid (Right, Below, Left or Above) and how it lines up under Align. Along a vertical edge the choices are Top, Middle and Bottom. Along a horizontal edge they are Left, Centre and Right. When the wall already has extra outputs, Of lets you choose one of them instead of the wall.
- Tick Configure as Canvus video output if Canvus should stream to this screen.
- Select Add an extra output.
A name is 1 to 64 letters, digits, dots, colons, underscores, hyphens or spaces inside the name. It must not match another output, or a display that streams itself as an output. A resolution is 1 to 16384 pixels each way.
Configure as Canvus video output
With the box ticked, mt-canvus.ini gets an [output:Name] section for the screen's rectangle. With it unticked, the screen is plain: it widens the wall's window and gets no section. You can change the box later in the inspector. A MultiTaction screen with the box ticked is named in the section by its display name, or by its label when it has none.
In the first screenshot, the Teams screen has the box ticked. The screen below the grid is a MultiTaction display that was on no wall, and its box is not ticked. For an output that SiteManager does not manage, choose Create new and give it a name and a resolution, as for Teams.
Snapping and gaps
An extra output snaps to the outside edges of the grid.
- Its facing edge must be within 120 graphics pixels of the edge to snap.
- Along that edge, it lines up with the start, centre or end of the grid when it is within 120 pixels of one of them. Otherwise it keeps the position where you dropped it, as long as it still touches the edge.
- A drop that would land on a display or on another extra output does not snap there.
- An extra output can also snap to the outside edges of another extra output of the same wall.
- With nothing in reach, the position rounds to the 10 pixel step.
The readout says what the extra output hangs on, for example right of the grid, aligned end, gap 10 px, and always shows the gap. Under Snap beside in the inspector you can choose a side and alignment again. Place exactly takes x and y in graphics pixels and does not snap. The arrow keys move an extra output by 10 pixels, or 1 pixel with Shift, without snapping. Two extra outputs that overlap each other or the grid are an error.
A MultiTaction extra output keeps the wall's gap from what it hangs on: the fixed pixels, the gap its bezels make in millimetres mode, or none. For right and left, SiteManager uses the wall's horizontal gap. For above and below, it uses the vertical gap. An output that SiteManager does not manage keeps no gap.
What SiteManager writes
screen.xml: the wall's window widens to cover the extra outputs, on the wall's GPU (the GPU most of its grid displays use). A window that would span a large empty space raises a warning, so snap the screen beside the wall.config.txt: a block only for a MultiTaction display. An output that SiteManager does not manage has no touch block and no touch area.mt-canvus.ini: an[output:Name]section for each extra output with the box ticked. As always, the file must exist already. See Write the Cornerstone files.
What SiteManager does not manage
SiteManager does not set the Windows screen layout, Mosaic, or the operating system's rotation of an output. Set those in Windows or X so that each output sits where the layout draws it. SiteManager warns when an output is not where the layout expects it.
Undo, export and import
Adding, changing and removing an extra output are steps in the wall's undo history. Undo puts the extra output back, and takes a MultiTaction screen off the wall again. A wall export carries the extra outputs, and importing it restores them. An imported output keeps its name unless the site already has an output of that name. Then SiteManager adds -2 (or -3, and so on) and the import report says so. Older builds refuse an export that carries extra outputs.
The site file
Extra outputs need a newer layout of site.json, the file that holds the site: schema 5. SiteManager upgrades an older file when it first loads it, and keeps the original bytes next to it as site.json.v4.bak. It never overwrites that backup.
A SiteManager that is older than schema 5 refuses to load a schema 5 file, because it would drop the new fields. When you run more than one SiteManager on a site, upgrade all of them together.
From the command line
sitemanager walls outputs, sitemanager walls output add, set, move and remove do the same. See Command reference.
This computer
The This computer page describes the computer that runs the service and the Cornerstone settings that belong to it.
- Outputs and render groups lists the video outputs the computer has. Detect the outputs again reads them (with
xrandron Linux) and matches each placed display to the output that contains it. You can edit the render groups by hand: GPU, screen number, location and whether the window is frameless. Platform is the dialect ofscreen.xmlto write:linux,windowsordarwin. - Video outputs are regions of the wall streamed to something that is not part of the wall. Each one gets an
[output:Name]section inmt-canvus.ini. Video outputs that belong to a wall, such as the Teams screen in the example in this page, are listed here too, and you change them on the wall's page. A plain extra output is listed with a note that it has no section. - Touch settings (config.txt) holds the blocks of
config.txtthat are not generated from the layout, such as extra touch sources. TheNetBridgeblock of each display is generated from the layout. Rotation notation chooses whether a rotated display is written with a negative or a positive angle. - Render options (screen.xml) are the vsync, seam-blend and layer-size options written into
screen.xml.
Write the Cornerstone files
Open Cornerstone files in the menu, or select Review and apply files on a wall page. The page shows:
- Windows: the windows
screen.xmlwill define; - Generated files:
screen.xml,config.txtandmt-canvus.iniwith their size, and where each one will be written on this computer; - Preview: for each file, a comparison with the file that is on the computer now, so you see exactly what would change.
Select Apply the ticked files to write them. A file larger than 4 MiB is refused. SiteManager first makes a backup of the files it is about to replace, then writes exactly what the preview showed. If a file changed on disk after you opened the page, or the layout changed, the apply is refused and you preview again. If writing one file fails, the files already written are put back. SiteManager also refuses to apply while the layout has an error, or while a planned display is not bound to a real display.
Note
screen.xml and config.txt belong together: the windows and the touch mapping describe the same layout. Apply both unless you have a reason not to.
SiteManager follows three rules whenever it writes:
- It never creates
mt-canvus.ini. That file holds the system-wide Canvus configuration, and a new file in a user's home could hide it. SiteManager only edits the[output:*]sections of an existing file and leaves everything else as it was. If the file does not exist, those sections are not written and a warning says so. - It never writes through a symbolic link. A target that is a link, or sits behind one in the user's home, is refused.
- It never restarts Canvus or Showcase. After an apply or a restore, the page reminds you: restart the application to load the new files.
Where the files go by default, for the user whose files SiteManager writes:
screen.xmlandconfig.txt:AppData\Roaming\MultiTouchon Windows,.MultiTouchon Linux,Library/MultiTouchon macOS.mt-canvus.ini:AppData\Roaming\MultiTaction\canvuson Windows,MultiTaction/canvuson Linux,Library/MultiTaction/canvuson macOS.
By default these are the files of the user who runs the service, or of the user named with --cornerstone-user. Point the service at other files, even outside the home folder, with the --screen-xml, --config-txt and --canvus-ini options. See sitemanagerd reference.
Blend check
When the service is started with the --scanout-blend option, the Cornerstone files page also has a Blend check for administrators. It runs the mt-scanout-blend program on the generated screen.xml as a job. The check disturbs the wall, so the job asks for your go-ahead when the wall looks in use. See sitemanagerd reference.
Backups and restore
The Backups list at the bottom of the page shows the backups, each with who made it and when. SiteManager keeps the 50 newest. When it makes a new one, the oldest beyond 50 are deleted. To go back, tick Replace the current files with this backup and select Restore. SiteManager backs up the current files first.
A restore puts back the files that were in the backup. It does not delete a file that did not exist then. If you restore a backup made before the first-ever apply, the files that apply created stay, and you delete them yourself if you want them gone.
Import existing files
To adopt a wall that is already set up, use Import files from a wall computer, which the Cornerstone files and This computer pages link to. Choose the screen.xml, config.txt and mt-canvus.ini of the wall, or tick Read the configured files on this computer instead. Each file can be up to 1 MiB.
The page shows a preview and saves nothing until you select Apply this import. SiteManager looks up each display named in config.txt to learn its serial number. It keeps what it cannot model exactly as the file had it, such as other config.txt blocks and custom windows or elements in screen.xml. Comments in the files are not kept, and the report says so.
Hidden values
Touch settings can hold secrets, for example a key. Values whose name contains pass, secret, token, key, credential, pwd, psk or auth (or pin as a separate word, or at the end of a camel-case name) are shown in full to an administrator and as <hidden> to a viewer.
From the command line
sitemanager config generates, previews, applies, imports and restores. See Command reference.
Projector rooms
Projector installations use rooms instead of walls. A room has its own designer, and its screen.xml is written from the Cornerstone files page like any other layout.