Bring in an existing wall
You do not have to draw a wall again if it already exists. SiteManager can read what you have:
- a SiteManager 2.x project file (
.mtspf), which knows your displays, their addresses and where they sit on a canvas; - the
screen.xml,config.txtandmt-canvus.iniof a wall computer, which know the window layout and the touch mapping.
Use the project file when you are moving from the SiteManager 2.x desktop app and want your displays on a wall. Use the Cornerstone files when the wall is running and you want SiteManager to take over its layout. You can use both: the project file first for the displays, then the files for the layout.
Both imports start with a preview and save nothing until you select Apply this import. Neither import changes a display, and neither writes a Cornerstone file. They only fill in SiteManager's own record of the site. The files on the wall computer change when you apply them later, in the same way as in Set up a wall.
For the command line and the comparison with 2.x, see Moving from SiteManager 2.x. For the Cornerstone files import in the reference, see Import existing files.
Import a SiteManager 2.x project file
Before you start
- Find the
.mtspffile on the computer that had SiteManager 2.x. A file can be up to 1 MiB. - You need to be an administrator. In local mode you are one. In network mode, sign in as an administrator, because a viewer cannot import.
- The displays should be on the network if the file has no serial numbers (see below).
Steps
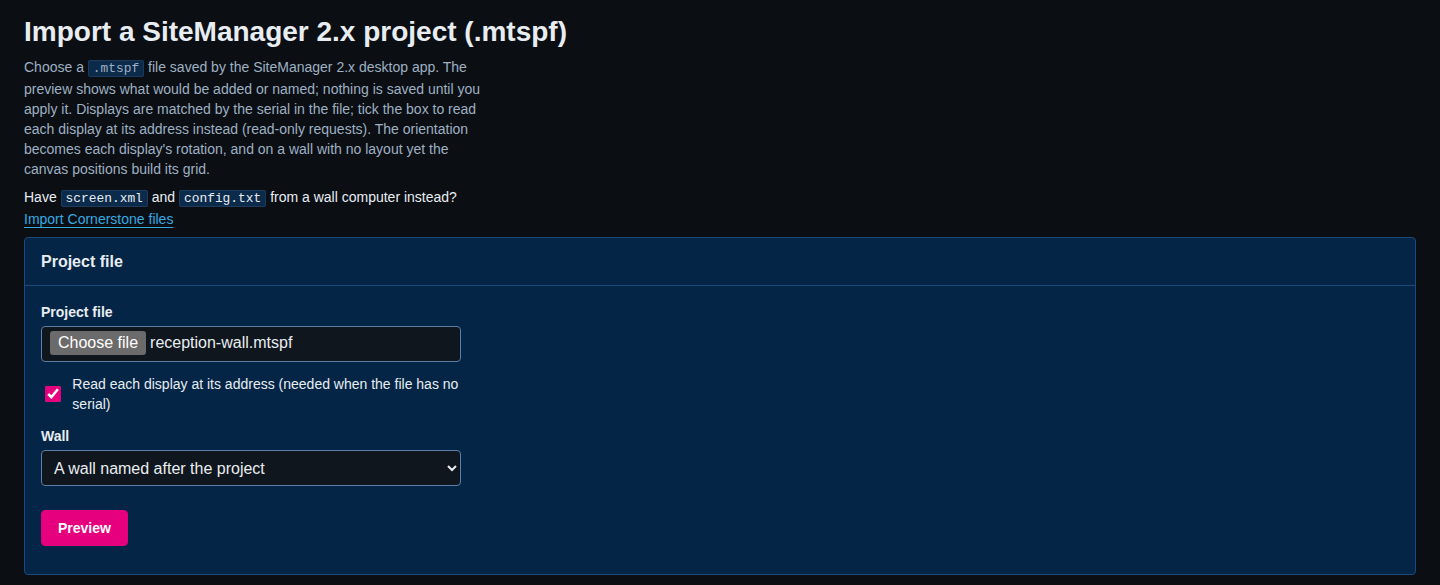
- Open Import in the menu (under Commission). The page is titled Import a SiteManager 2.x project (.mtspf).
- Under Project file, choose the file.
- Tick Read each display at its address (needed when the file has no serial) if some displays in the file have no serial number. SiteManager then asks each display for its serial. This only reads. Tick it when in doubt: it also checks the serials that are in the file.
- Under Wall, leave A wall named after the project to make a new wall, or choose a wall that exists.
- Select Preview.
The preview says Preview: nothing has been saved. Under it:
- a count line: how many displays would be added, updated or left unchanged, how many have no serial number and how many could not be reached;
- which wall the displays go on, for example New wall Reception wall for displays that have no wall yet.;
- the site name, when SiteManager takes it from the project;
- a line for each display: Name, Address, Serial, Result, Note, Placed, Orientation and Canvas position.
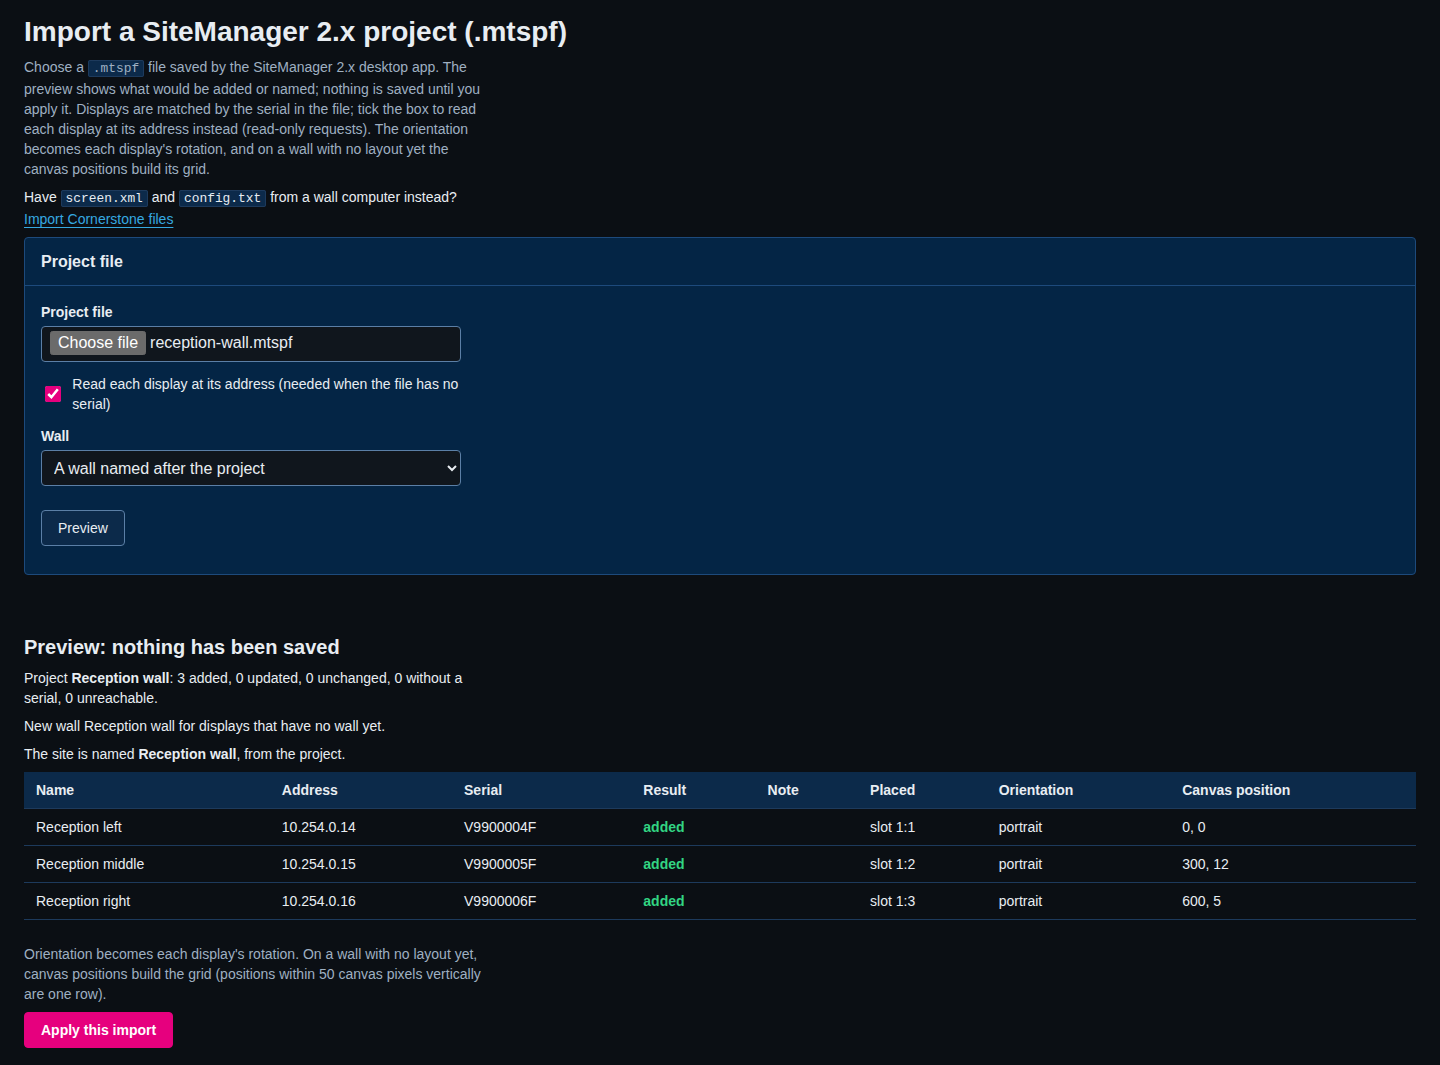
Read the Result column:
- added: a new display in the site.
- updated: the display was in the site already. SiteManager filled in what was missing (its name, its address, its wall).
- unchanged: nothing to do. This also appears when a serial is listed twice in the file. The first one is used.
- unidentified (orange): no serial number for the display. The Note says what to do.
- unreachable (red): you ticked the box to read the displays, and this address did not answer.
When the preview is right, select Apply this import. The page then says Imported.
What comes over
- Names. A name in the file is used when the site has no name for that display. A display that already has a name keeps it, and the Note says so. A name longer than the limit is cut, and the note says so.
- Addresses. An address (or a host name that resolves) becomes the display's address. SiteManager identifies displays by serial number, so it follows a display that gets a new address later.
- Serial numbers. From the file, or read from the display when you ticked the box. If both exist and differ, the display's own serial wins and the note says
file says X, display at this address reports Y. - The wall. A wall named after the project is created. On a wall with no layout yet, the Orientation becomes each display's rotation, and the Canvas position orders the displays into a grid: positions within 50 canvas pixels vertically count as one row. The canvas position is in 2.x pixels. It only decides the order, never the size or the gaps.
- The site name. When the site still has the default name, it takes the project's name.
What does not come over
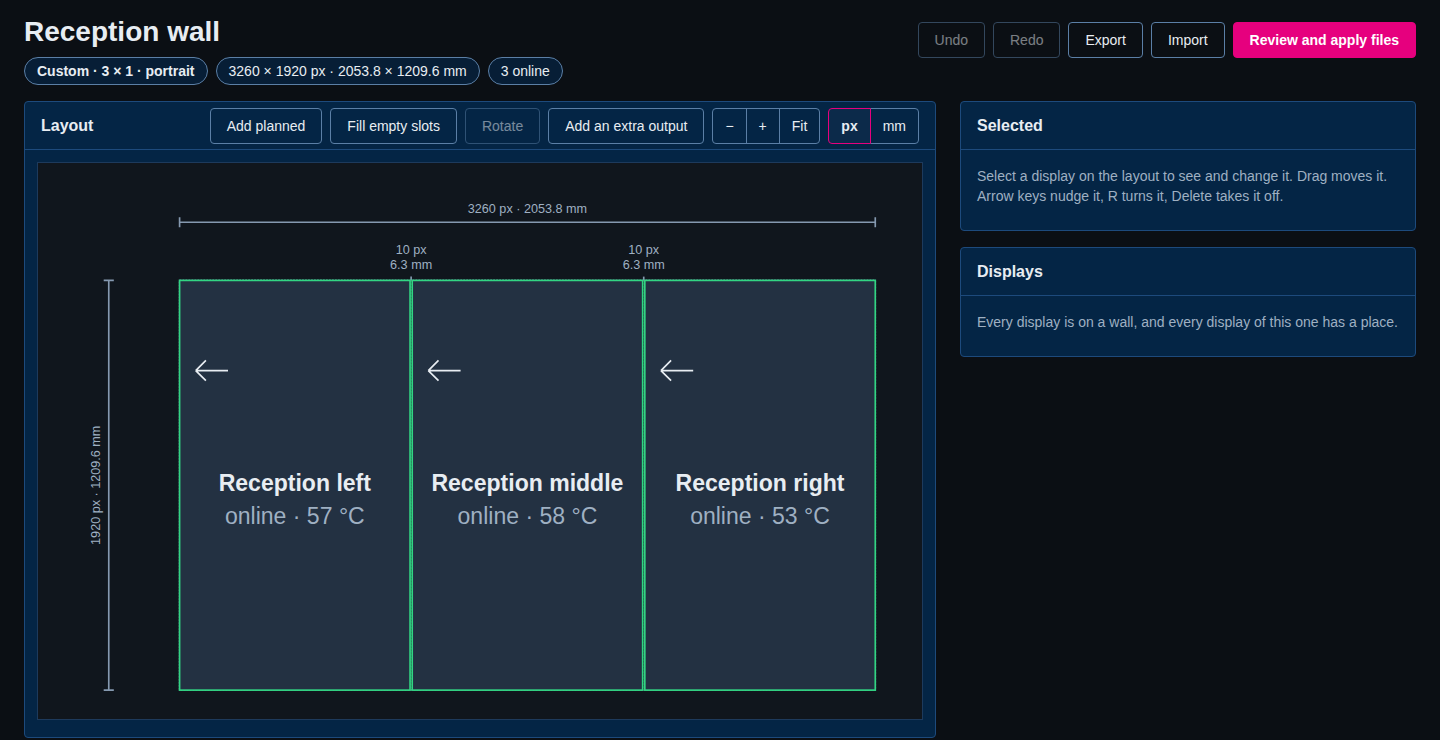
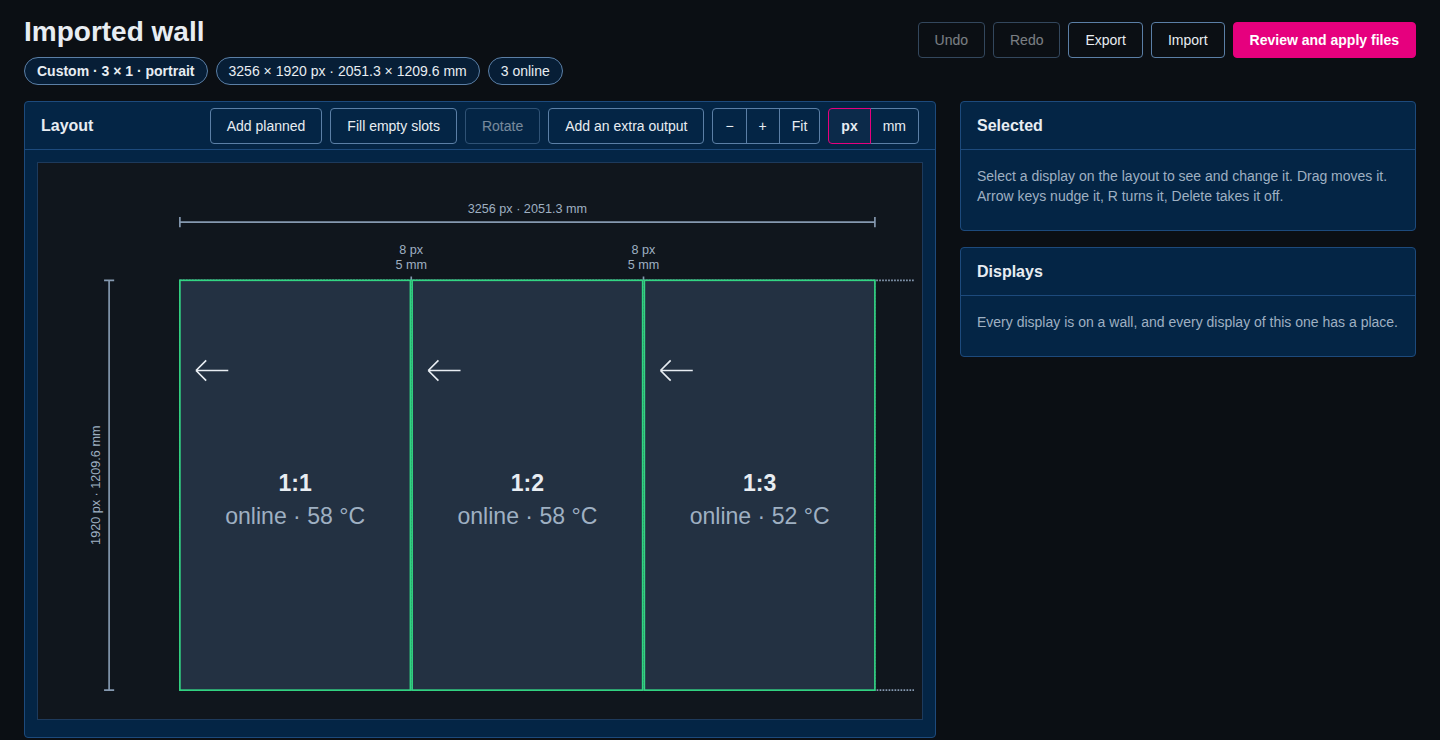
- The display model. The wall is made with the model Custom. In the screenshot the title chip reads Custom · 3 × 1 · portrait.
- Gaps and bezels. SiteManager uses its default gap (10 pixels). Measure your wall and set the real gaps.
- The GPU. Every display is on GPU 0.
- Settings, profiles and firmware. The project file holds none of them. SiteManager reads the display's model and firmware from the display itself when it can.
- Anything about the 2.x canvas beyond order and orientation.
What to check afterwards
- Open the wall (Walls, then Open wall). Compare the layout with the real wall: every display in the right place, turned the right way, and online.
- Open Layout settings and choose the Display model, the real gaps (Gaps come from), and the Panel bezel (mm, landscape panel) if you use millimetres. See Layout settings.
- Set the GPU of each display if the wall is driven by more than one graphics card.
- Add the extra outputs the wall has (a Teams screen, a table controller). See Step 6 of Set up a wall.
- Preview and apply the Cornerstone files (steps 8 to 11 of Set up a wall), then test touch.
If it goes wrong
Message: unsupported .mtspf version: file version 1952999795, this reader knows version 1.
It appears when the chosen file is not a project file. The number is the first four bytes of the file read as a version. What to do: choose the .mtspf file itself. SiteManager reads only the format that 2.x wrote. A damaged file is refused with a message that says it is corrupt.
The row unidentified looks like this, when the file has no serial for a display and you did not tick the box:
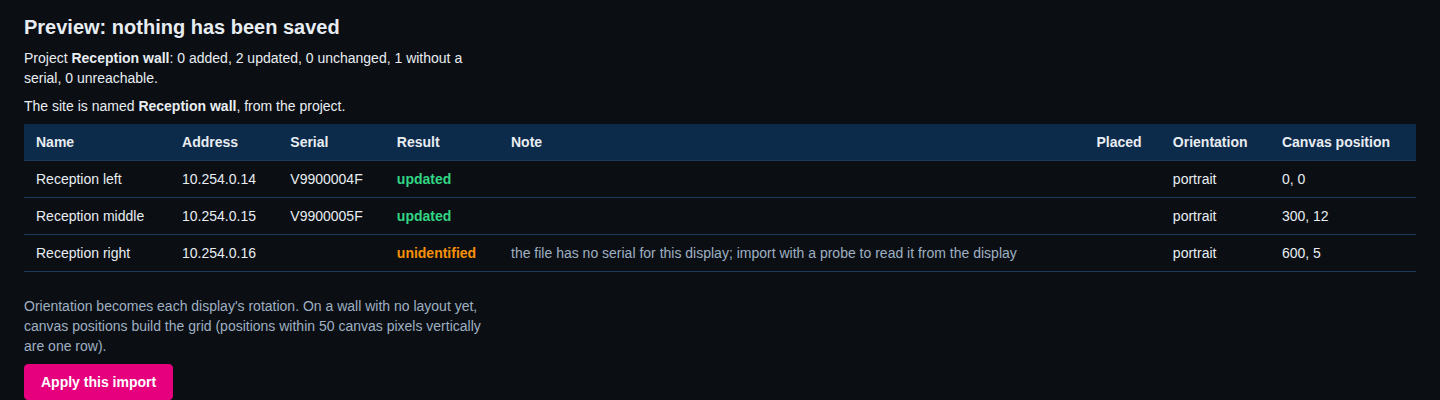
Note: the file has no serial for this display; import with a probe to read it from the display. What to do: tick Read each display at its address and preview again. The display must be on the network. If the display has no SiteManager interface, the note says the host has no SiteManager API (only NetBridge answers), so it has no serial to key it by, and it cannot be imported. Check that the display's address in the file is still right.
Other notes you may see in the Note column: serial in the file is not usable: 1 to 64 letters, digits, dots, underscores or hyphens, the name in the file has control characters and was not applied, and it stays on its wall <wall> when the display is already on another wall.
Import the files of a wall computer
Before you start
You need the three files from the wall computer: screen.xml, config.txt and mt-canvus.ini. Each can be up to 1 MiB. Where they live:
screen.xmlandconfig.txt:AppData\Roaming\MultiTouchon Windows,.MultiTouchin the user's home folder on Linux,Library/MultiTouchon macOS.mt-canvus.ini:AppData\Roaming\MultiTaction\canvuson Windows,MultiTaction/canvuson Linux,Library/MultiTaction/canvuson macOS.
You can import one, two or all three. If SiteManager runs on the wall computer itself, you do not need to copy anything: it can read the configured files.
The displays named in config.txt should be on and reachable from SiteManager, because it asks each one for its serial number with a read-only request. Without the serial it cannot tell which display is which.
Comments
config.txt accepts // and /* ... */ comments. A line that starts with # is not a comment in Cornerstone, and SiteManager refuses the file.
Steps
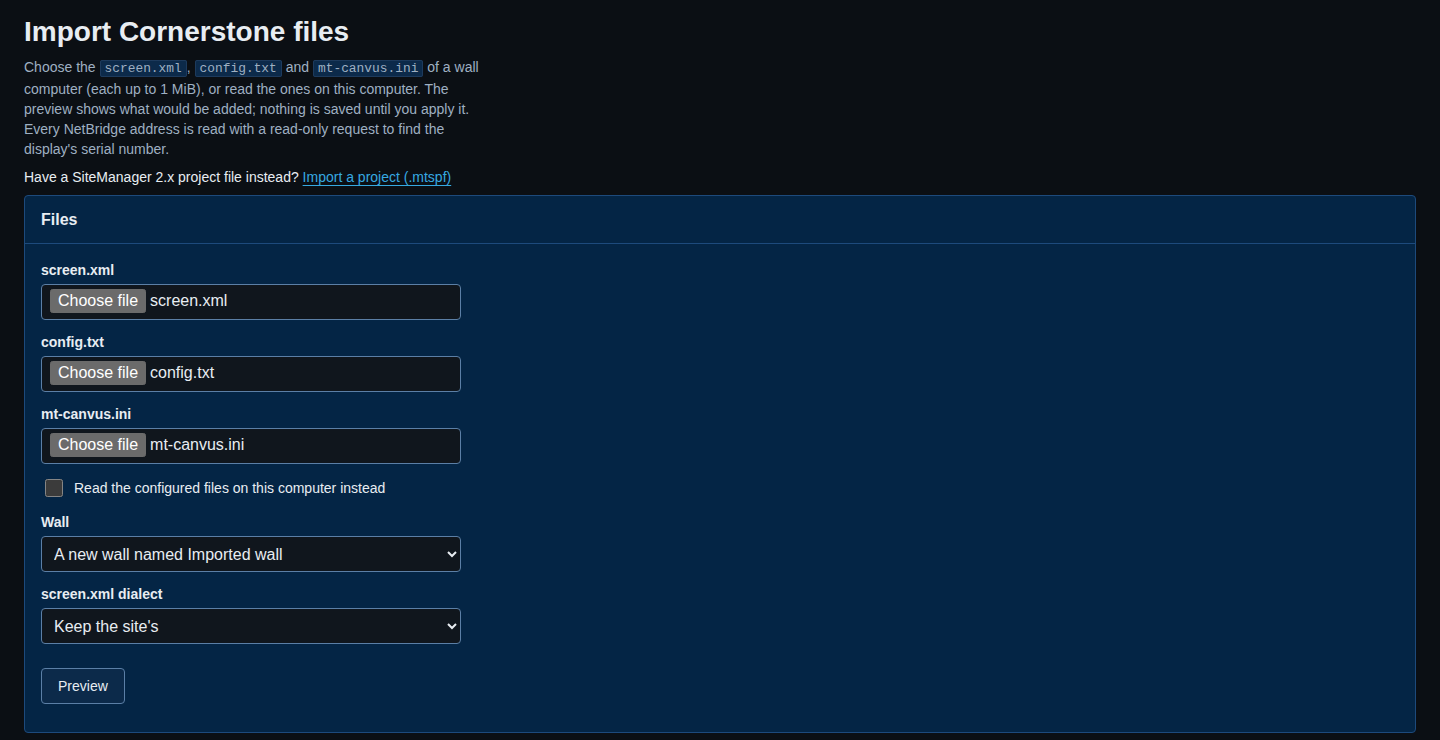
- Open Cornerstone files in the menu and select Import files from a wall computer. (This computer has the same link, called Import files, and the Import page links to it as Import Cornerstone files.) The page is titled Import Cornerstone files.
- Under Files, choose screen.xml, config.txt and mt-canvus.ini. Or tick Read the configured files on this computer instead.
- Under Wall, leave A new wall named Imported wall, or choose a wall to put the displays on.
- Under screen.xml dialect, leave Keep the site's, or choose linux, windows or darwin if the files come from another kind of computer than the one SiteManager runs on. This is the form of
screen.xmlthat SiteManager writes later. - Select Preview.
The preview shows:
- Displays: a card for each display found in
config.txt, with its address, the word added or updated, its GPU and rotation, its serial number and the slot it would take (Placed at col 0, row 0); - Kept as the file had it: what SiteManager cannot model and so keeps exactly as it was;
- Notes: what it changed or noticed.
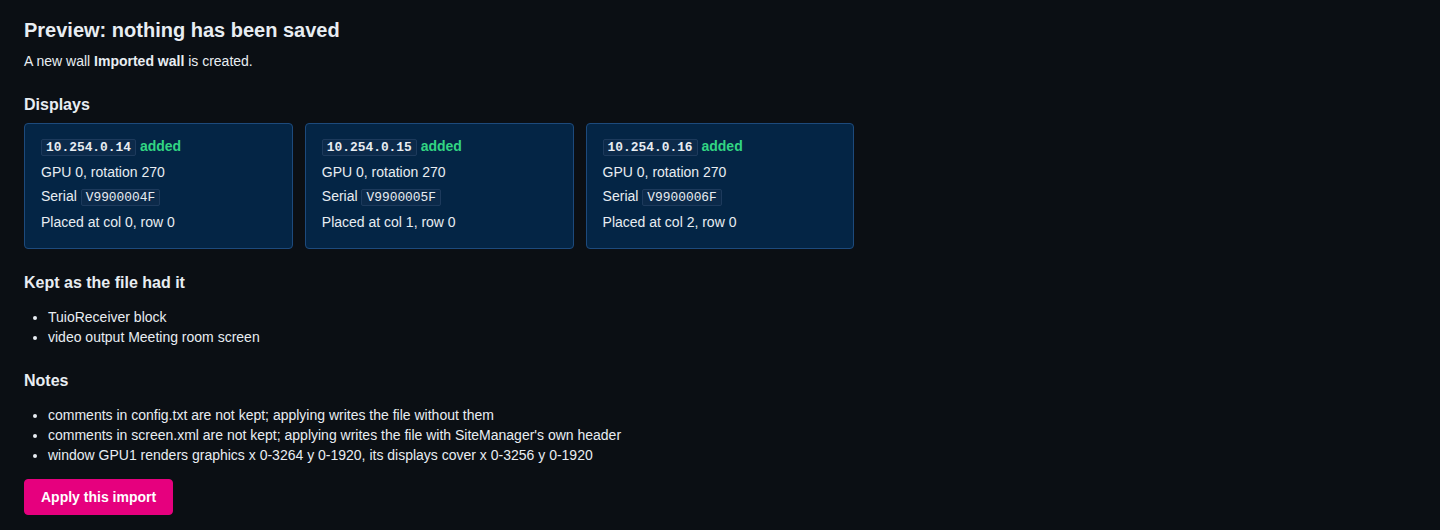
When it looks right, select Apply this import. The page then says Imported and offers See the files this would generate.
What comes over
- The displays, one for each
NetBridgeblock whose address answered, with the serial number the display reported. - Their rotation and place. The
input-rotateandinput-translateof each block, and the window layout, give each display its rotation, GPU and slot in a new grid. When the displays do not make a regular grid, SiteManager places them freely and a note says why. - The windows of
screen.xml: for each GPU, its size, location and X screen. - Video outputs. Each
[output:Name]section ofmt-canvus.inibecomes a video output, which you see on This computer under Video outputs.
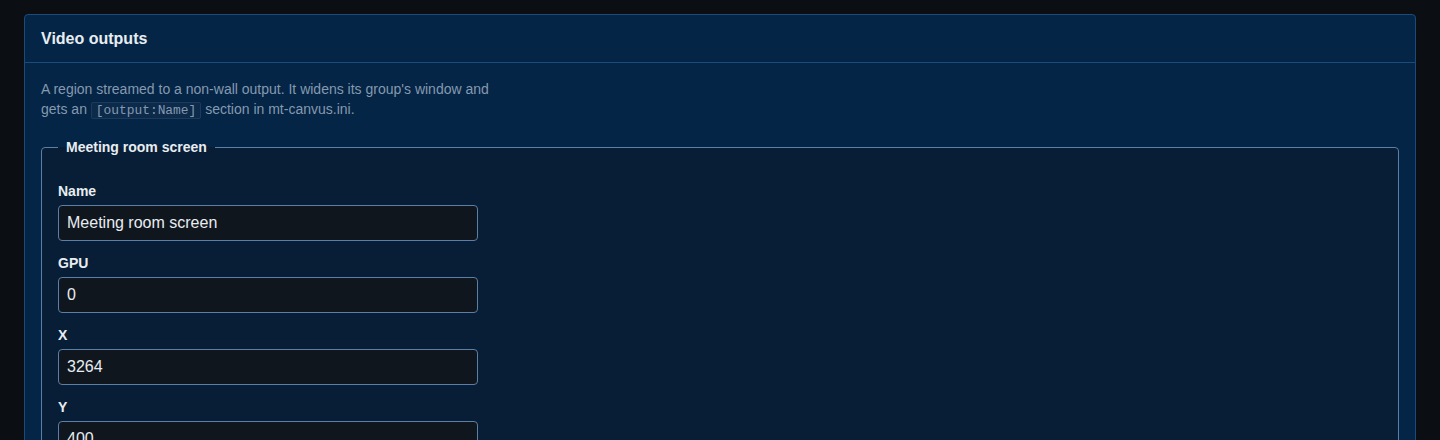
What is kept as it was
Anything SiteManager cannot model exactly is kept and written back unchanged. In the example:
- a
TuioReceiverblock ofconfig.txtshows under Kept as the file had it. It is also listed in Touch settings (config.txt) on This computer, and an apply writes it after the generated blocks.
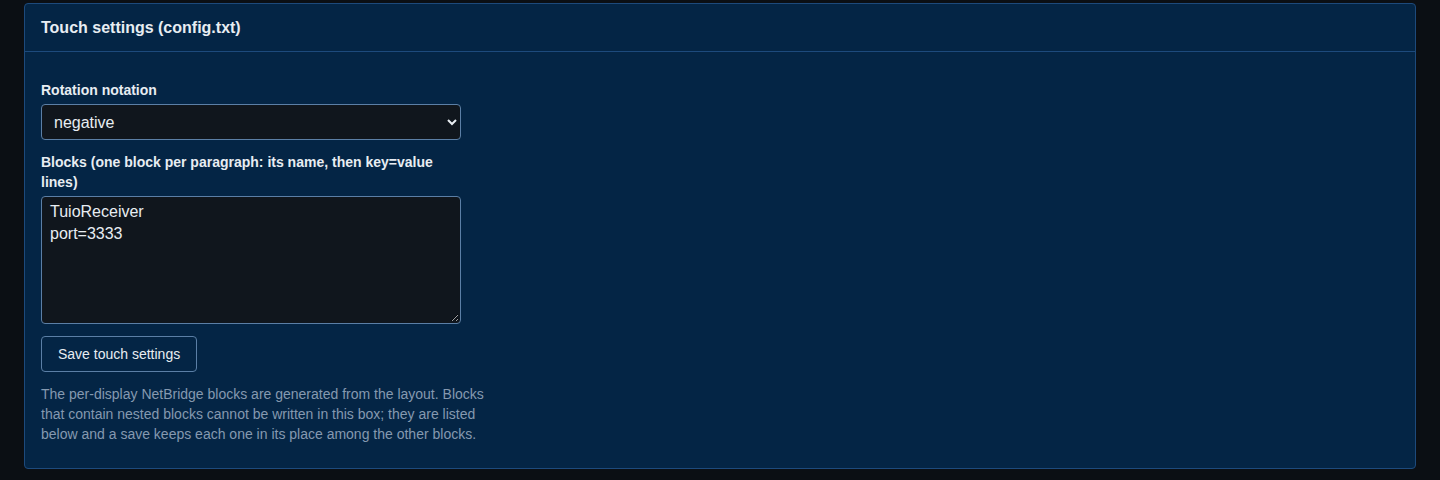
screen.xmlelements it does not know (custom windows and elements) are kept;- a
NetBridgeblock for a display that did not answer, or that cannot be placed, is kept as it is, with a line such asno display answered at <address>; its block is kept as it is; - a section of
mt-canvus.inithat is not an[output:...]section is not touched.
What does not come over
- Comments in
screen.xmlandconfig.txt. The notes say so. An apply writesscreen.xmlwith SiteManager's own header. - The order of the
config.txtblocks. Blocks that are kept as they are move after the generated ones, and a note says so. - Display settings. The files hold none. Names are not in the files either, so imported displays are labelled by their slot (
1:1) until you name them. - Display models. The wall takes the model Custom, so choose the real Display model in Layout settings. See the screenshot below.
What to check afterwards
- Open the wall and compare with the real one, as for a project file. Put the real Display model in Layout settings.
- Open Cornerstone files. The Preview compares what SiteManager would write with the files on disk. Read it as a review of the import. The generated
screen.xmlis not byte for byte the old one: SiteManager adds its header and a comment per window, uses its own order, and may write<screennumber>. Check that the sizes, locations and touch lines are the same. - Look at the Notes you saw in the preview. A note such as
window GPU1 renders graphics x 0-3264 y 0-1920, its displays cover x 0-3256 y 0-1920says how the windows and displays line up. Read it as a check: the window should cover the displays. - Do not apply the files yet if the differences are not what you expect. The import changed only SiteManager's record, not the wall computer. Apply when you are happy, as in Set up a wall. The backup made by an apply lets you go back.
- Name the displays (see Step 2 of Set up a wall).
A video output widens the window
In the example, the imported mt-canvus.ini has a video output at the right of the wall. The generated window is then wider than the wall (5184 pixels, not 3264) because the window covers the video output as well. The wall page's size chip shows only the grid (3256 × 1920). A video output you import is listed on This computer, not on the wall page, so you will not see it drawn on the wall. Check that its place and size are right.
If it goes wrong
Message: config.txt refused: line 19: unexpected character '#'.
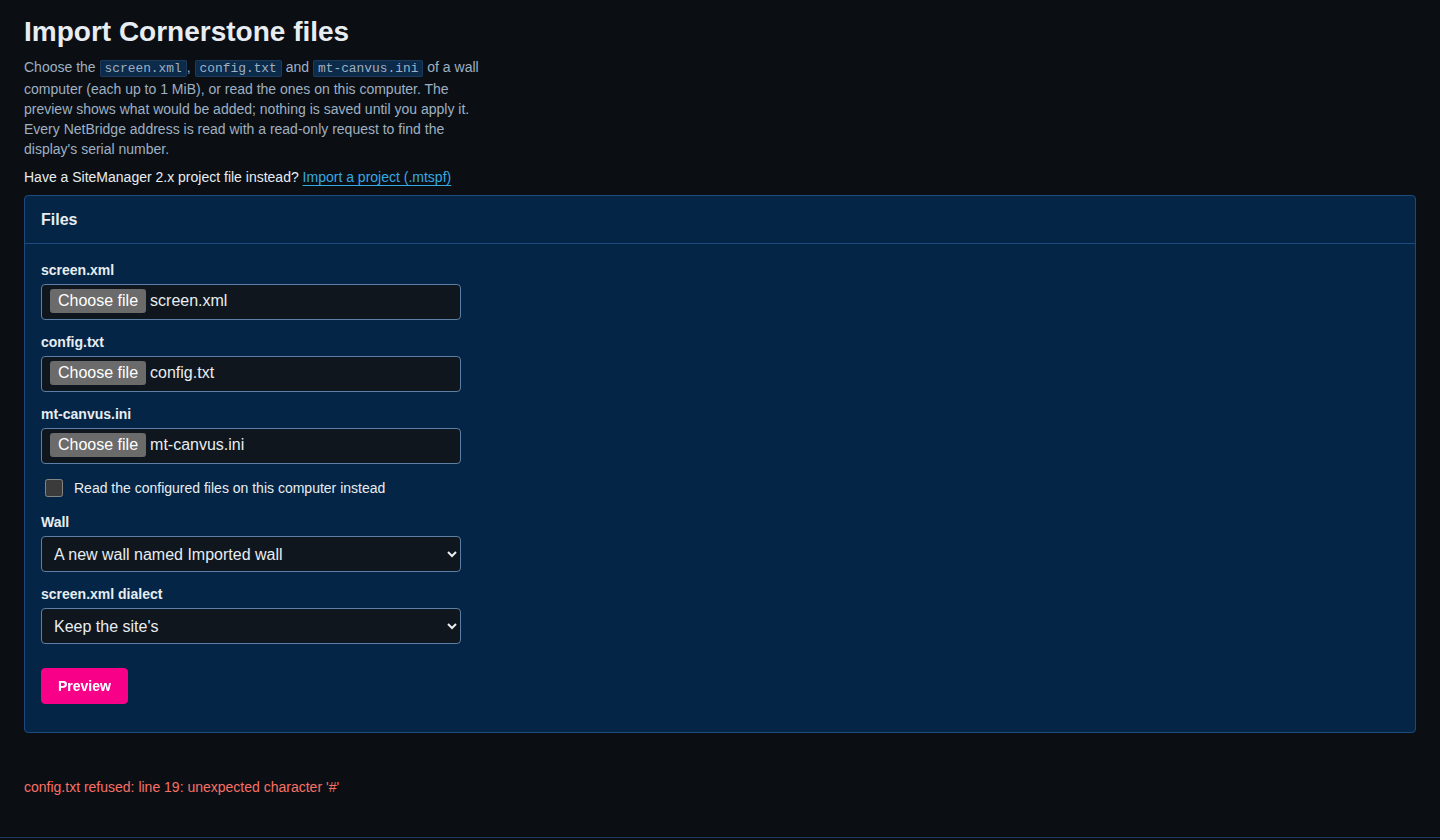
It appears when config.txt has a line that starts with #. What to do: change the comment to start with //, or delete it, and choose the file again. Nothing was saved. The same style of message names the file (screen.xml refused: ..., config.txt refused: ...) and the line.
Other things you may meet:
screen.xml is larger than ... bytes, and the same for the other two files. The limit is 1 MiB each.window GPU1: <screennumber> is not written for windows; applying removes itandwindow <name> has no <screennumber>; applying writes <screennumber>N</screennumber>: not errors. They tell you what an apply will change inscreen.xml.<serial> is not in config.txt and was taken off the layout: you imported into an existing wall, and a display of that wall that had a place is not in the files. It stays on the wall without a place.<address>: <reason>; its NetBridge block is kept as it is: SiteManager could not use that block, usually because the display did not answer. Check the address and the network, then import again, or leave the block as it is.
From the command line
The same imports are available without a browser:
sitemanager site import-mtspf reception-wall.mtspf
sitemanager site import-mtspf reception-wall.mtspf --apply
sitemanager config import --screen-xml screen.xml --config-txt config.txt --canvus-ini mt-canvus.ini
sitemanager config import --screen-xml screen.xml --config-txt config.txt --canvus-ini mt-canvus.ini --apply
Without --apply, only a preview is shown. See Command reference for the other options (--wall, --platform, --probe, --from-disk).
Where next
- Set up a wall: finish the layout, then apply and test.
- Walls, rooms and the Cornerstone files: what each of the three files does.
- Day to day: once the wall is in, put it under watch.