Set up a projector room
This page takes you from nothing to a projector room that SiteManager has written the Cornerstone files for. It follows one small room, step by step, and then shows a larger finished room so you can see what a real installation looks like.
Use a room when projectors, not display walls, make the picture: several projectors overlap on one or more surfaces, and the overlap is blended. If you have a grid of identical MultiTaction displays, set up a wall instead. See Walls and rooms for the difference and Set up a wall for the wall steps.
This page shows how to do the work. The reference page, Projector rooms, lists every control and field. Open it when you want the full detail of one thing.
Before you start
- SiteManager is running and you can open it in a browser. See First start.
- You know your projectors. You need how many there are on each surface, the pixel size each one renders, and how much neighbouring projectors overlap.
- You know which output windows (Mosaic windows) feed the projectors. In a big room, one Mosaic window usually holds four projectors in its four corners.
A room does not need any display from the Discover page. Projectors are described in pixels, not found on the network.
A finished room
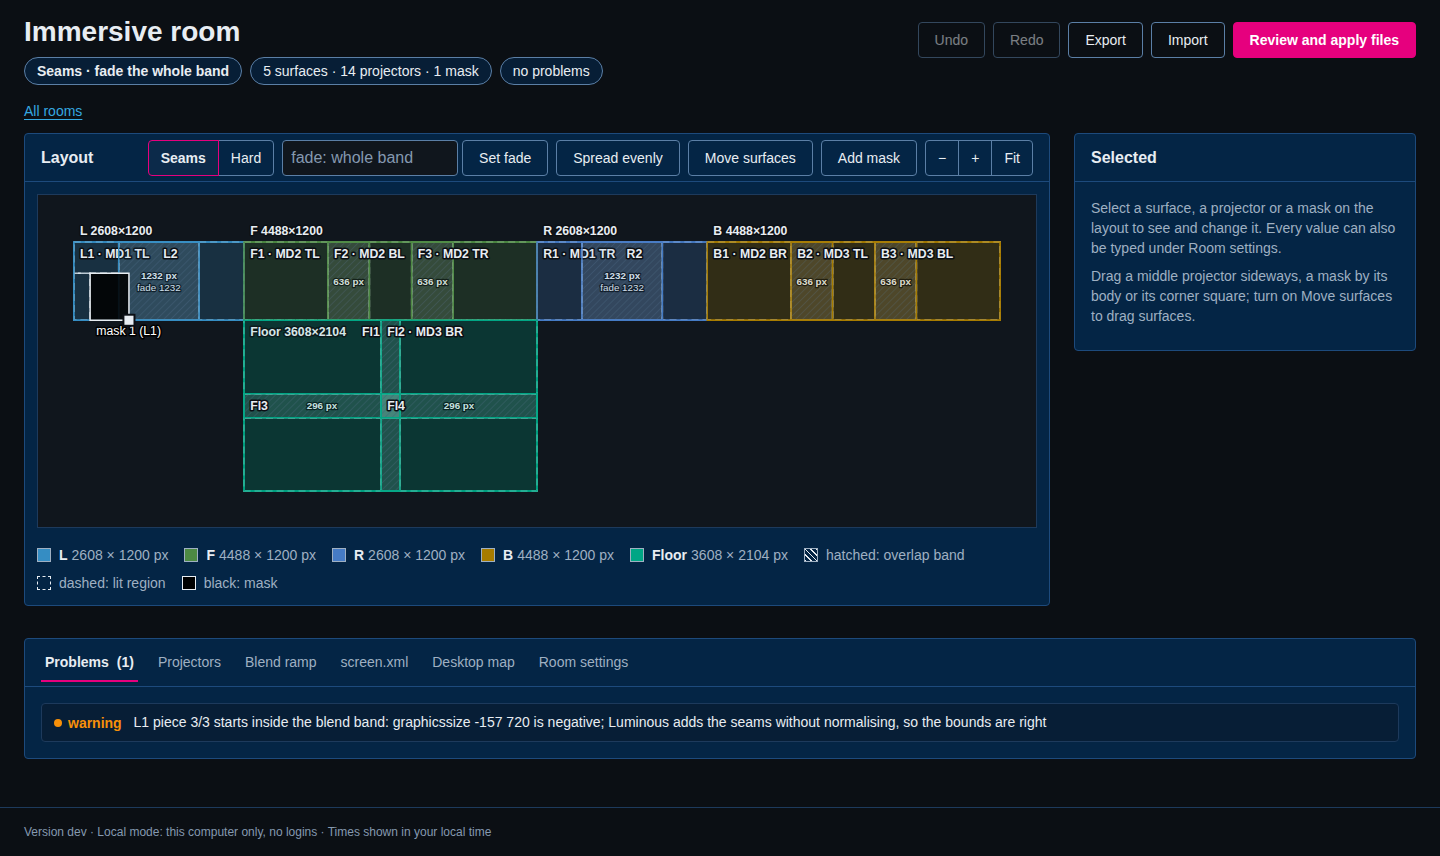
This is what a finished room looks like. It has five surfaces (a left wall, a front wall, a right wall, a back wall and a floor), fourteen projectors and one mask. Each projector sits in a coloured frame, and the hatched bands are the overlaps. The text on a band gives its numbers.
The small room in the steps below has one surface and two projectors. It works the same way.
Step 1: Create the room
- Open Rooms in the menu. The list shows the rooms you have, with the number of projectors and surfaces.
- Under New room, fill in the form:
- Id: a short name for the file system and the command line, such as
meeting-room. Use letters, digits, dots, underscores or hyphens, up to 64 characters. - Name: the name people see, such as
Meeting room. - Projector columns and Projector rows: how many projectors across and down, 1 to 8 each.
- Raster width (px) and Raster height (px): the pixel size one projector renders.
- Overlap across (px) and Overlap down (px): how far neighbouring projectors overlap.
- Id: a short name for the file system and the command line, such as
- Select Create room.
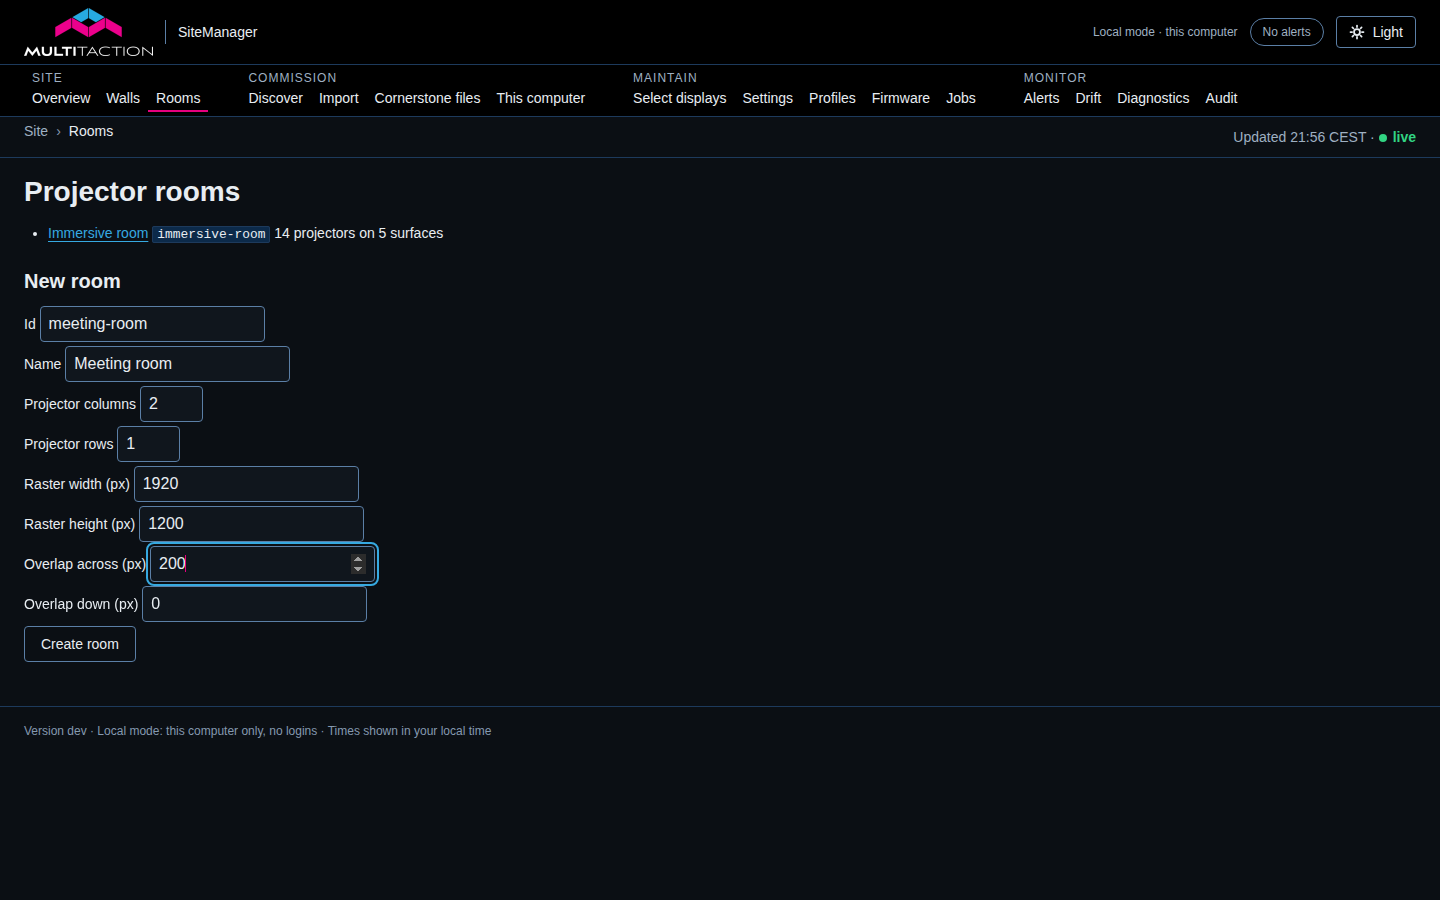
SiteManager makes one surface that exactly fits the projectors and the overlap, and gives each projector its own output window. You adjust everything afterwards.
Give the room an id you can type
The id is fixed after you create the room. The name can change at any time.
Step 2: Read the designer
SiteManager opens the room designer.
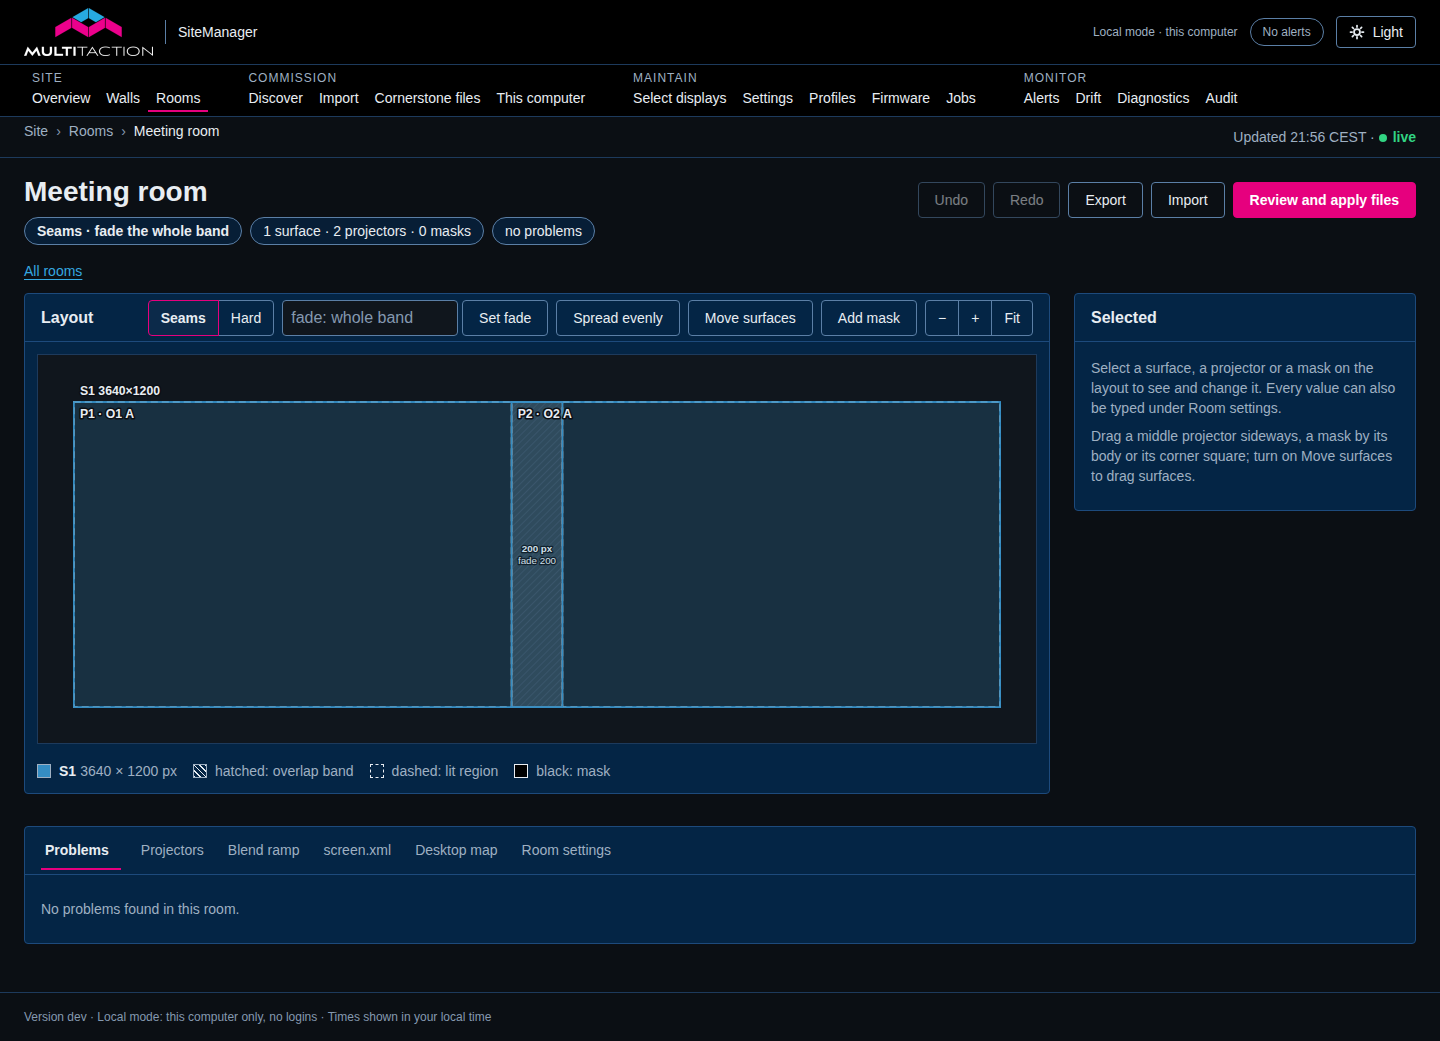
- At the top are the room name and three chips: the blend mode (Seams · fade the whole band), the counts (1 surface · 2 projectors · 0 masks) and the state (no problems).
- Undo, Redo, Export, Import and Review and apply files are at the top right.
- The Layout panel is the canvas. Its toolbar holds Seams and Hard, the fade box with Set fade, Spread evenly, Move surfaces, Add mask and the zoom buttons.
- The Selected panel on the right shows whatever you pick on the canvas.
- The tabs under the canvas are Problems, Projectors, Blend ramp, screen.xml, Desktop map and Room settings.
Each projector is drawn as a frame labelled with its id, the output window and the slot, for example P1 · O1 A. A dashed line marks the part of the raster that is lit. The legend under the canvas explains the hatching, the dashed line and the black mask colour.
Dragging works with a mouse on a wide screen. On a phone or a touch screen the canvas pans and zooms, and you type values instead. You can also reach every item with the keyboard: press Tab to move between surfaces, projectors and masks, and Enter to open the item in the Selected panel.
Step 3: Check the surface
Select a surface to see and change it. Its label on the canvas shows its name and size, for example S1 3640×1200.
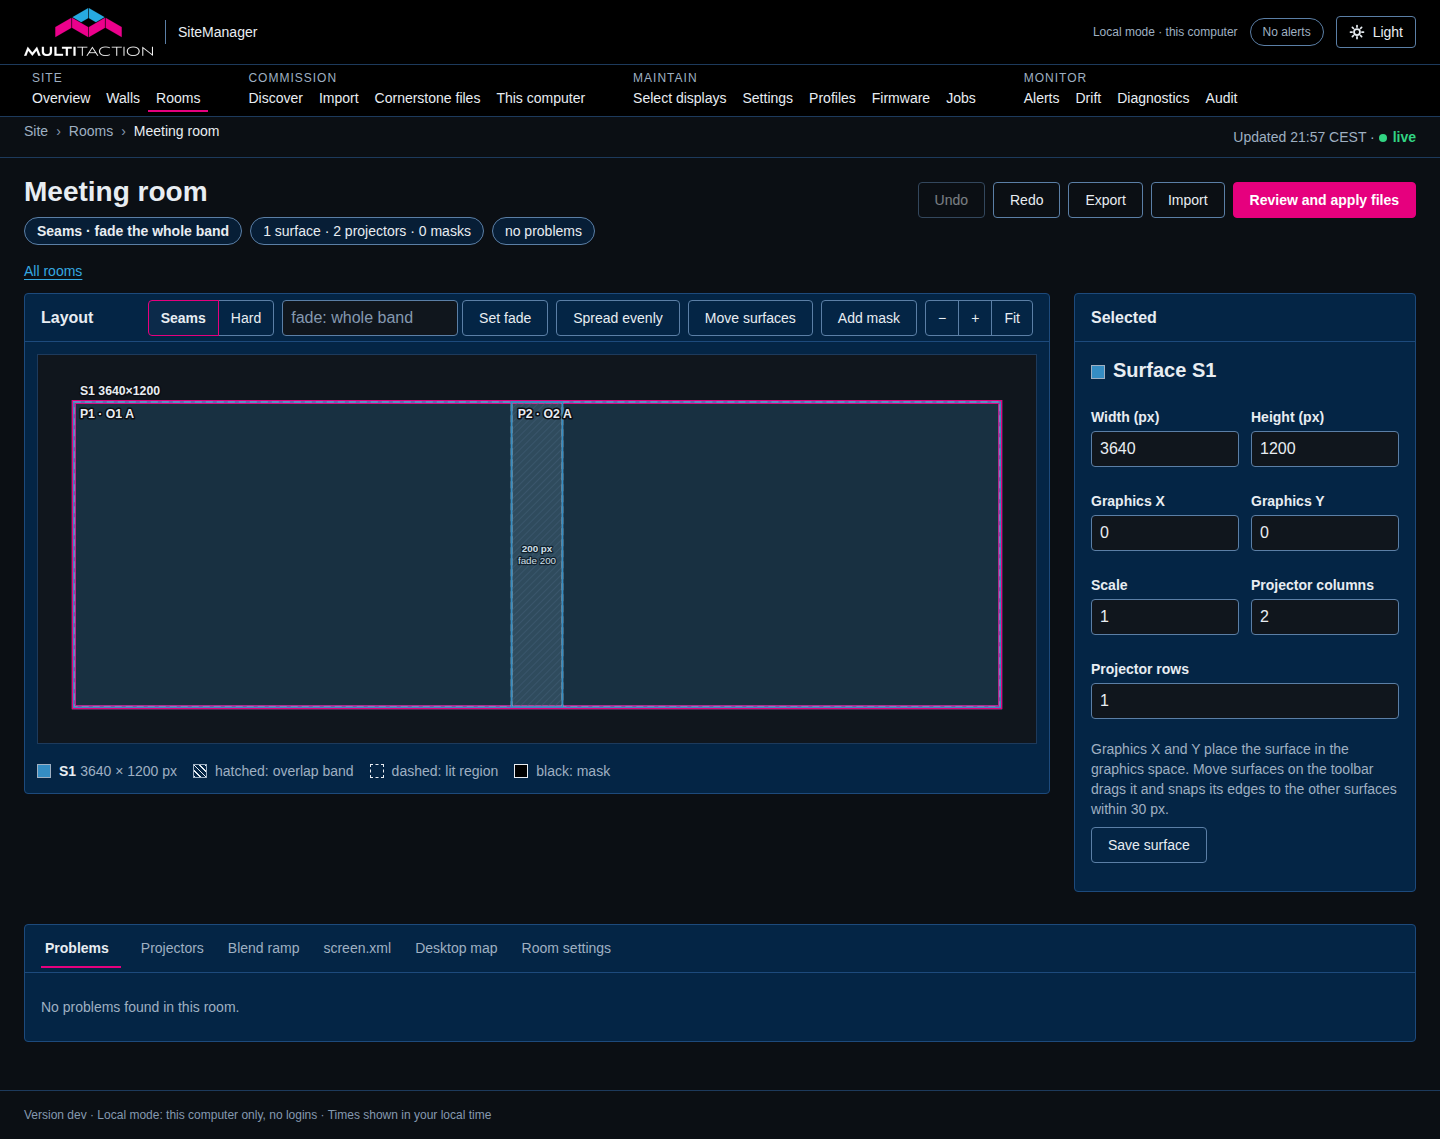
The panel has these fields:
- Width (px) and Height (px): the size of the surface in its own pixels.
- Graphics X and Graphics Y: where the surface sits in the graphics space that Canvus or Showcase draws into. When a room has several surfaces, each has its own place, and they can touch or leave gaps.
- Scale: how many graphics pixels one surface pixel covers. Leave it at 1 unless a surface is stretched.
- Projector columns and Projector rows: the grid of projectors on this surface.
Change a value and select Save surface. With Move surfaces on the toolbar you can also drag a surface. Its edges snap to the edges of the other surfaces when they are within 30 pixels.
Step 4: Place the projectors
Select a projector. The Selected panel shows where it sits.
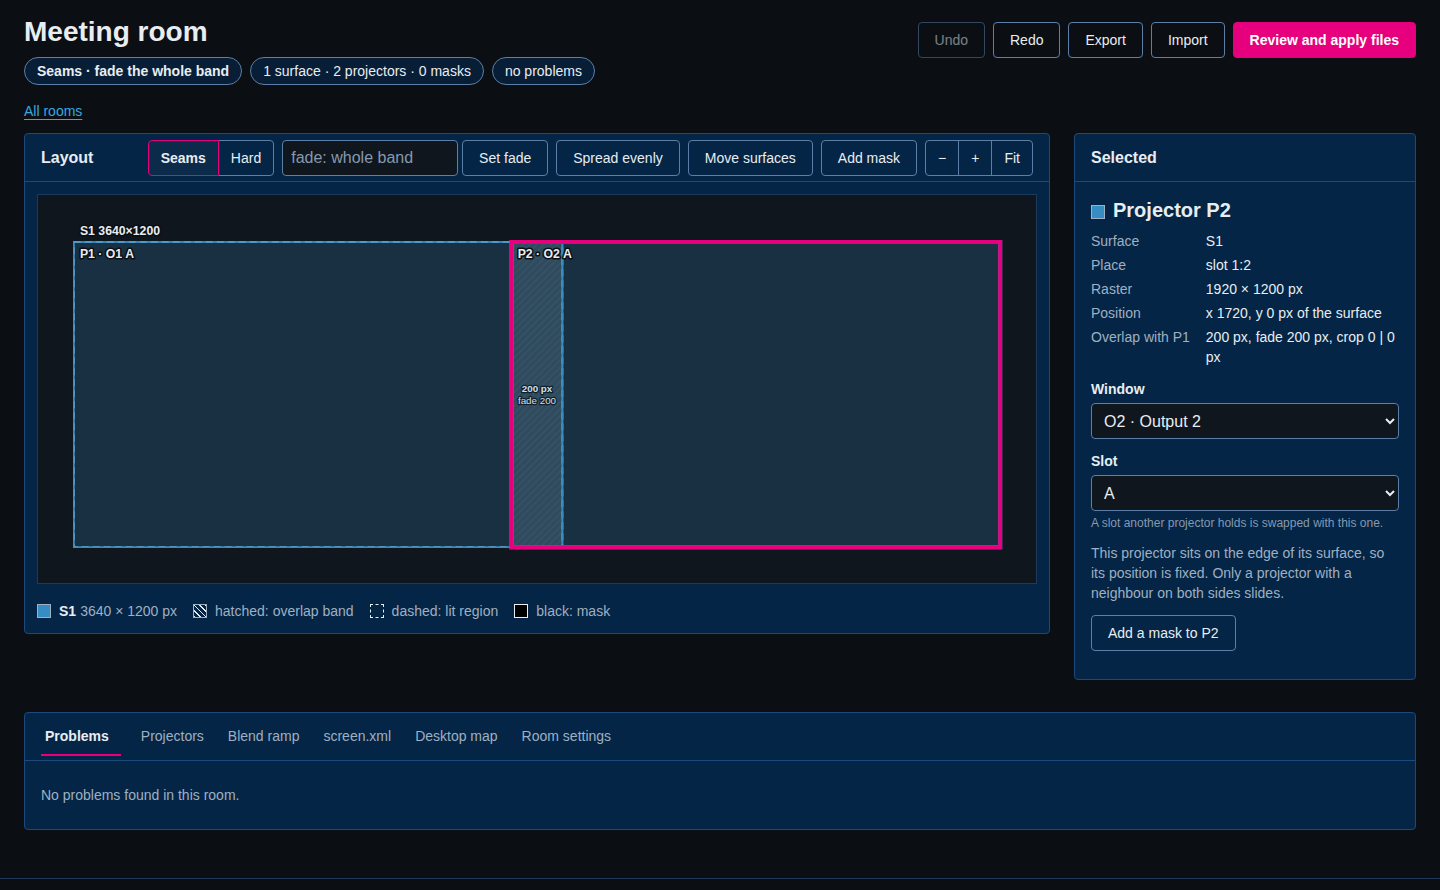
- Place is the slot in the grid, counting from 1.
slot 1:2is the first row, second column. - Raster is the size it renders.
- Position is where its raster starts on the surface.
- Overlap with P1 gives the overlap, the fade and the crop. The next step explains them.
- Window and Slot say which output window and which quadrant of it the projector renders into.
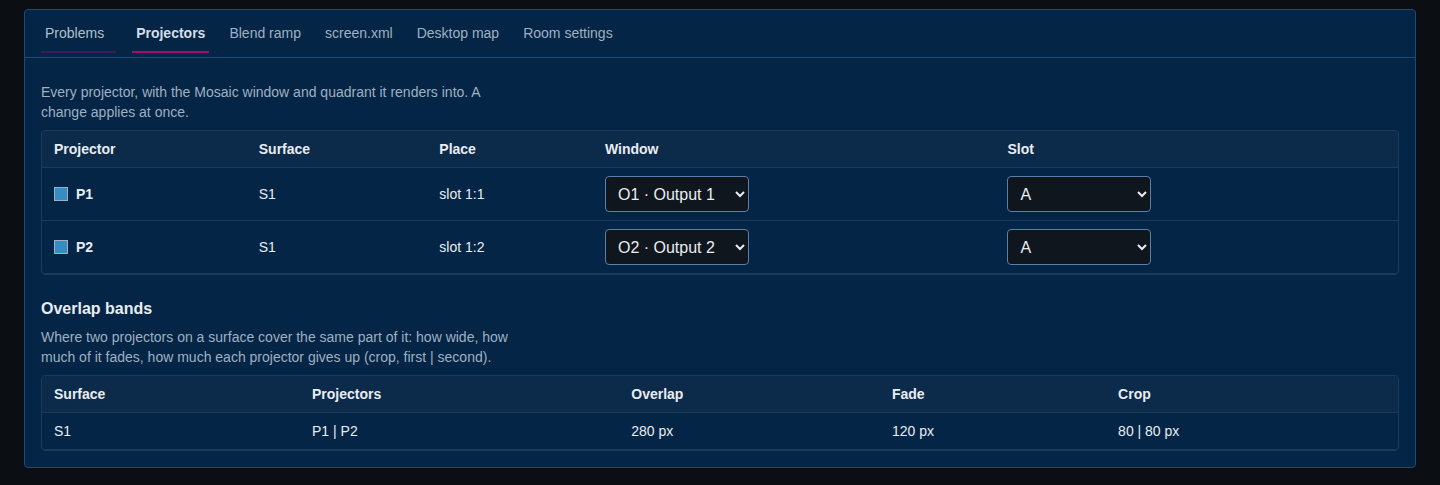
To send a projector to a different window or slot, pick it from Window or Slot. The change applies at once. If another projector already holds that slot, the two swap. The Projectors tab lists every projector with the same two pickers, which is quicker when you have many.
Window and slot must match the real outputs
The window and slot say which part of the desktop feeds which projector. If a projector shows the wrong part of the picture, check these two first.
Step 5: Set the overlap, the fade and the crop
Where two projectors overlap, the canvas draws a hatched band. Three numbers describe it:
- the overlap: how wide the band is, in pixels;
- the fade: how much of the band is faded from one projector to the other;
- the crop: how much each projector gives up. In Seams mode a band that is wider than the fade is split: the two projectors each give up half of the extra, and the odd pixel goes to the second projector.
In a two-projector room the outer projectors always sit on the edges of the surface, so the overlap follows from the surface width. The surface in the example is 3640 pixels wide and the two rasters are 1920 pixels, so they overlap by 200 pixels. To make the overlap wider, make the surface narrower.
Change the surface width
- Select the surface, type a smaller Width (px), for example
3560, and select Save surface. - SiteManager does not move the projectors for you. The right-hand projector now hangs over the edge of the surface, and the room has an error.
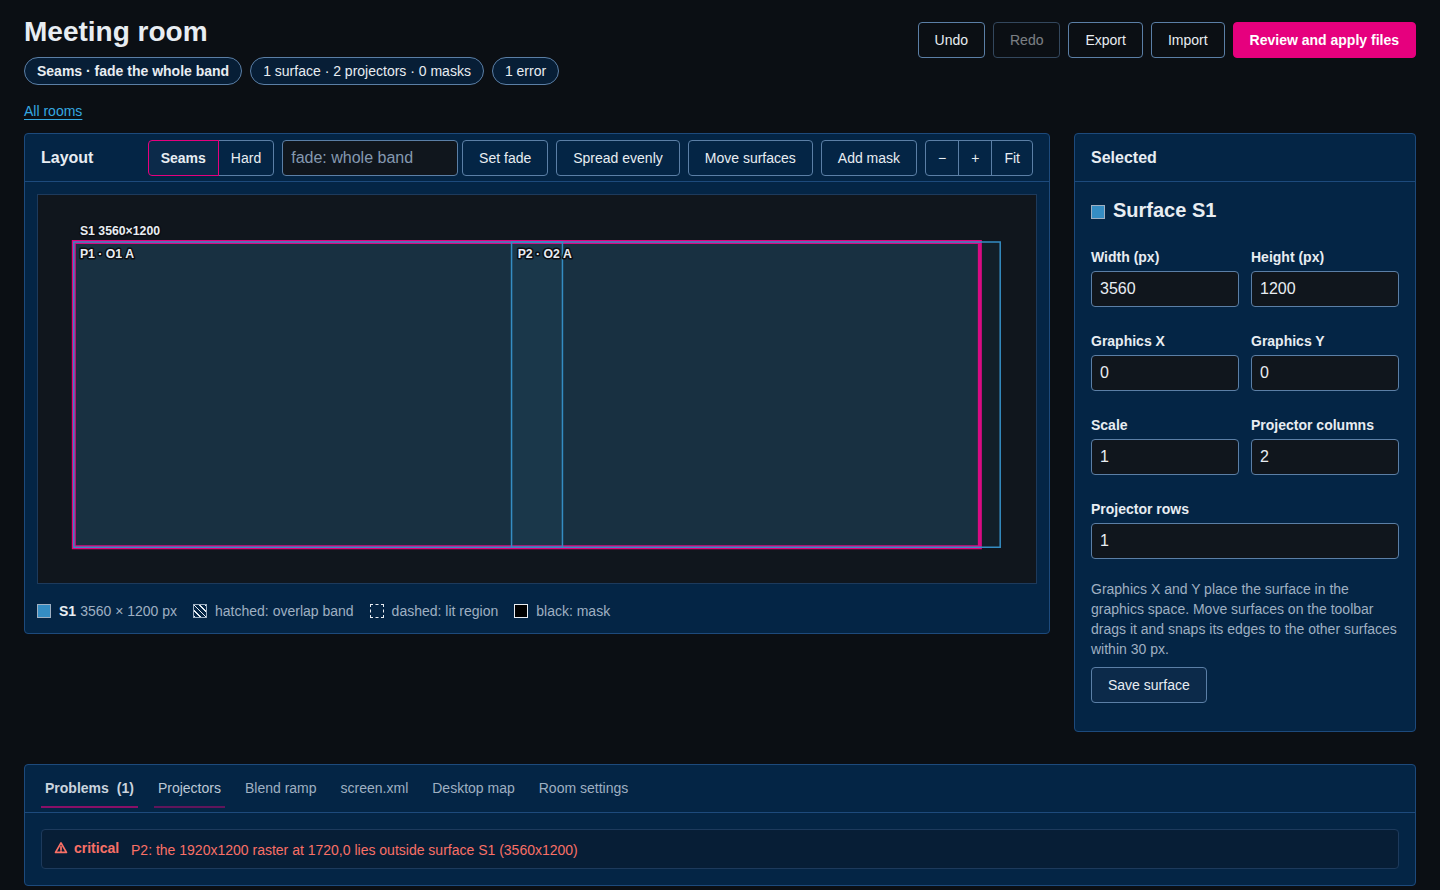
- Select Spread evenly on the toolbar. It spaces the projectors of every surface evenly, so the outer projectors sit on the edges again. The error goes and the overlap is now 280 pixels.
Set the fade
By default the fade covers the whole band. To fade only part of it, type a width in the box on the toolbar (for example 120) and select Set fade. The chip changes to Seams · fade 120 px. Leave the box empty to fade the whole band again.
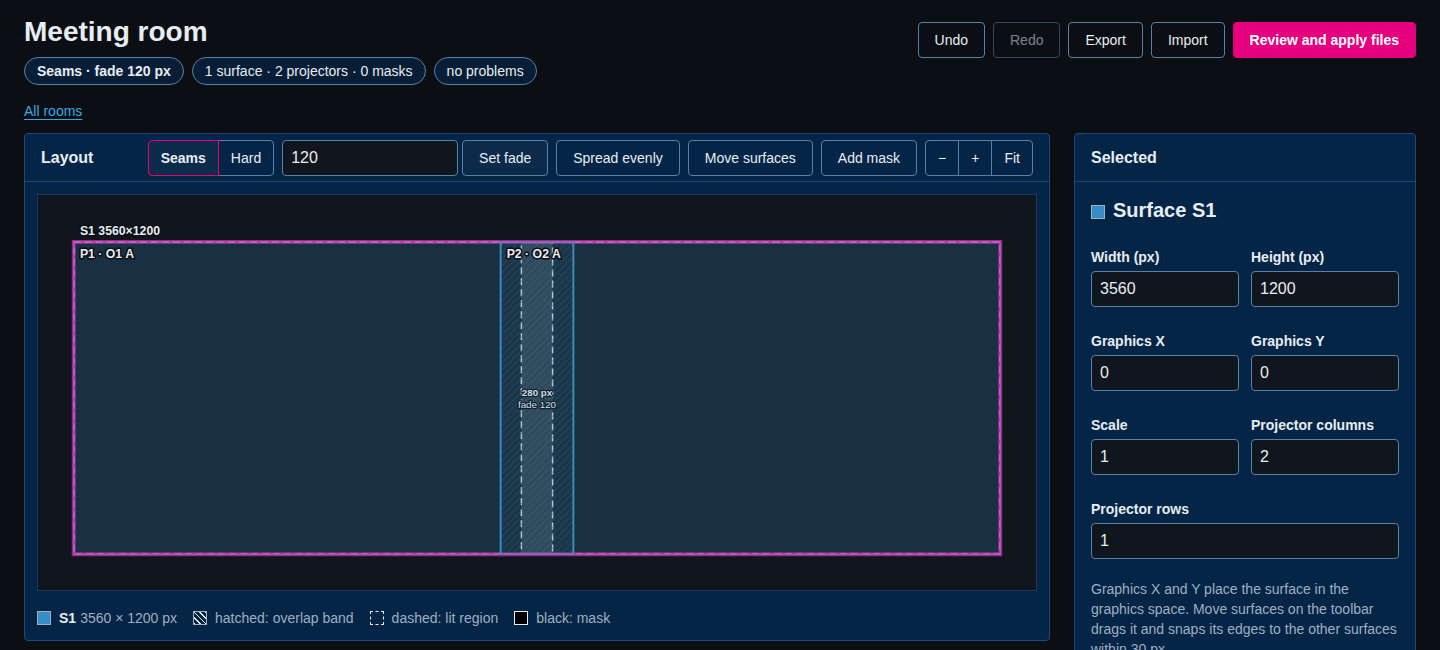
The label on the band reads 280 px and fade 120. The Projectors tab has the same numbers in the Overlap bands table, with the crop. Here the crop is 80 | 80: the two projectors each give up 80 pixels.
The label on the canvas is shortened, or left out, when it does not fit at the current zoom. Hover over a band, or look in the table, to read it in full.
Compare with a hard edge
Seams and Hard are the two blend modes.
- In Seams, every projector renders its whole raster and the seams define the blend zone. The blend happens when the picture is sent to the projector.
- In Hard, every projector renders only its share of each overlap, as a butt joint, with no blend. Use Hard as a geometry check.
Select Hard to see the crop. The chip changes to Hard edge · crops, no blend. The band reads 280 px, fade 0, and the crop is 140 | 140.
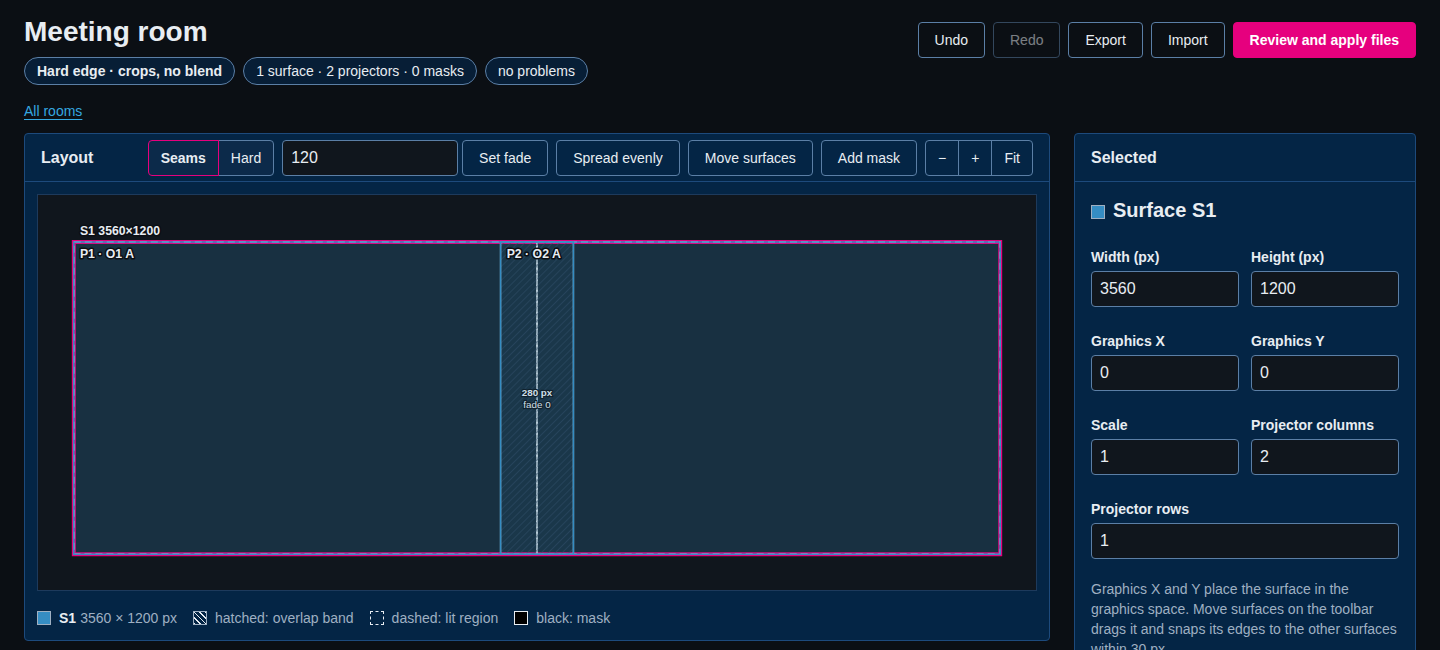
Select Seams to go back. The fade box and Set fade work in Seams mode only.
Slide a middle projector
A projector that has a neighbour on each side can slide sideways. In a room with three or more projectors on a surface, drag a middle projector and the readout shows the crop and fade of the bands beside it. You can also type its X (px) and Y (px) in the Selected panel and select Move.
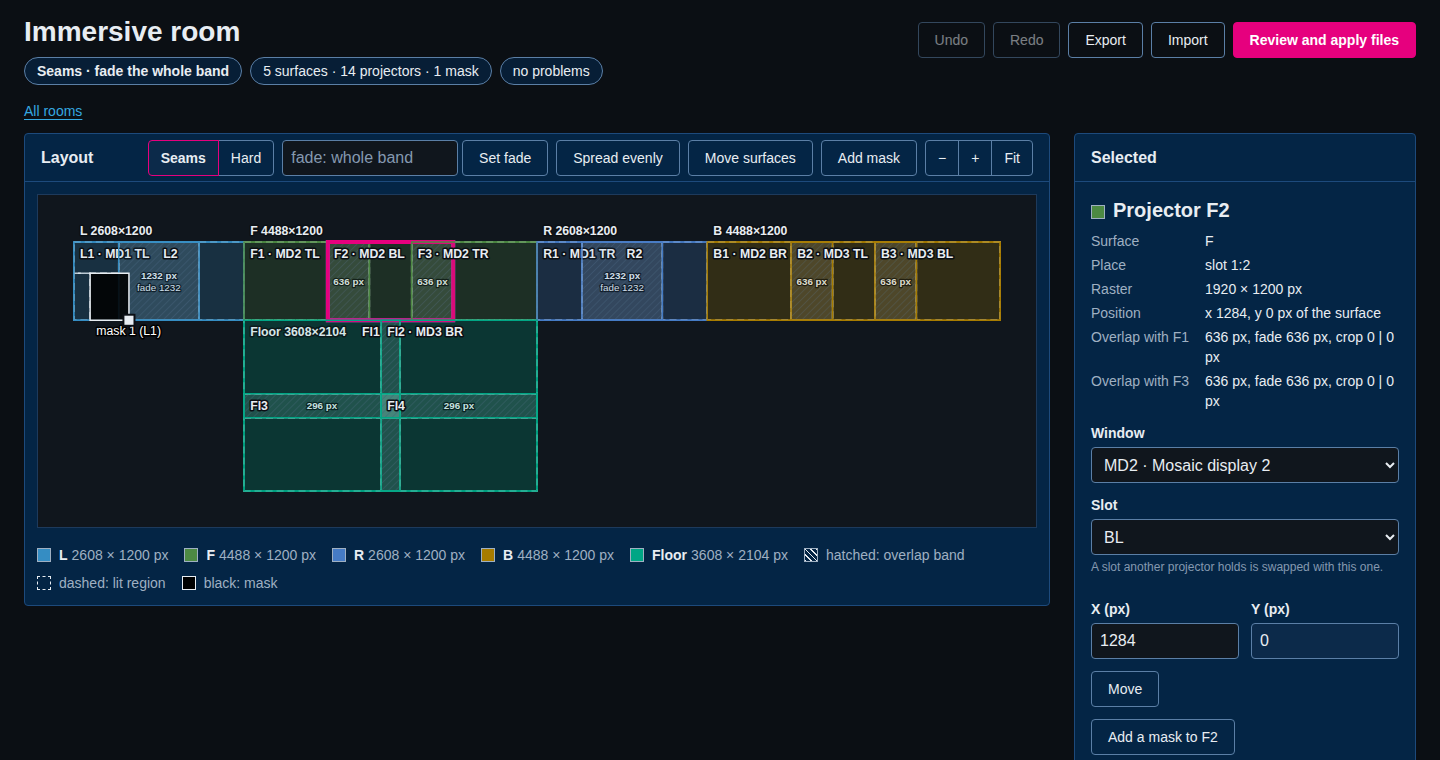
A projector on the edge of its surface is fixed. The panel says so.
Step 6: Add a mask
A mask blacks out a part of one projector's raster, for example where a pillar blocks the beam.
- Select Add mask on the toolbar. A mask appears on the first projector. To add one to a particular projector, select that projector and use Add a mask to P2 in the Selected panel.
- Select the mask. Drag it by its body to move it. Drag the small square at its bottom-right corner to resize it. Or type X (px), Y (px), Width (px) and Height (px) and select Save mask. The numbers are in the projector's own raster pixels.
- To delete it, select Remove mask.
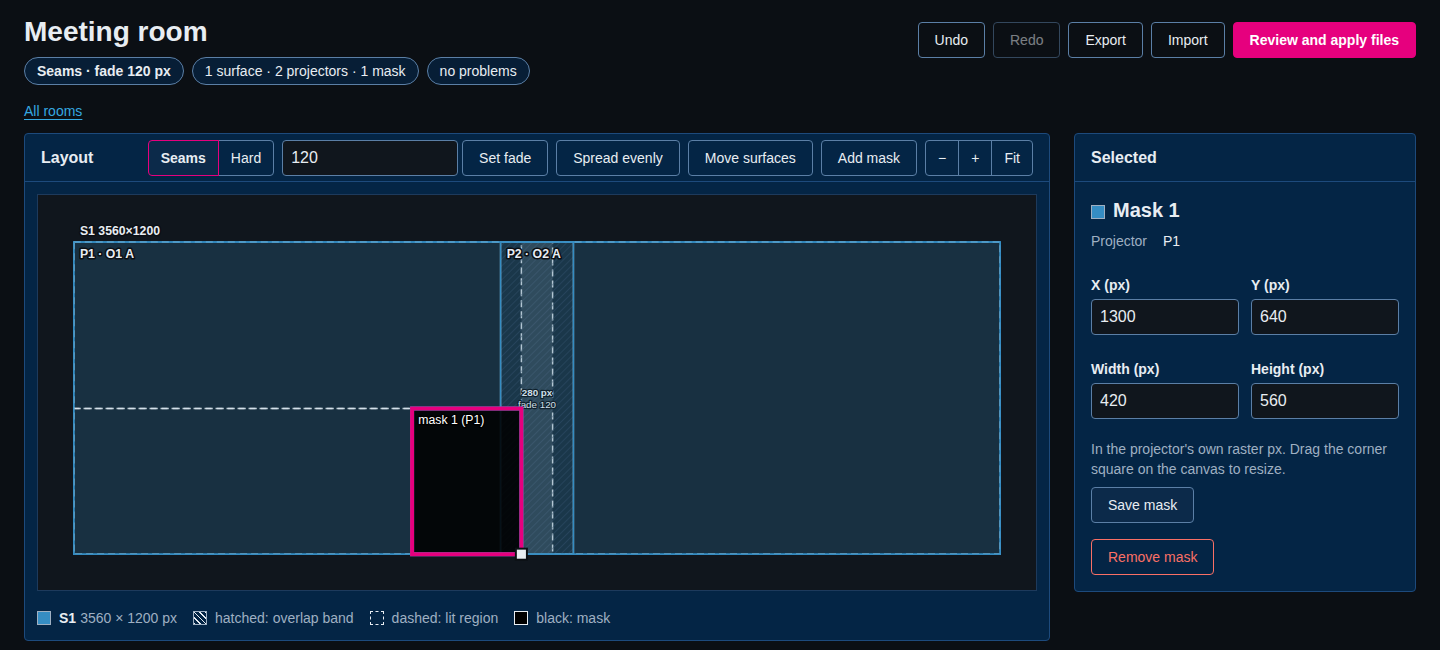
The mask is drawn in black. A mask splits the lit area of its projector into pieces, and each piece is written into the file as its own area. You see this on the Desktop map tab, described below.
Step 7: Look at the tabs
Each tab answers one question. The tabs follow every change you make, and none of them touches the disk.
Problems answers "is this room valid?". It lists what the generator found, or says No problems found in this room. An error blocks applying. The tab name shows the count, for example Problems (1).
Projectors lists every projector with its window and slot, and the Overlap bands table.
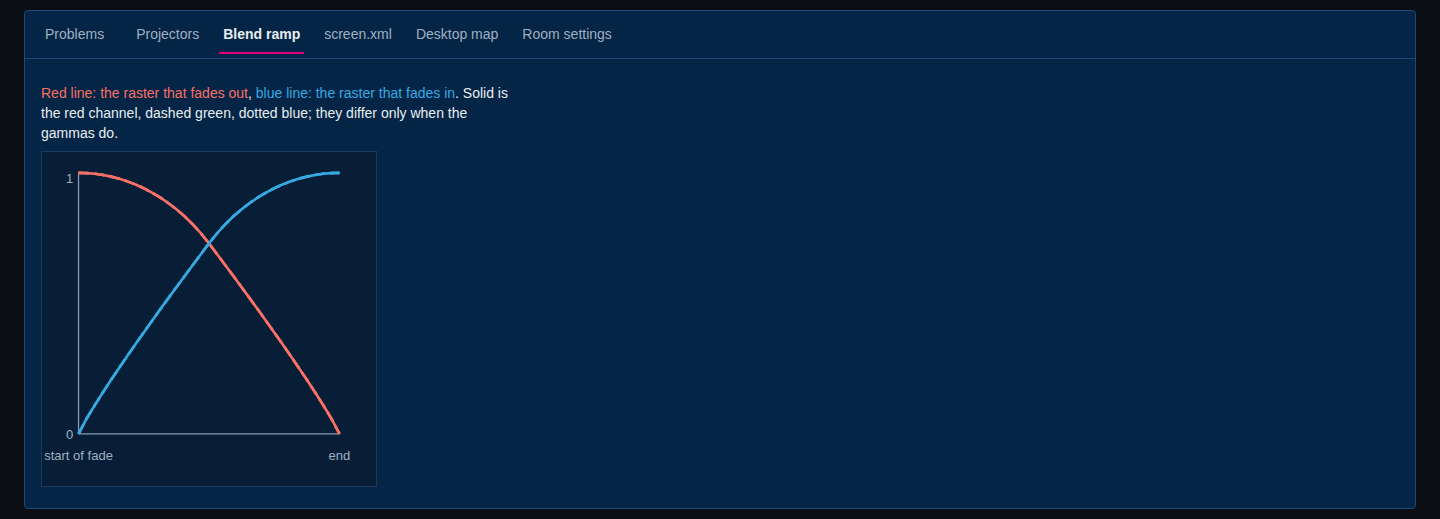
Blend ramp is a chart of how brightness changes across an overlap. The red line is the projector that fades out and the blue line is the one that fades in.
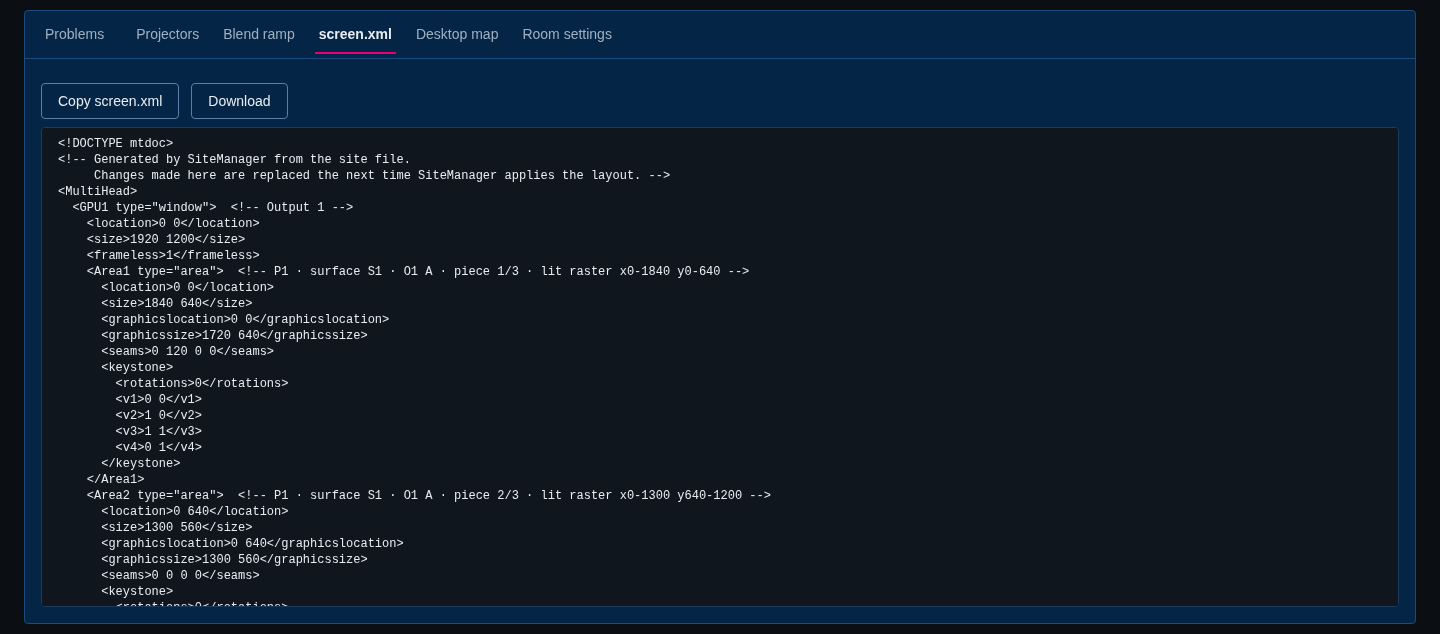
screen.xml shows the screen.xml that SiteManager would write for the whole site as it is now. You can copy it or download it.
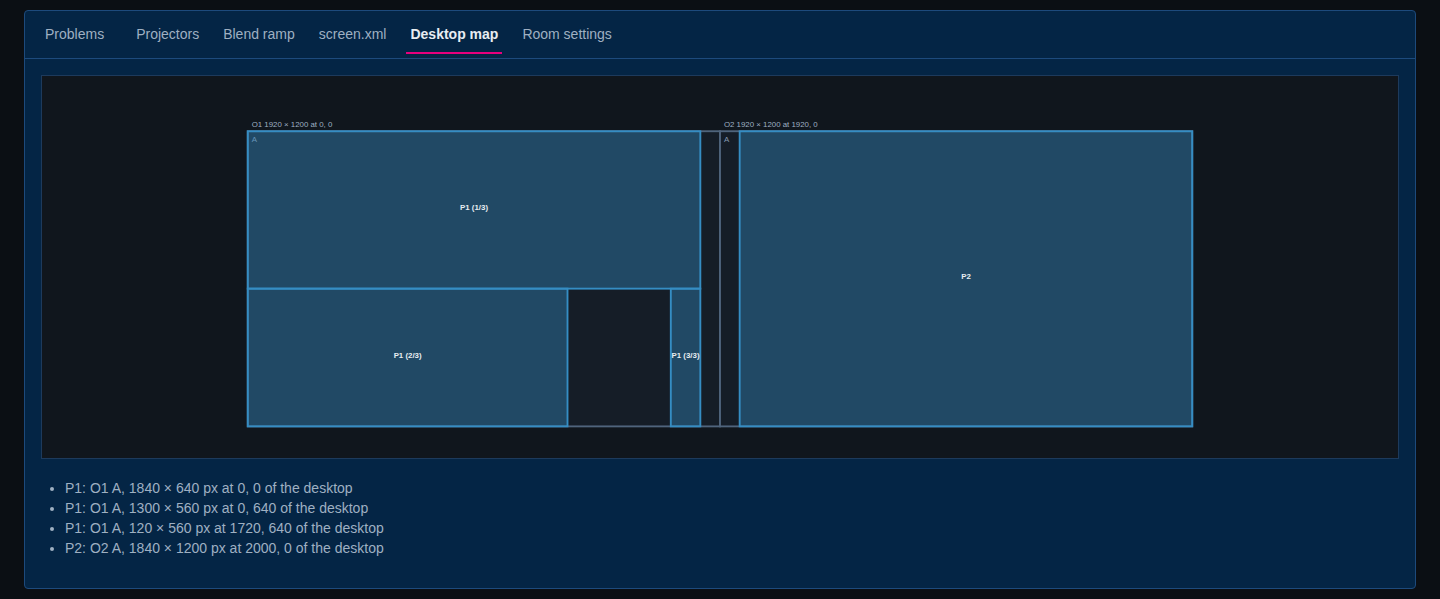
Desktop map shows the output windows on the desktop and the area each projector fills in them. The list under the map says it in words, one line per piece, for example P1: O1 A, 120 × 560 px at 1720, 640 of the desktop. In the example the mask has cut the first projector into three pieces, labelled P1 (1/3), P1 (2/3) and P1 (3/3), and the black gap is the mask.
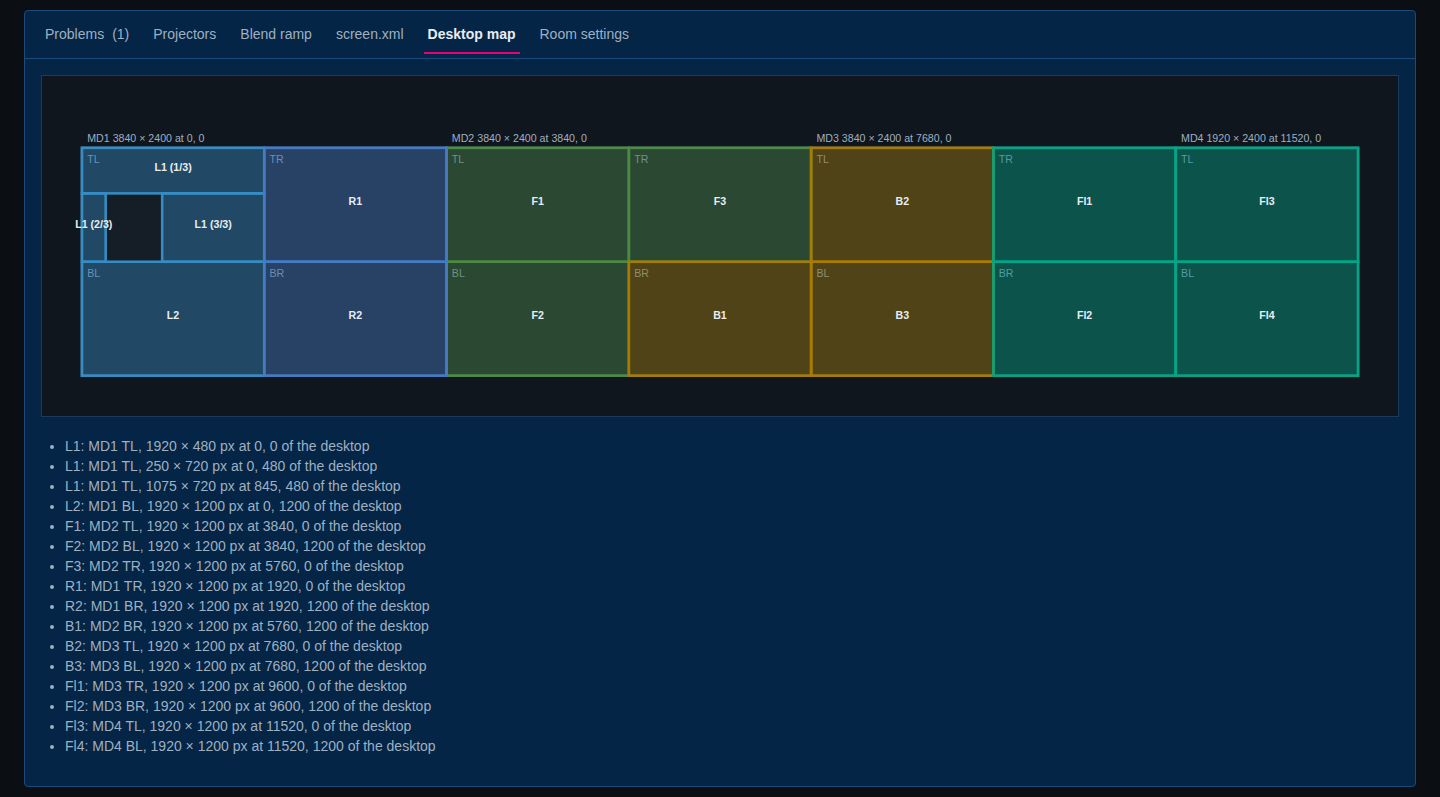
In a big room, the desktop map shows how projectors share Mosaic windows. Each window is drawn with its four quadrants, named TL, TR, BL and BR, and each projector's area is labelled with its id.
Room settings holds every value as a form: the room name and blend mode, the fade width, the blend power, the gamma of each colour and the black level, and then each surface, projector, output window and mask. It also has Delete this room. Use it when you need a value the canvas does not offer.
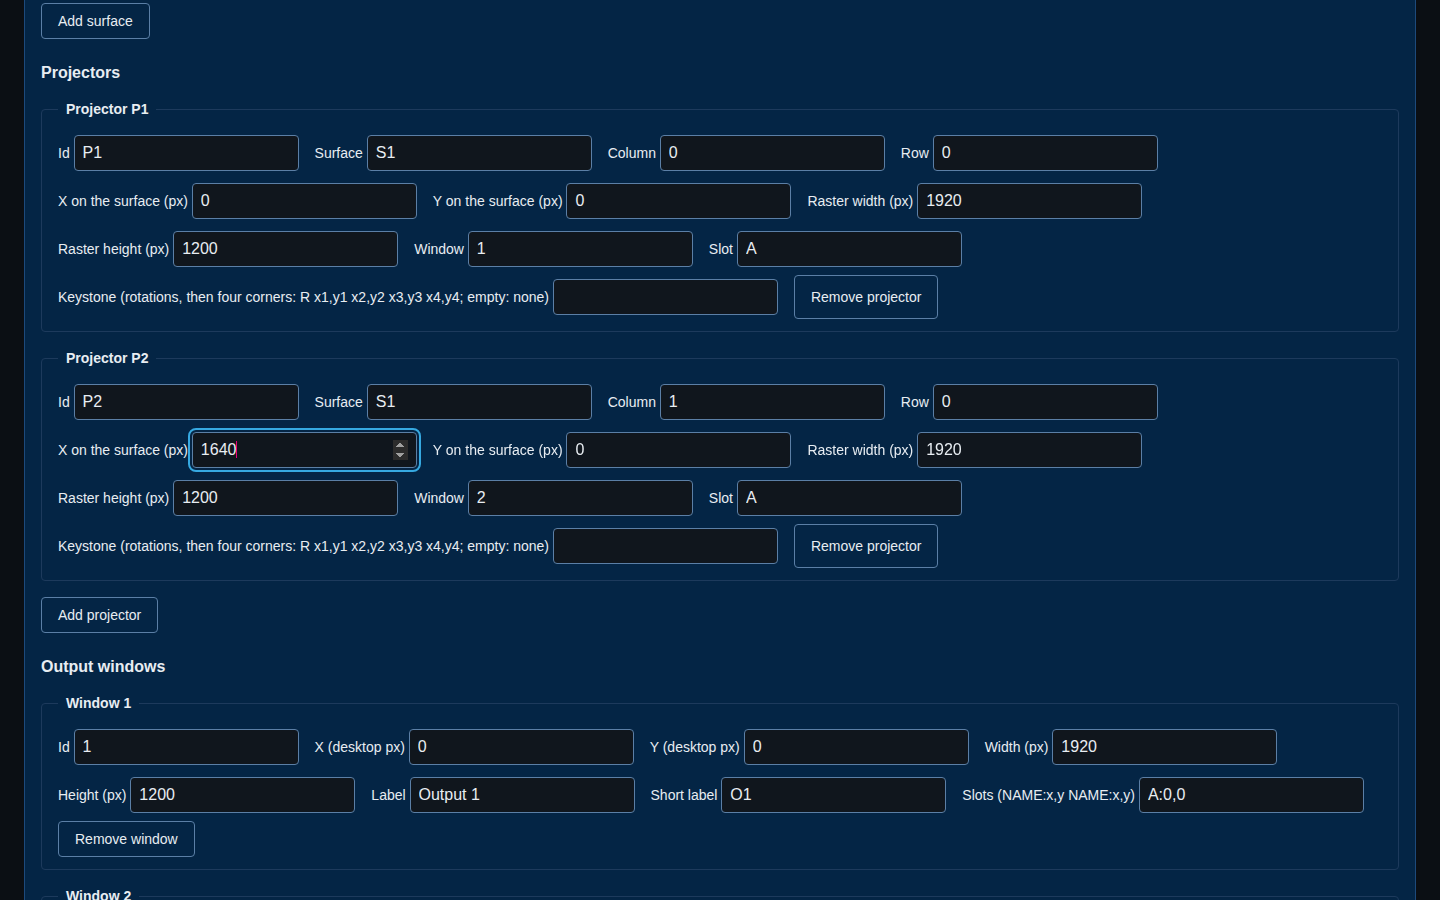
Room settings has its own save button
The form in Room settings saves with Save room. A change you type there is not saved until you select it. Changes made on the canvas or in the Selected panel apply by themselves.
Add a surface or a projector in Room settings
Add surface, Add projector, Add window and Add mask add a new row to the form. Two things to know:
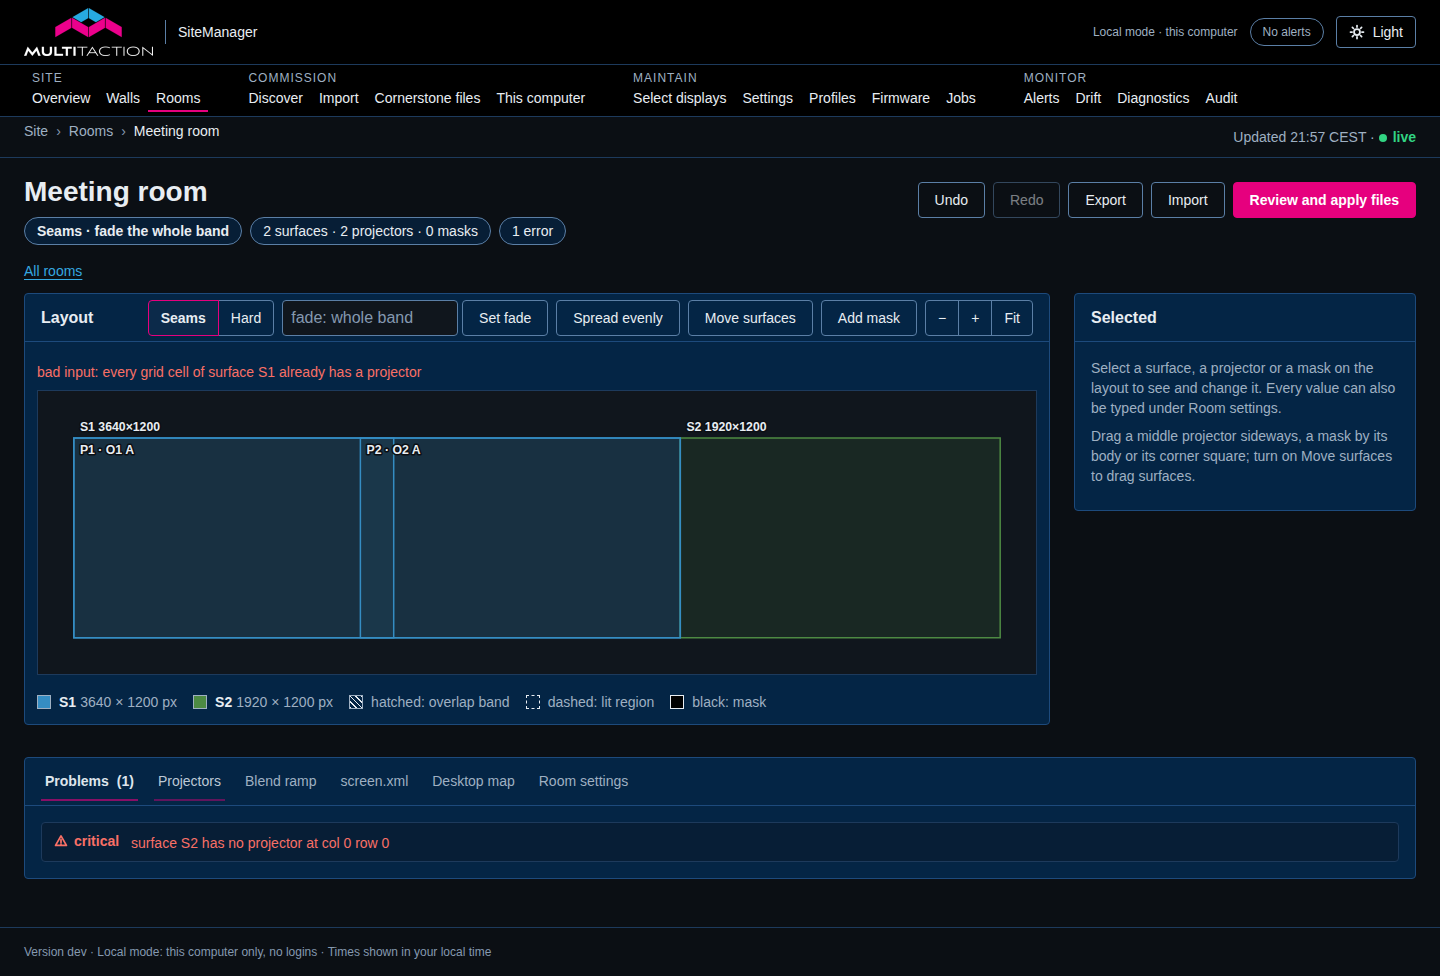
- A new surface needs a projector in every cell of its grid. Until it has them, Problems says
surface S2 has no projector at col 0 row 0. - Add projector adds a projector to the first surface only. When that surface is full, SiteManager answers
bad input: every grid cell of surface S1 already has a projector. To put a projector on another surface, change the Surface, Column and Row of a projector you added, or of an existing one.
Step 8: Write the Cornerstone files
When Problems is clear, write the files.
- Select Review and apply files. This opens the Cornerstone files page. It is the same page the walls use. It shows the whole site, so a site with walls and rooms writes one
screen.xmlfor all of them. - Read the Windows panel. Each output window is listed with its name,
(room)or(wall), the GPU, its position on the desktop and its size.
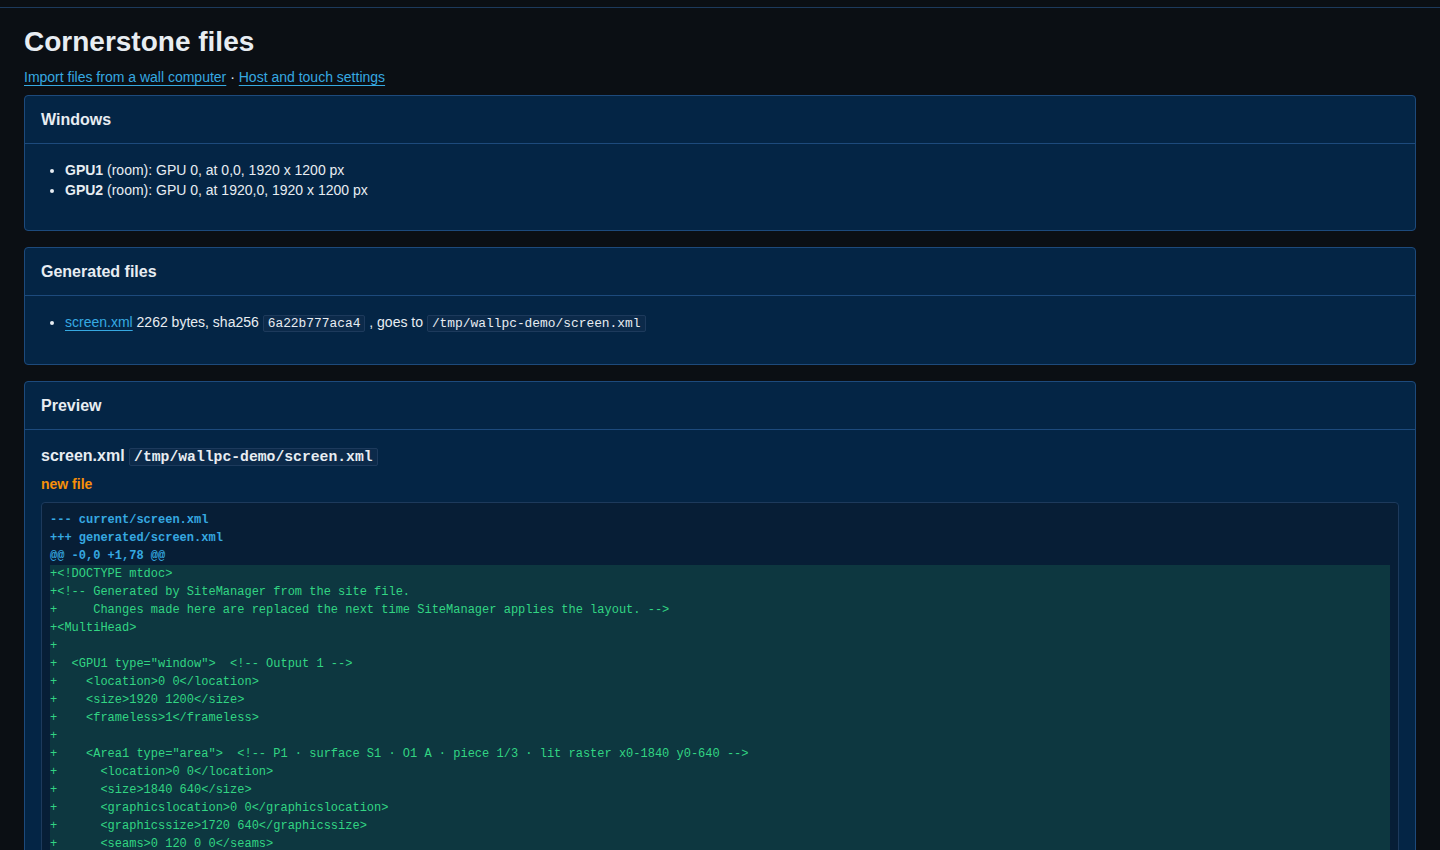
- Read the preview under Preview. For a file that does not exist yet, it says new file and shows the whole file as added lines. For a file that exists, it shows only the lines that change.
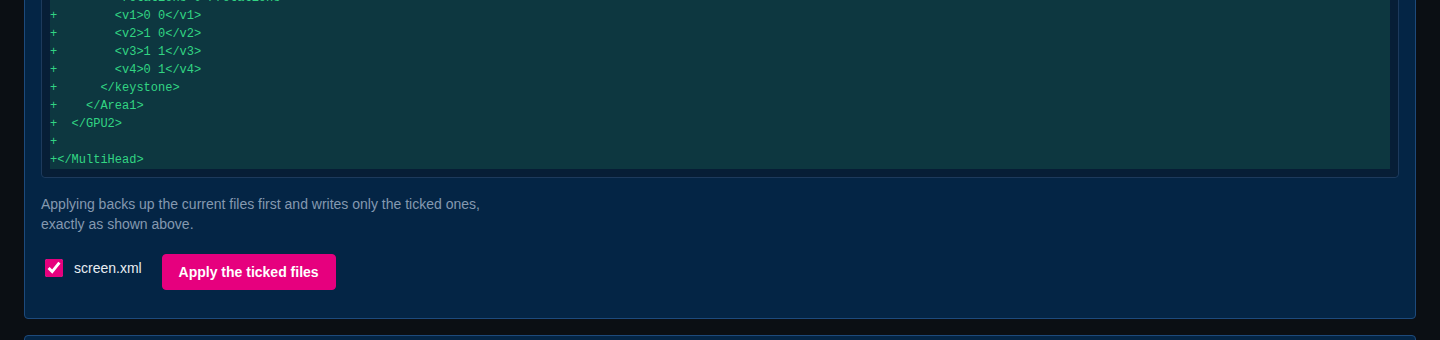
- Scroll down. Tick the files you want to write and select Apply the ticked files.
SiteManager backs up the current files first, then writes the ticked ones. You see a green banner that says Applied, the backup id and the file written.
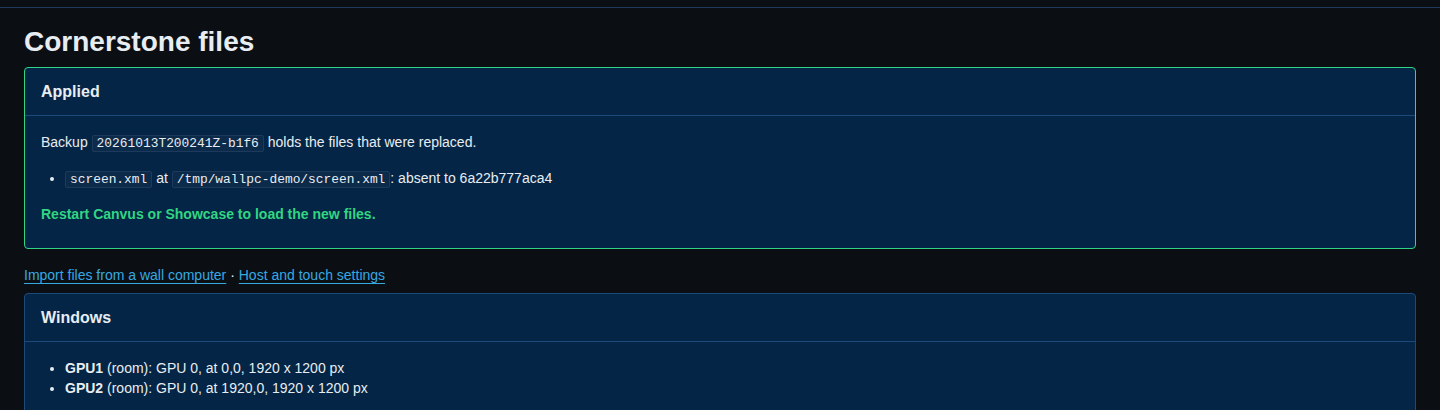
- Restart Canvus or Showcase on the wall computer to load the new files. The banner says Restart Canvus or Showcase to load the new files.
The page keeps every backup in its Backups panel. To go back, tick Replace the current files with this backup and select Restore. A backup taken before the first apply does not remove a file that did not exist before. Delete that file by hand.
For more on this page, the touch preview and the backups, see Write the Cornerstone files.
Where the files go
The page tells you the path each file goes to. In your own installation these are the paths of the Cornerstone user on the wall computer. The paths in the screenshots are examples.
Step 9: Undo, export and import
Undo and Redo take back and replay every change you make in the designer, 50 steps deep. The history is kept in memory. If the service restarts, it is gone. Press Ctrl+Z to undo and Ctrl+Shift+Z to redo.
Export downloads the room as a file. Keep one as a copy before a big change, or use it to copy a room to another SiteManager.
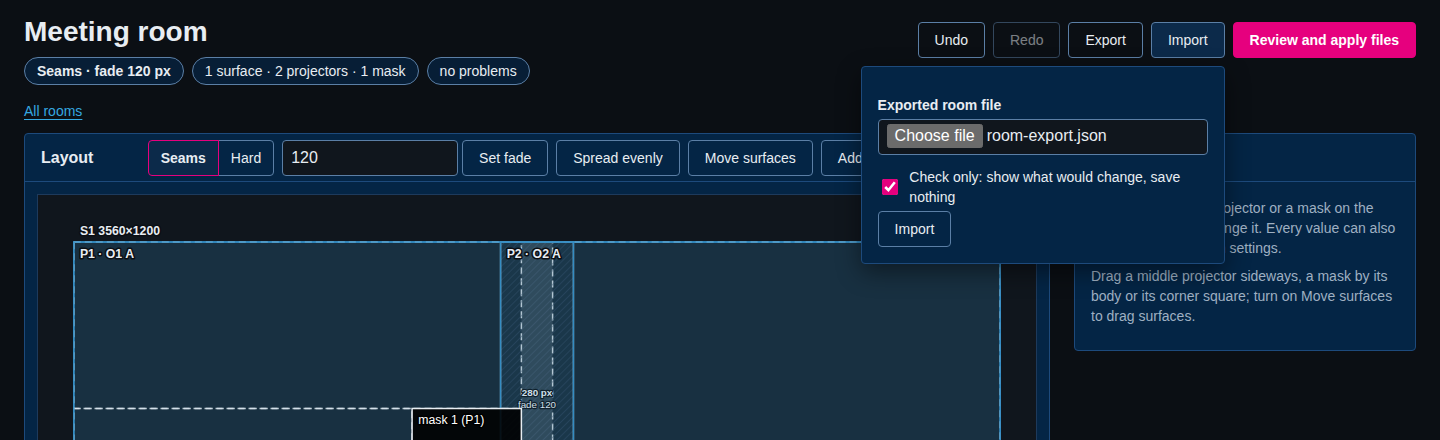
Import reads a file onto this room. It keeps the room's id and name and replaces its surfaces, projectors, masks and windows.
- Select Import. A small form opens.
- Choose the exported room file.
- Check only: show what would change, save nothing is ticked. Leave it ticked to read a report first.
- Select Import in the form.
The page shows an Import check. It says nothing was saved and what would change.
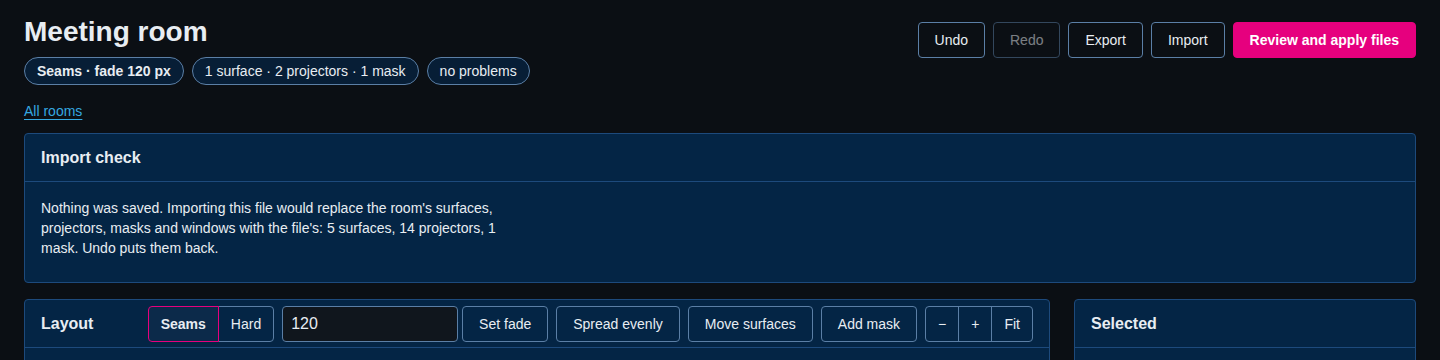
To really import, choose the file again, untick the box and select Import. Undo puts the old room back.
From the command line, the same steps are:
sitemanager rooms show meeting-room
sitemanager rooms export meeting-room --out meeting-room.json
sitemanager rooms import meeting-room meeting-room.json --dry-run
sitemanager rooms import --new second-room meeting-room.json --name "Second room"
rooms show prints each overlap as a line such as 280 px overlap, fade 120, crop 80 | 80. See Command reference.
Common mistakes
These are the messages you are most likely to meet, word for word.
The room will not create.
a room with id "meeting-room" exists: the id is taken. Choose another.room id "bad id" must be 1 to 64 letters, digits, dots, underscores or hyphens: take out spaces and other characters.a room has 1 to 8 projector columns and rows: the new-room form makes at most an 8 by 8 grid. Make the room smaller, then add rows in Room settings.an overlap is 0 to half the raster (960 px across, 600 px down): the numbers in brackets depend on your raster size. Enter a smaller overlap.
The room has an error on the Problems tab. An error blocks the Cornerstone files page. It says Apply is unavailable: the layout has errors; fix them before generating files, and Generated files says Nothing is generated yet: fix the problems above, or place displays and add a room.
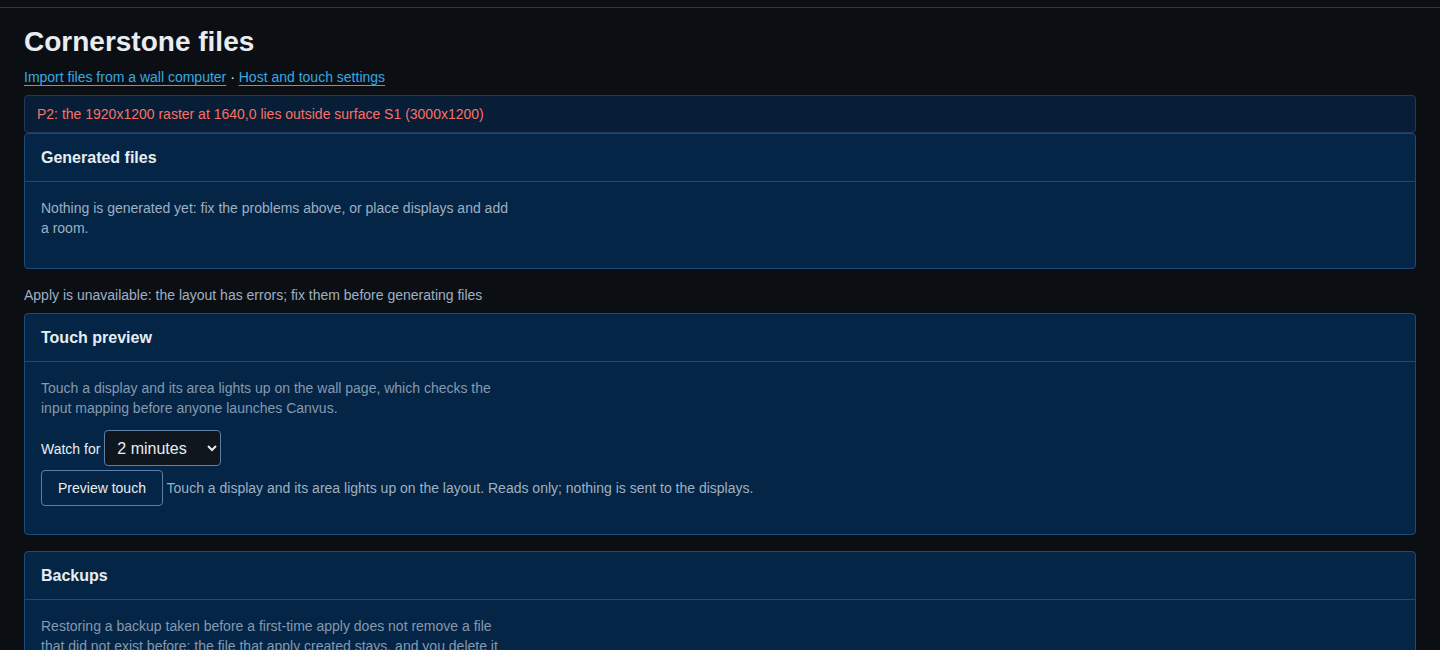
Fix the error on the room page. The messages and what they mean:
surface S2 has no projector at col 0 row 0: the grid of a surface has a cell with no projector. Add a projector there, or make the grid smaller.P2: the 1920x1200 raster at 1720,0 lies outside surface S1 (3560x1200): a projector is not inside its surface. Use Spread evenly, or correct the surface size or the projector's position.P1: window 5 does not exist,P1: MD1 has no BL slotandMD1 TL is used by both L1 and F1: the window or the slot of a projector is wrong, or two projectors share one slot. Pick them again in the Projectors tab.P1: overlap crops of 900+900 px across and 0+0 px down leave nothing of the 1920x1200 raster lit: the overlaps eat the whole raster. The numbers in your message will differ. Check the projector positions.
A warning does not block applying, but read it:
S1: gap of 40px between P1 and P2; no seam written: there is a gap between two projectors, not an overlap.S1: blend 500px exceeds the 280px overlap between P1 and P2 (clamped): the fade is wider than the band, and SiteManager uses the band's width.mask 1 on P1 extends outside the 1920x1200 raster: a mask hangs over the edge of its projector.P1: masks leave nothing of its raster lit, so it gets no area: the masks cover the whole projector.
A note on messages in the large room
The large room in the first picture shows one message on its Problems tab: L1 piece 3/3 starts inside the blend band: graphicssize -157 720 is negative; Luminous adds the seams without normalising, so the bounds are right. It is shown as information, not as an error: it does not block applying, and SiteManager says the bounds are right.
The picture on the wall is wrong although SiteManager shows no problems. SiteManager checks that the room is valid, not that it matches your cabling. Check the window and slot of each projector first, then the overlap numbers against what you measured.
What next
- Read Day-to-day to look after the site once it runs.
- Read Projector rooms for the full list of controls.
- Back up a working room with Export before you change it.