Set up a wall
This page takes you from an empty SiteManager to a working wall: displays found and named, the wall drawn, the Cornerstone files written, and touch checked. The example is a wall of six displays in three columns and two rows, called Lobby wall, with a Teams screen to its right. You can follow it with any number of displays.
If the words display, wall, window and extra output are new to you, read Walls and rooms first. For every button and setting, see the reference page Walls and Cornerstone files. If projectors make the picture, see Set up a projector room instead.
You need:
- SiteManager running on the computer that drives the wall (see First start).
- The displays on the same network as that computer, powered on.
- About twenty minutes for a first wall.
Nothing in steps 1 to 8 changes a display or a Cornerstone file. The only things SiteManager sends to a display are the identify messages in steps 4 and 12. Files are written only in step 10.
Step 1: find and add the displays
Open Discover in the menu (under Commission). There are three ways to find displays. Nothing joins the site until you add it.
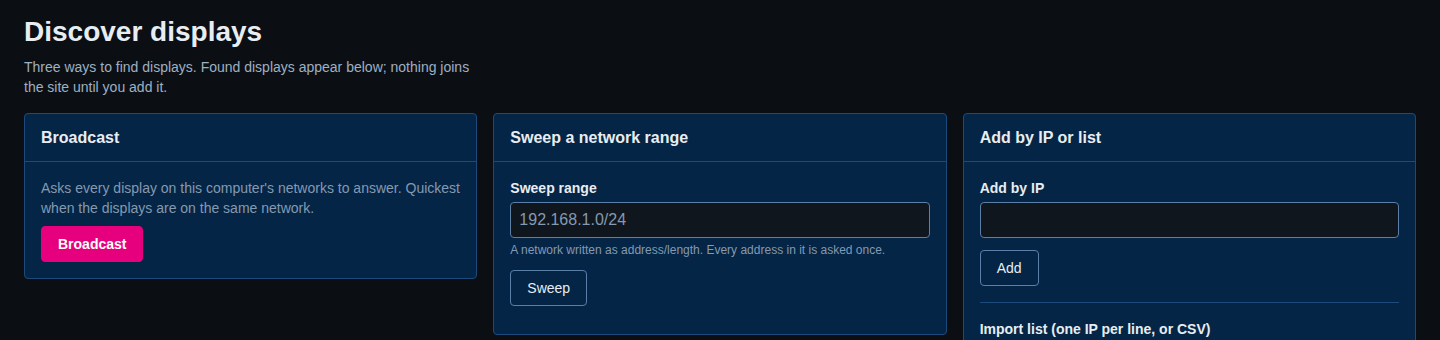
If the displays are on the same network as this computer, select Broadcast. Every display on that network answers.
If the displays are on another network, or behind a router, use Sweep a network range. Type the network as address and length, for example 10.254.0.0/24, and select Sweep. SiteManager asks every address in the range once.
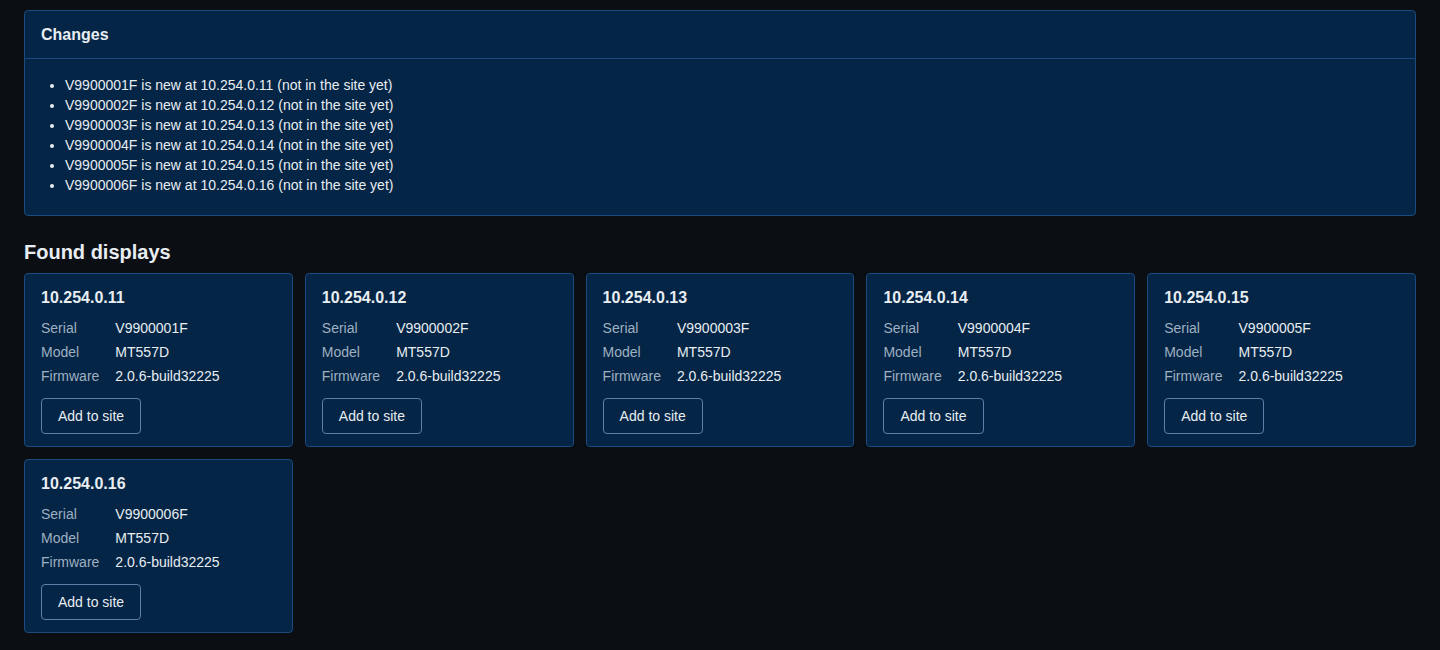
Found displays appear under Found displays, each with its serial number, model and firmware version. Changes above them lists what is new, for example V9900001F is new at 10.254.0.11 (not in the site yet). Select Add to site on each display you want. A display that is already in the site is marked in site.
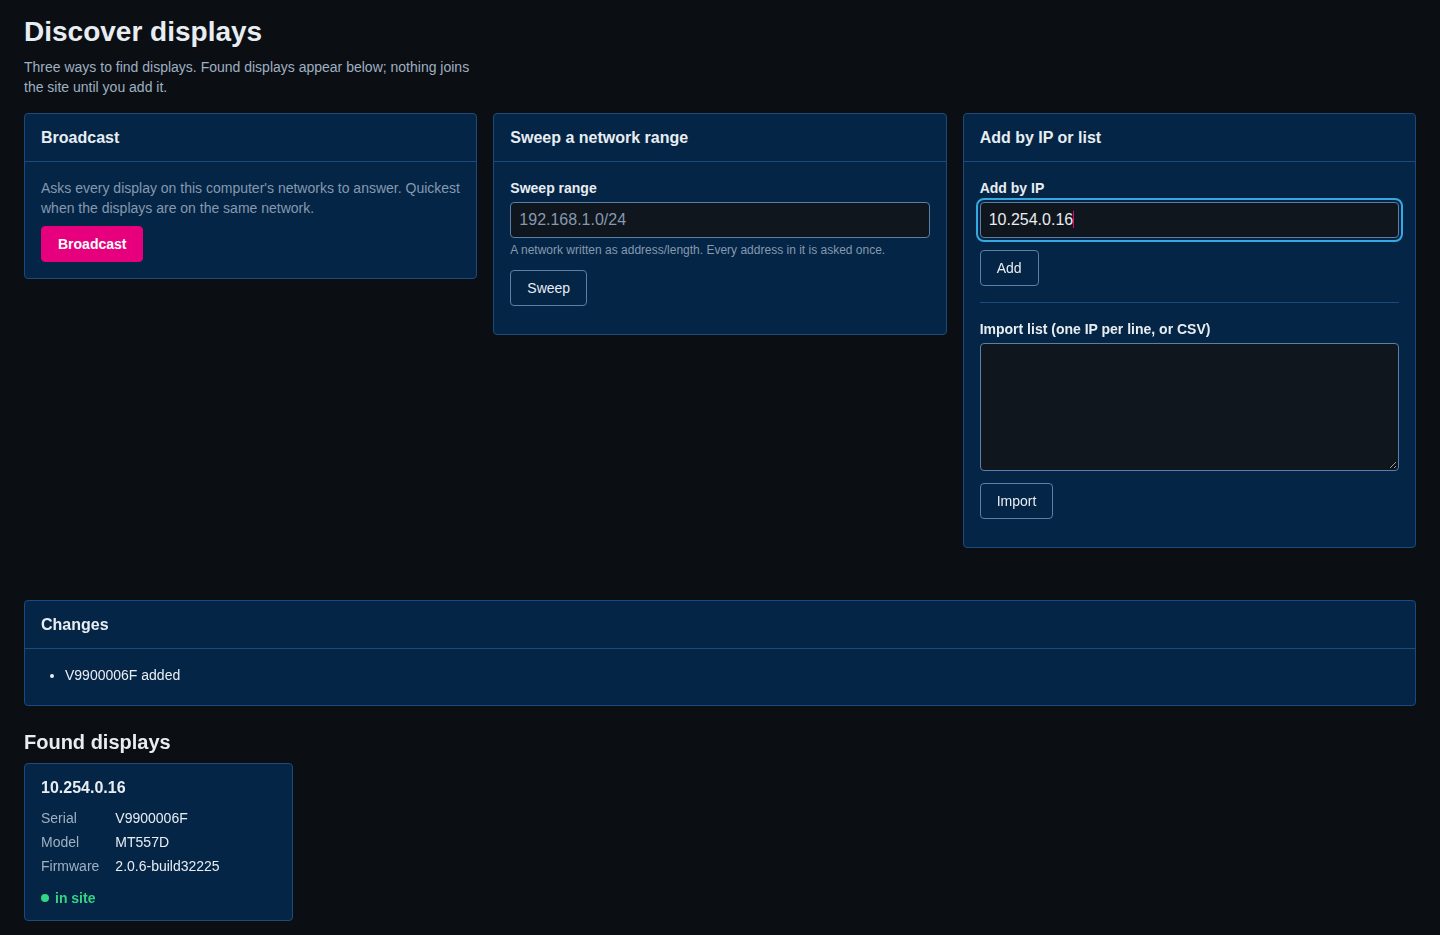
If you know the address, type it under Add by IP and select Add. This asks that one display and adds it straight away, with no second click. Import list does the same for many addresses, one per line or as a CSV.
The rest of this page assumes that all your displays are in the site. Look at Overview: each added display is a tile under Not on a wall.
If a display does not show up
A display that answers but has no SiteManager interface is listed with a note and cannot be managed. A host that reports no serial number cannot be added. For a sweep, the range can hold at most 4094 addresses. See Find and add displays and Ports and firewall.
Step 2: name the displays (optional)
SiteManager shows a display by its name, or by its place on a wall (1:2 is the top row, second column), or by its serial number. On a wall, positions are usually clear enough. A name helps when displays are not in a grid, or when several walls look alike.
To name a display, open it from Overview, type under Name in Properties, and select Rename. Renaming changes only what SiteManager shows. It does not write to the display.
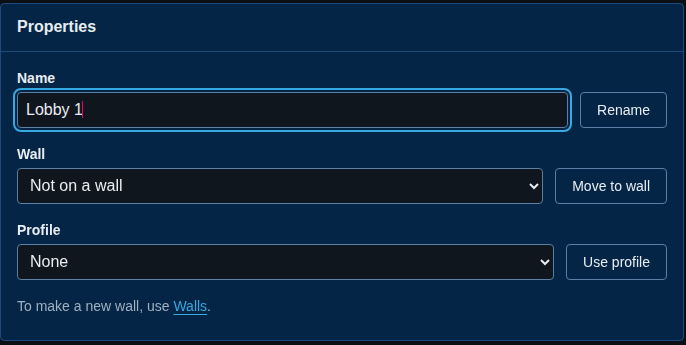
The example uses Lobby 1 to Lobby 6.
Step 3: make the wall
Open Walls in the menu and fill in New wall.
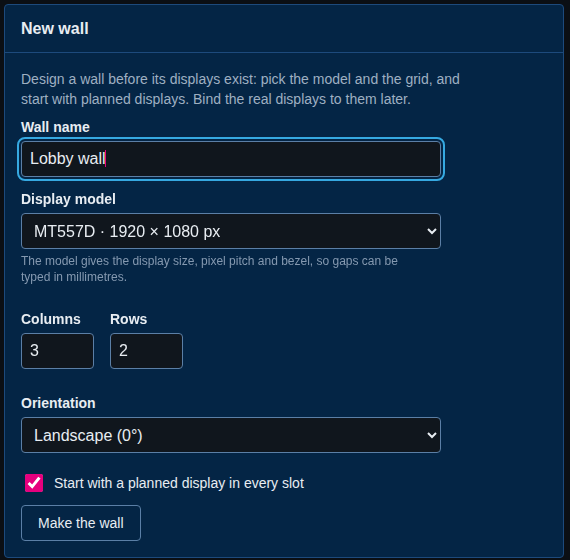
- Wall name:
Lobby wall. - Display model: the model of your displays. The list is the model catalogue: MT557D, MT556XNB and MT556UNB, each with its resolution. The model fills in the display size, the pixel pitch and the bezel, so SiteManager can work out the gaps between displays in millimetres. Choose Custom for any other display, and type the sizes on the wall page afterwards.
- Columns and Rows:
3and2. - Orientation: Landscape (0°) if the displays hang as they come out of the box. Choose a portrait or upside-down orientation if they are turned. Every display you place gets this rotation by default.
- Leave Start with a planned display in every slot ticked. A planned display is a placeholder for a display that is not bound yet. It lets you see the whole grid and bind the real displays one at a time.
Select Make the wall. The wall opens in the designer. The title chips show the model, the grid, the size in pixels and millimetres, and how many displays are online. A wall made with planned slots shows a warning, because the planned displays have no real display behind them yet.
Step 4: bind the real displays to the slots
Each dashed slot is a planned display. To put a real display in it:
- Select the slot on the Layout. The inspector (Selected) shows its place.
- Under Bind to a display, choose the display. The list holds displays that are on no wall.
- Select Bind.
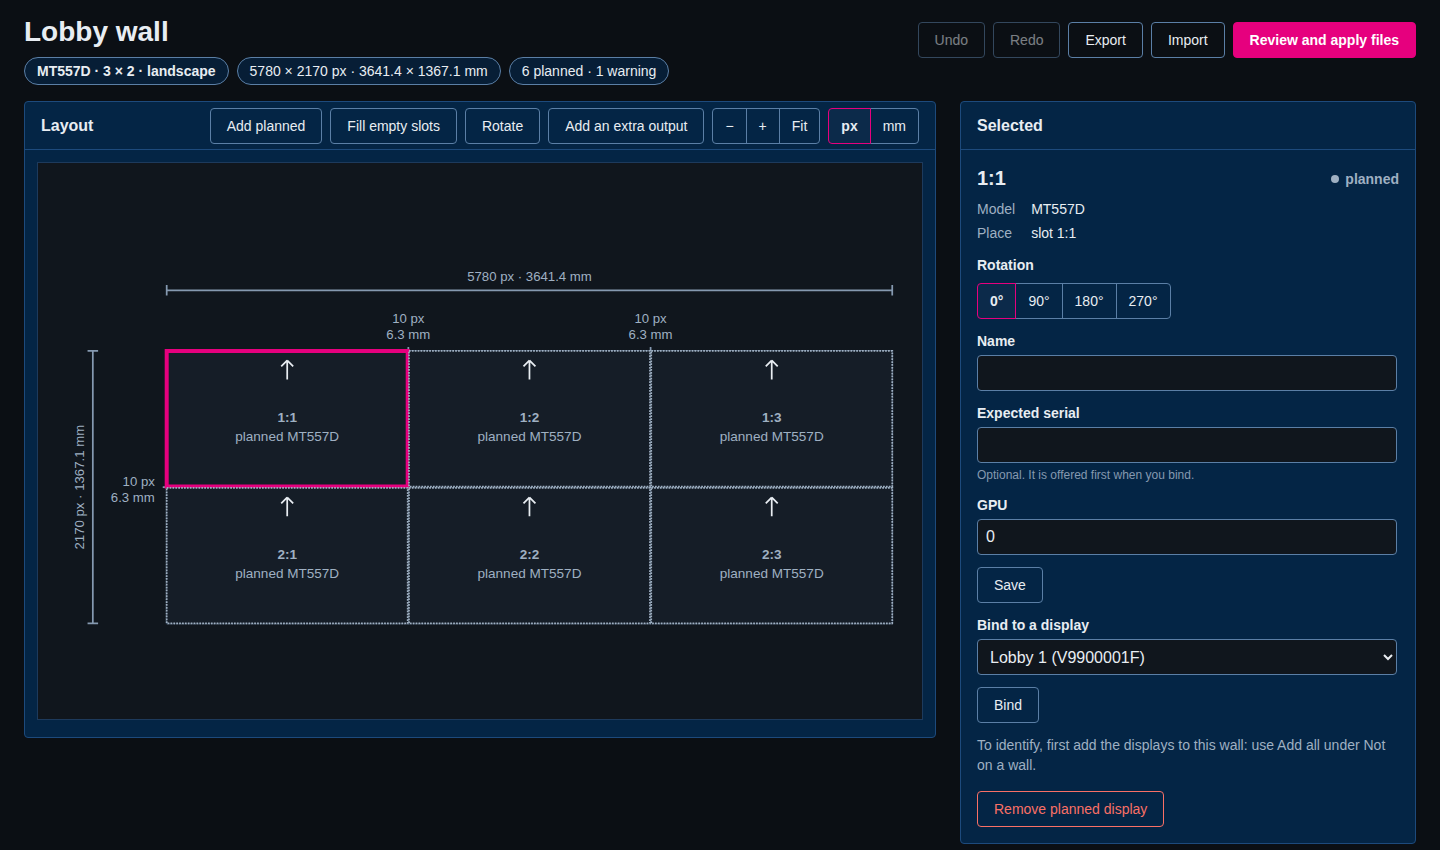
Repeat for each slot. If you do not know which serial number hangs where, let SiteManager show you:
- Under Displays, Not on a wall, select Add all to add every free display to this wall without a place. They are then listed as Unplaced here.
- Select a planned slot and then Identify to bind, or select Identify to place under Unplaced here.
- SiteManager shows an identify message on one display at a time. Select the slot on the layout where you see the message. A planned slot binds the display, and an empty slot places it. Skip this display leaves one for later.
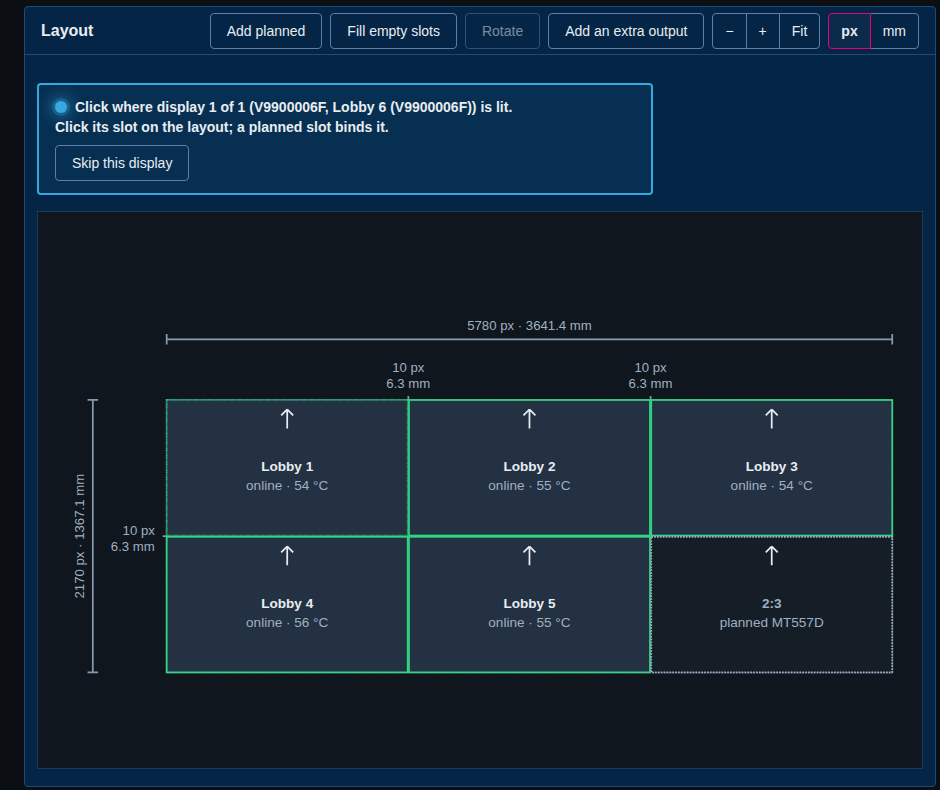
This is a job. The identify message is the only thing the designer writes to a display. Skip it if you already know the serial numbers.
Tip
Add to this wall next to a single display, then a click on a free slot, places that display exactly there. Use it when you are replacing one display.
When every slot is bound, the warning disappears and the wall chip counts displays as online.
Step 5: check the layout, then move, swap and turn displays
Look at the layout. Each tile is a display, drawn in its real proportions. A tile shows its name, its state and its temperature. The arrow shows the top edge of the display as it hangs. The dimension lines show the size of the grid and the gaps between displays.
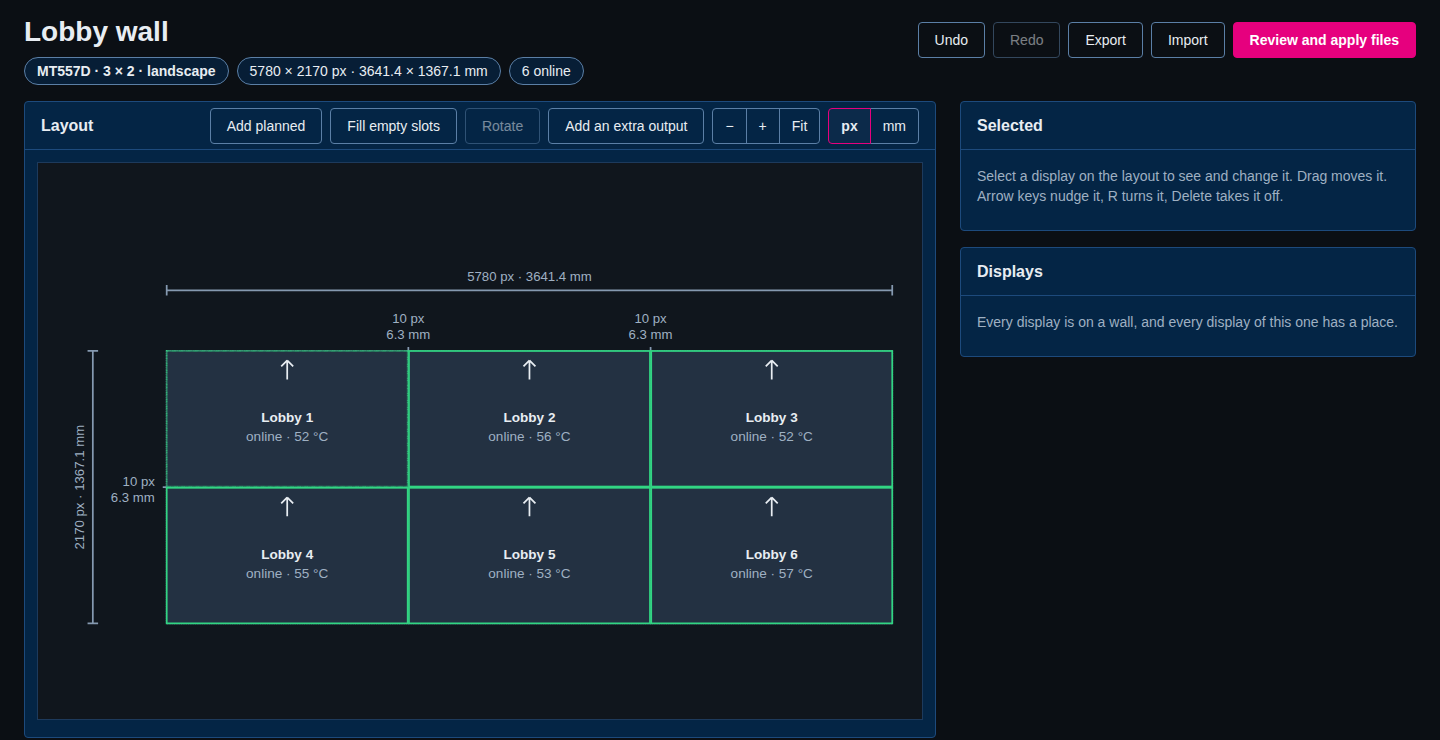
If a display is in the wrong place:
- Drag it to another slot. Dropping it on an occupied slot swaps the two displays. While you drag, a readout says where it would land and what it would swap with. Press Escape to cancel.
- On a narrow screen or a touch screen, tap the display and then tap the slot.
- Select a display and use Rotate, the Rotation buttons in the inspector, or the
Rkey to turn it by 90 degrees. - Delete takes the selected display off the wall. Undo and Redo step through your changes, 50 deep.
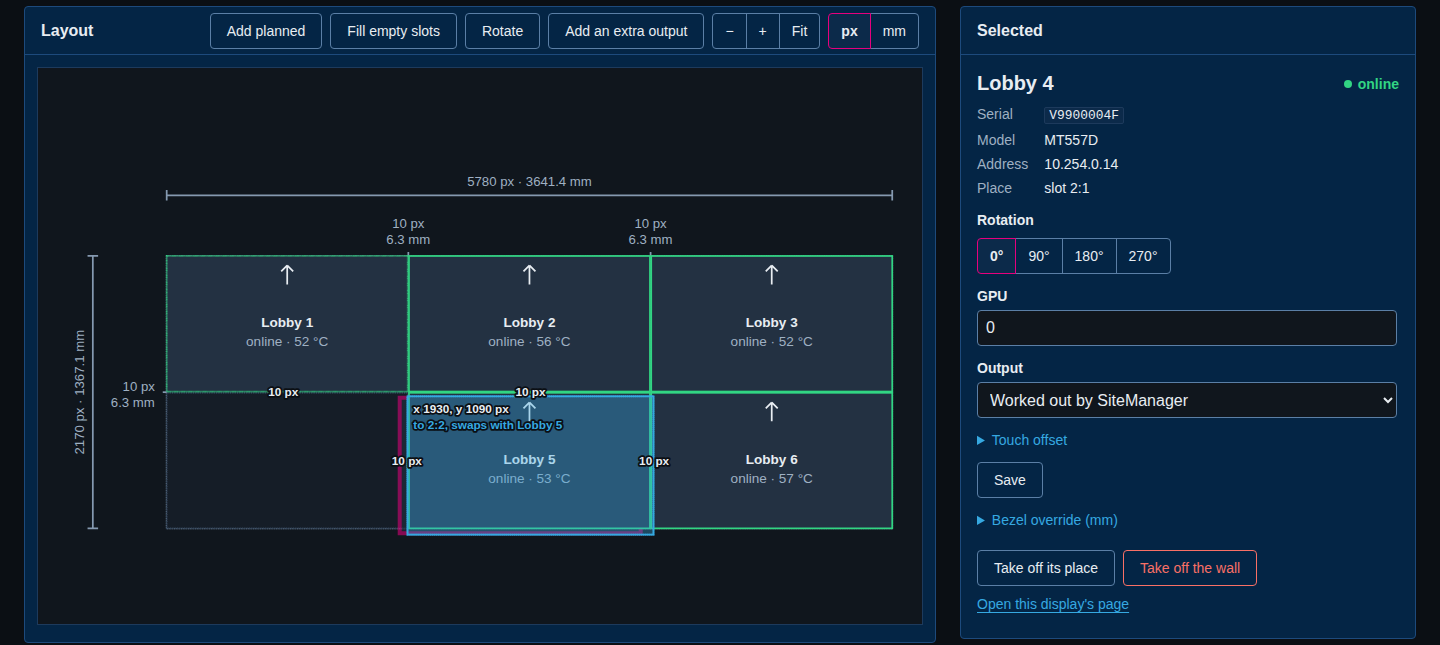
Every change is saved to the site at once. It does not reach the Cornerstone files until step 10.
The inspector holds the settings of one display.
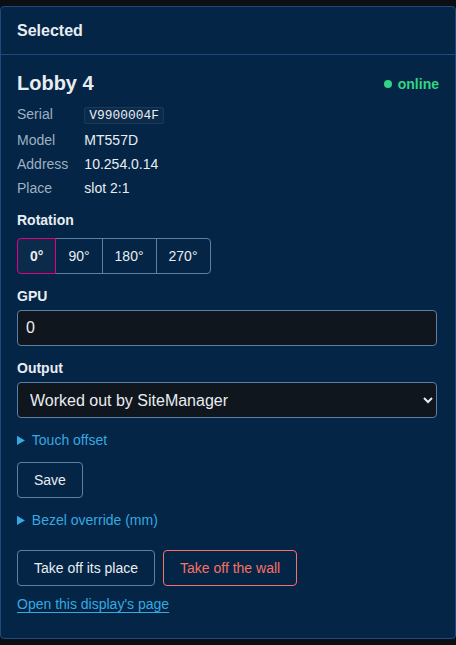
- Rotation: how this display is turned.
- GPU: the render group. Displays on one GPU become one window in
screen.xml. - Output: the name of the video output. Worked out by SiteManager is right for most walls.
- Touch offset and Bezel override (mm): for fine adjustment. Leave them alone until a check shows you need them.
The shortcuts and the Layout settings tab (gaps, bezels, origin) are in The wall designer.
Step 6: add an extra output (optional)
An extra output is a screen beside the wall that is not one of its grid displays. It can be a MultiTaction display that is on no wall, or a screen SiteManager does not manage, such as a Teams screen or a table controller. It never takes a slot in the grid. See Walls and rooms for what an extra output is for.
Select Add an extra output in the toolbar. The form opens in the inspector.
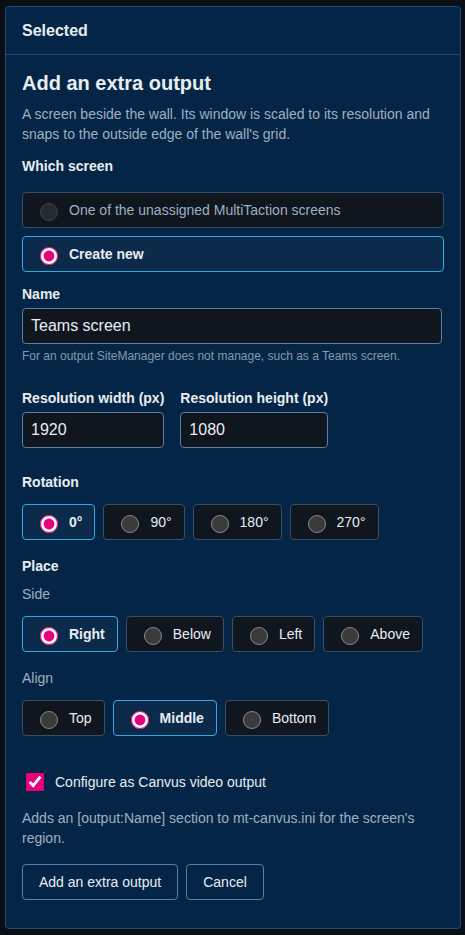
- Under Which screen, choose One of the unassigned MultiTaction screens (greyed out when every MultiTaction display is on a wall) or Create new. For a screen SiteManager does not manage, choose Create new, then give it a Name (
Teams screen) and a resolution in pixels (1920 by 1080). - Choose its Rotation.
- Under Place, choose a Side of the grid (Right, Below, Left or Above) and how it lines up under Align.
- Tick Configure as Canvus video output if Canvus should stream to this screen. SiteManager then writes an
[output:Name]section intomt-canvus.ini. - Select Add an extra output.
The extra output snaps to the edge of the grid. The line above the layout says where it landed, for example Placed: Right of the wall · aligned middle · gap 0 px.
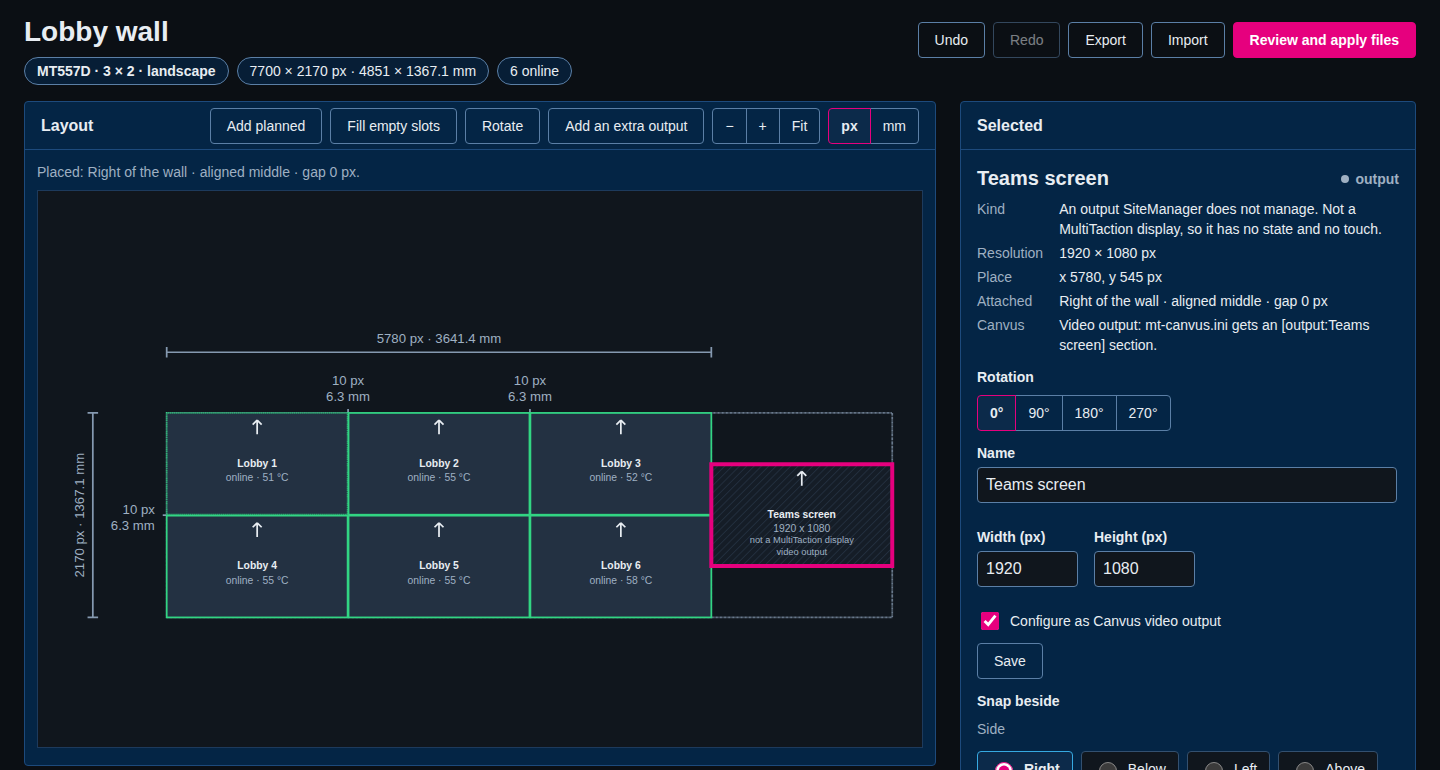
Note that the wall is now wider: the size chip reads 7700 × 2170 px, because the wall's window grows to cover the extra output. SiteManager does not set the operating system's screen layout. Make sure the Teams screen really sits to the right of the wall in Windows or X. The rules for snapping, gaps and undo are in Extra outputs beside a wall.
Step 7: check the overview card
Open Overview. The wall has a card with the grid, the model, the size in pixels and the firmware version, and a tile for each display.
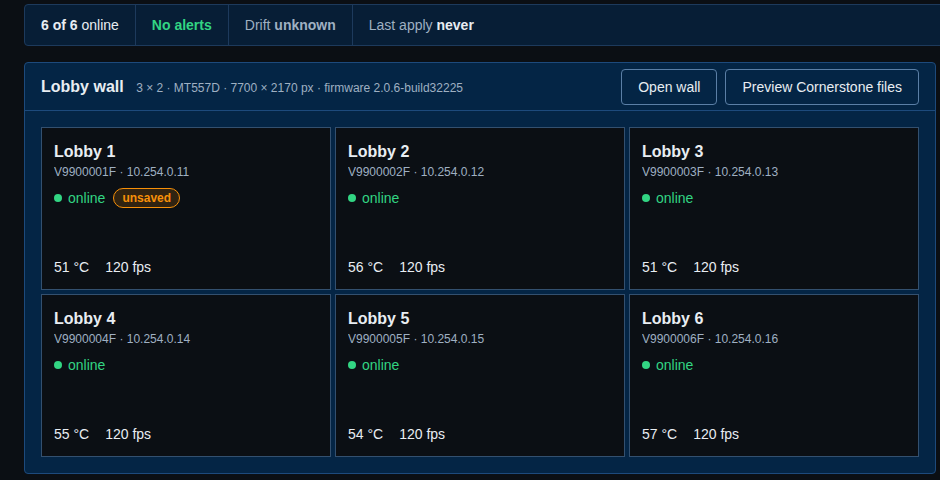
The size on the card is the same as on the wall page: it includes the gaps and the extra outputs. If a tile is not online, fix that first (see Troubleshooting). Two buttons on the card open the wall (Open wall) and the Cornerstone files (Preview Cornerstone files).
Note
In the screenshot, Lobby 1 carries an unsaved badge. That means settings were applied to that display and not saved on it yet, a state of the displays and unrelated to the wall. See Displays.
Step 8: look at the files before you write them
Two tabs under the wall layout show what SiteManager will write. Neither touches the disk.
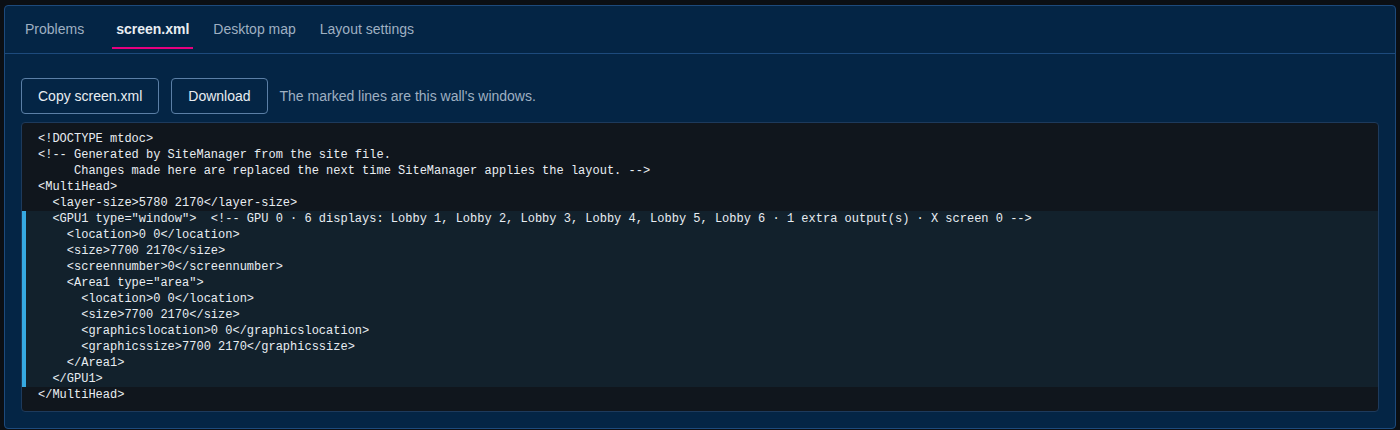
screen.xml shows the file generated from the site as it is now, with this wall's window marked. Copy screen.xml and Download are on the tab.
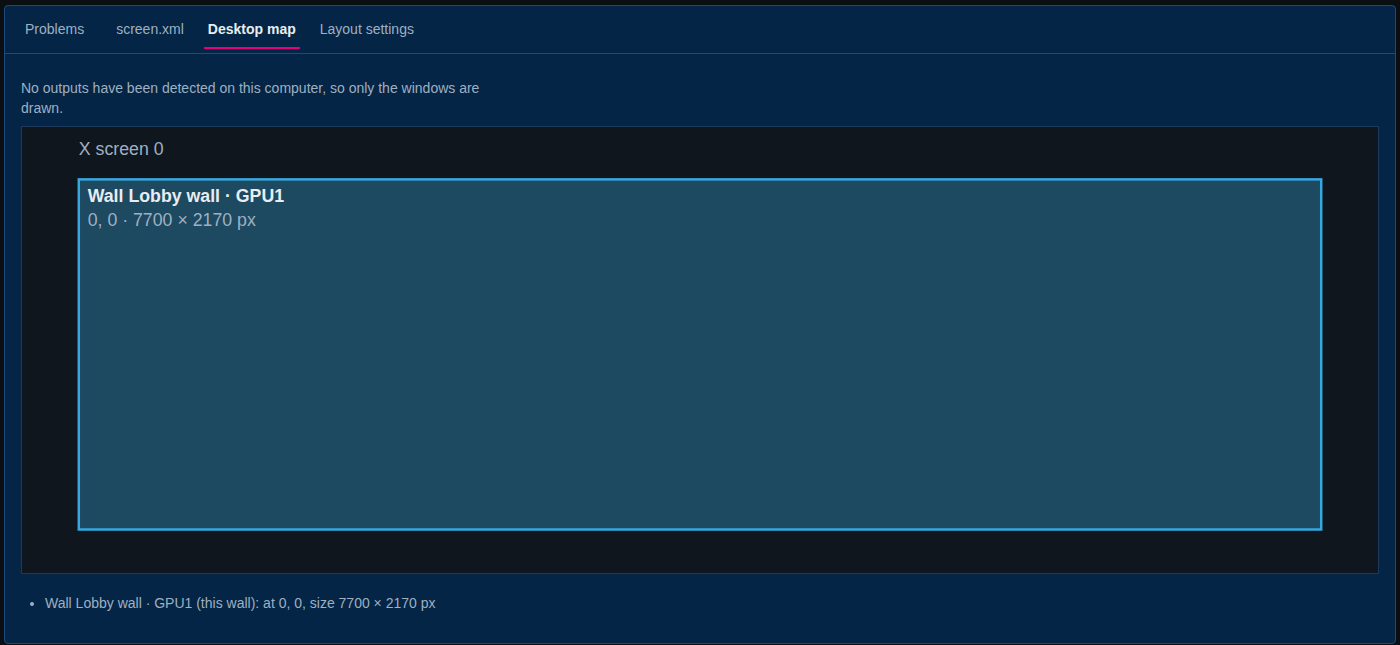
Desktop map draws the windows on the desktop, by X screen and GPU, and names each one by what it renders (Wall Lobby wall · GPU1). If two windows cover each other on one X screen, the tab says so in words. Where the service found outputs on this computer, the map draws them too. Here there are none, so only the window is drawn.
The Problems tab lists anything wrong. A critical problem blocks writing the files. A warning does not. When the tab says No problems found in this wall, go on.
Step 9: preview the Cornerstone files
Select Review and apply files at the top of the wall page. This opens Cornerstone files (you can also open it from the menu).
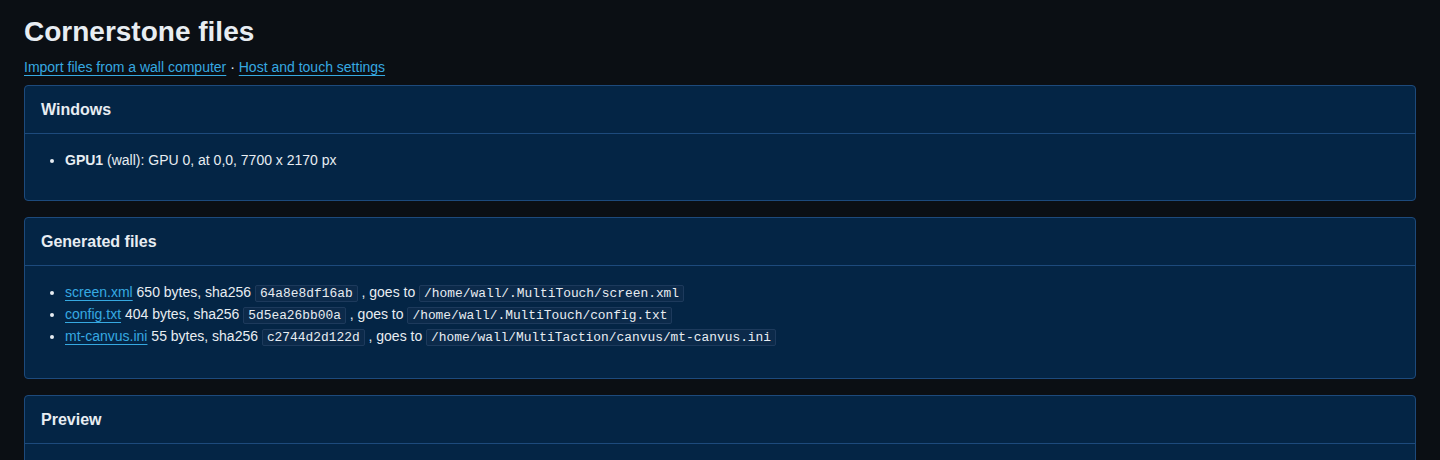
Windows lists the windows screen.xml will define. Generated files lists screen.xml, config.txt and mt-canvus.ini, with their sizes and the path each one will be written to on this computer. Under Preview, each file is compared with the file that is on disk now. Green lines are added, red lines are removed. A file that does not exist yet is marked new file.
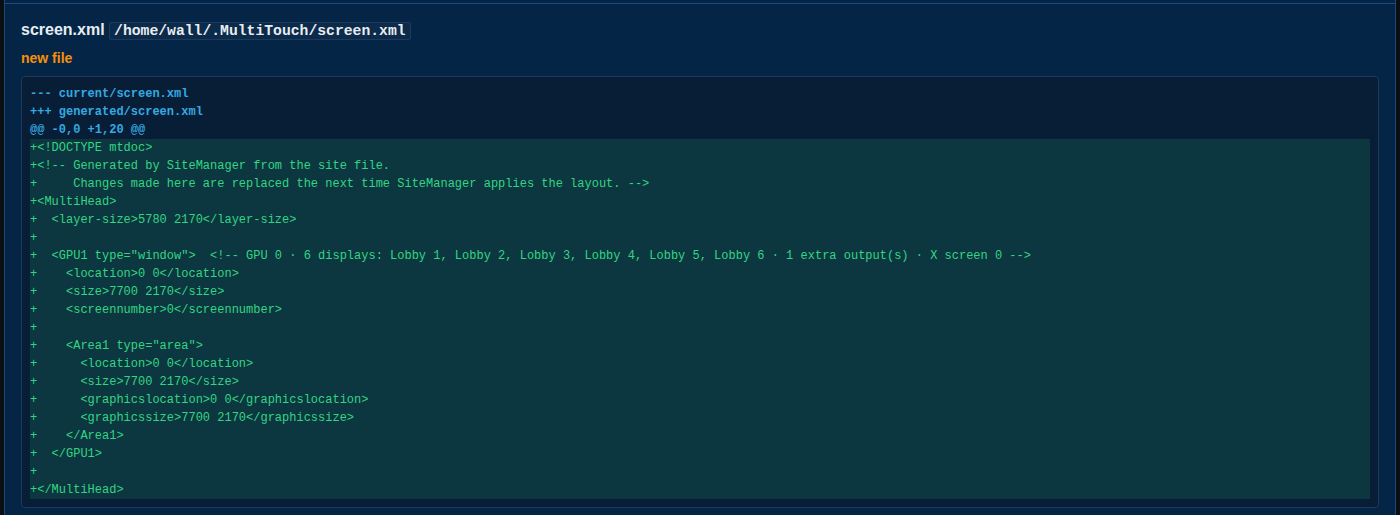
If the paths are not where Canvus or Showcase reads its files, stop here. The service writes where --screen-xml, --config-txt and --canvus-ini point, or to the default folder of the user it runs for. See Write the Cornerstone files.
Step 10: apply the files
The last file in the preview is mt-canvus.ini. SiteManager only edits its [output:...] sections, here the Teams screen. It never creates the file: it must exist already, and the rest of it stays as it was.
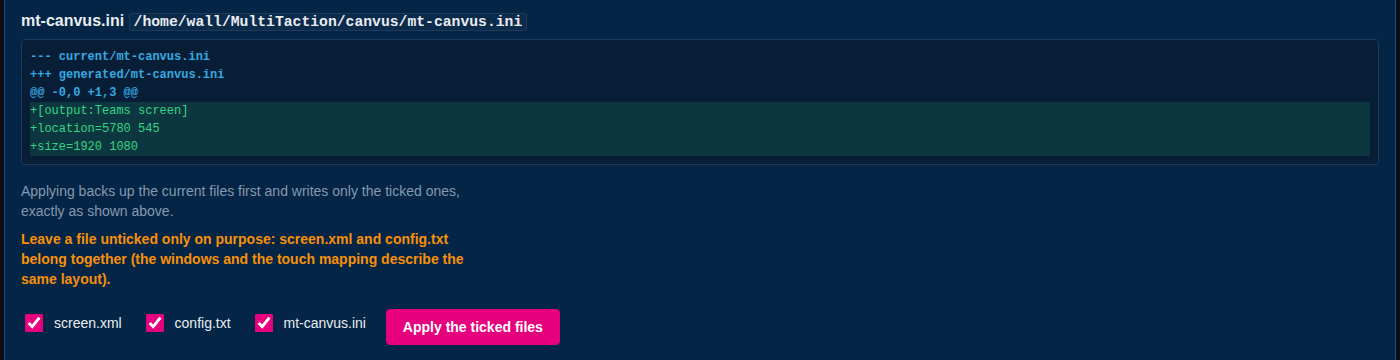
- Leave all three files ticked.
screen.xmlandconfig.txtbelong together: the windows and the touch mapping describe the same layout. - Select Apply the ticked files.
SiteManager first makes a backup of the files it is about to replace, then writes exactly what the preview showed. A green panel confirms it.
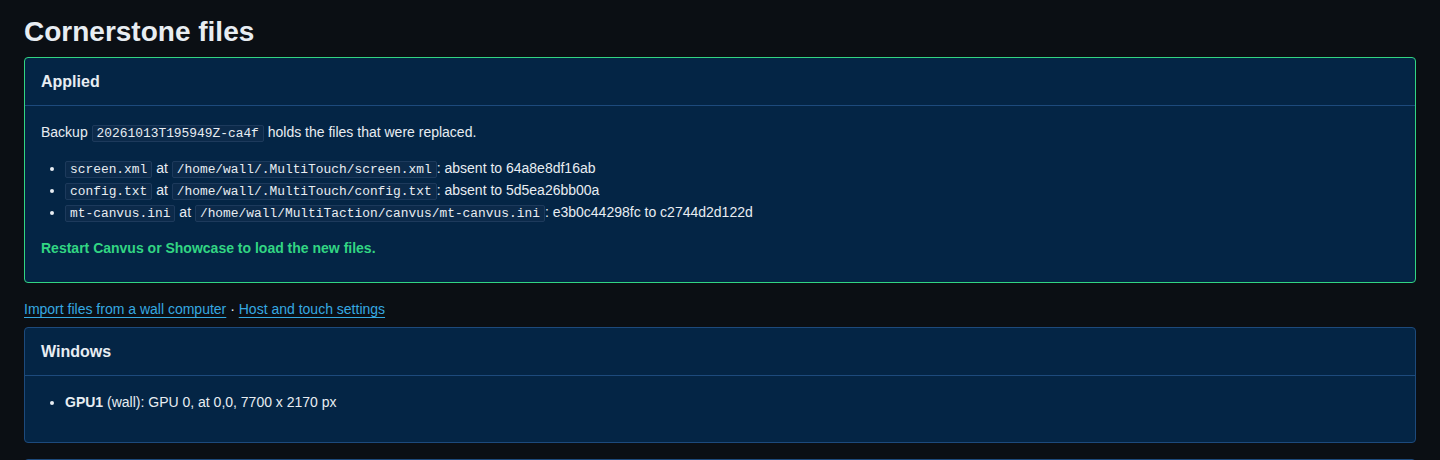
Read it:
- Backup
20261013T195949Z-ca4fholds the files that were replaced. A file that did not exist before (herescreen.xmlandconfig.txt) showsabsentand has nothing to back up.mt-canvus.iniexisted, so its old content is in the backup. - For each file it shows the path and a short fingerprint before and after.
- Restart Canvus or Showcase to load the new files. SiteManager never restarts them for you.
If writing one file fails, the files already written are put back. If a file changed on disk after you opened the page, nothing is written and you preview again.
Where the backups are, and how to go back
Backups are kept next to the state, in config-backups inside the state directory (see sitemanagerd reference). Each backup has its own folder with a manifest.json and a copy of every file that existed. SiteManager keeps the 50 newest. The Backups panel at the bottom of the Cornerstone files page lists them with who made each one and when.
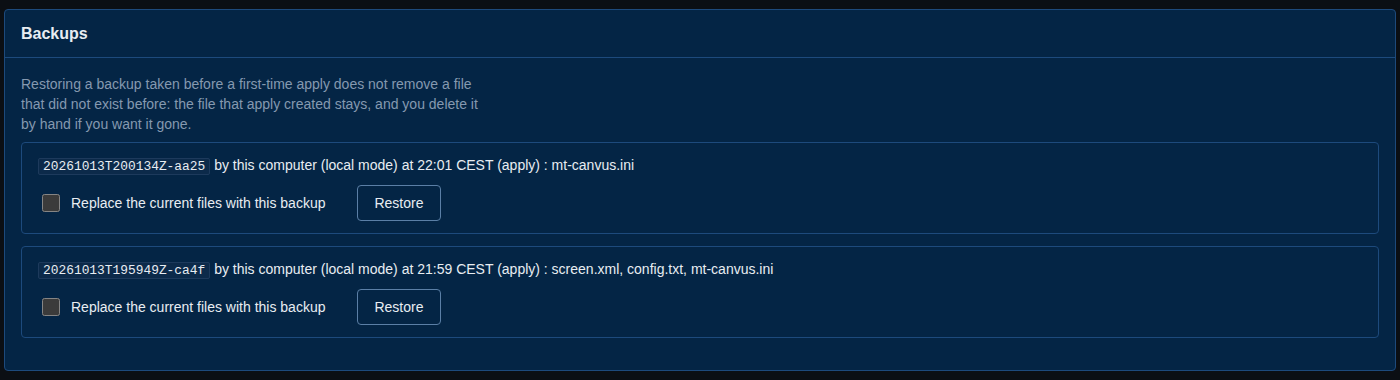
To roll back:
- Find the backup from before the change you want to undo.
- Tick Replace the current files with this backup.
- Select Restore.
SiteManager backs up the current files first, so a restore can be undone with another restore. The page then shows Restored backup and the same restart reminder.

A restore puts back the files that were in the backup. It does not delete a file that did not exist then. If you restore the backup from before your very first apply, screen.xml and config.txt stay, and you delete them yourself if you want them gone.
Step 11: check touch before anyone starts Canvus
The touch preview shows whether touch input lands on the right display. It only reads.
- On the wall page, or at the bottom of the Cornerstone files page, choose how long to Watch for (1, 2, 5 or 10 minutes).
- Select Preview touch.
- Touch a display. Its tile lights up on the layout.
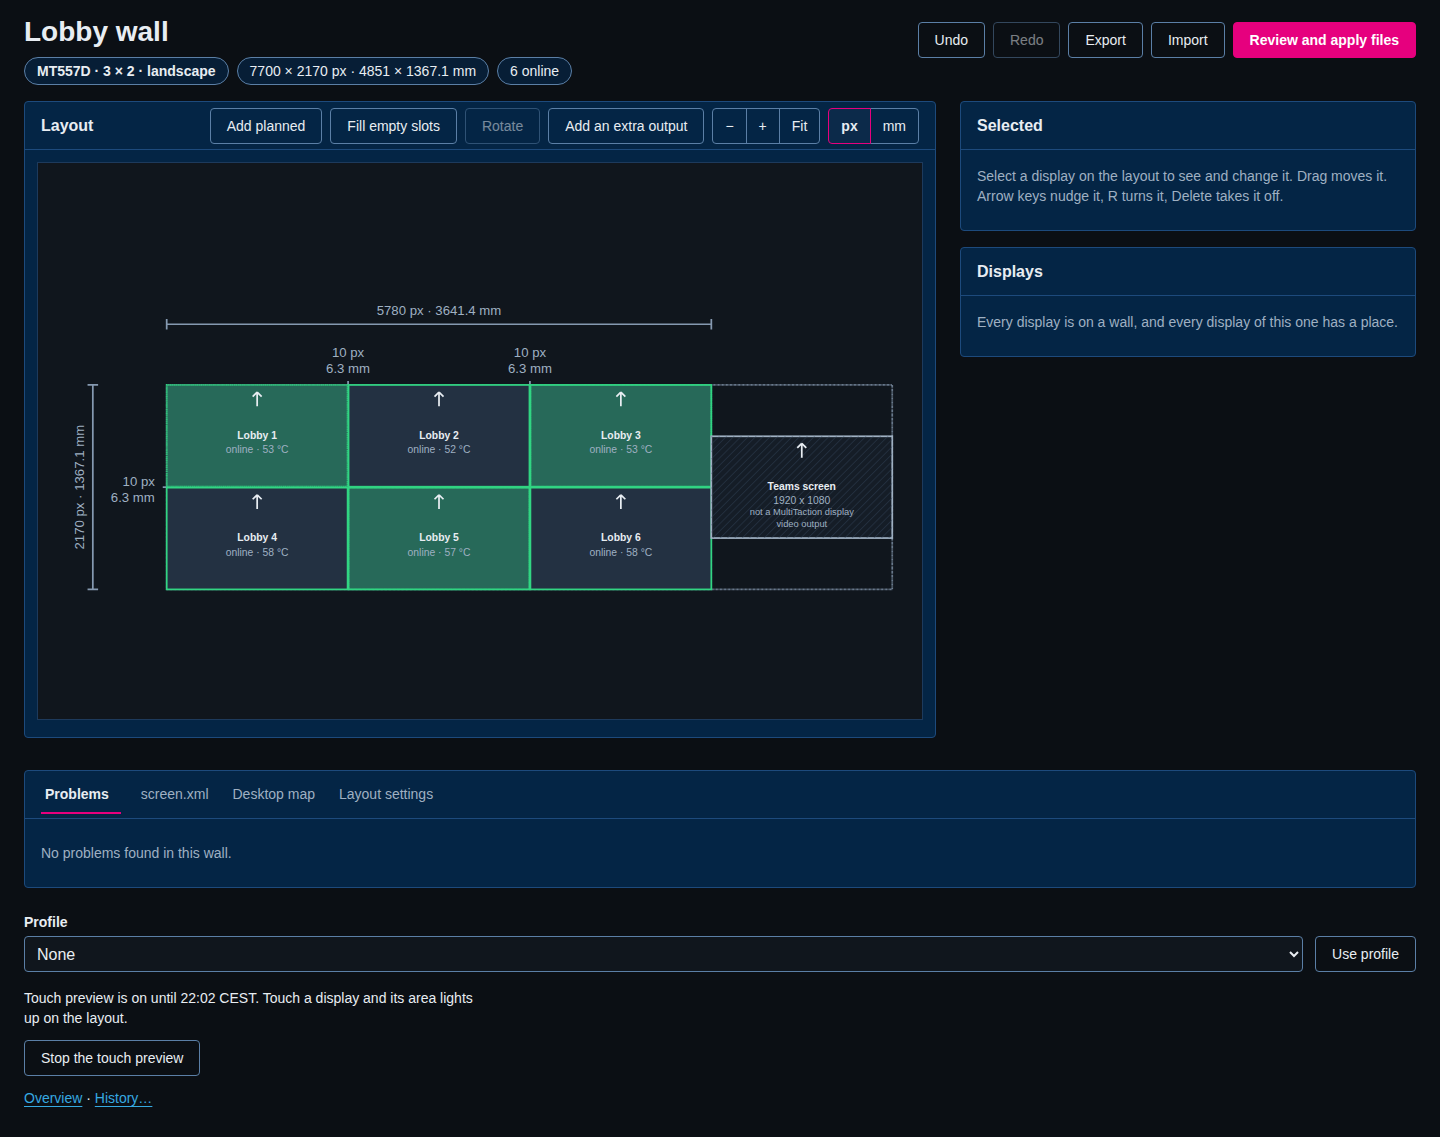
Touch each display in turn. If the wrong tile lights up, a display is in the wrong slot or its touch mapping is wrong. Check the slot first. If the displays are in the right slots, the Touch offset in the inspector adjusts the mapping of one display. Apply the files again and test again. Select Stop the touch preview when you are done, or wait for the time to run out. Details, and the case where SiteManager asks you to confirm because it would become a second touch client, are in Touch preview.
Step 12: confirm which physical display is which
To check that the slot you see on screen is the display you expect on the wall, use Identify. Open a display page and look at Actions, then Identify.
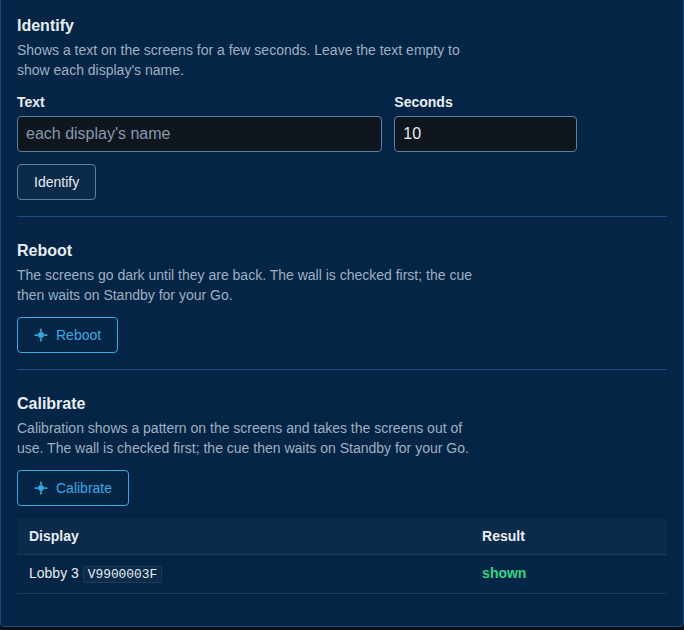
Leave Text empty to show the display's name, or type your own text. Seconds says how long the message stays. Select Identify. The display shows the message, and the Result column says shown. To identify several displays at once, tick them under Select displays and use Reboot, calibrate, identify (see Day to day).
Your wall is now set up. Start Canvus or Showcase, and look at Day to day for what to do next.
Common mistakes
Each message below is the exact text SiteManager shows.
Nothing is placed and there is no room or custom window
Message: nothing is placed and there is no room or custom window, so no screen.xml can be written.
Where it shows: at the top of the Cornerstone files page, in red. Under Generated files the page says Nothing is generated yet: fix the problems above, or place displays and add a room. and Apply is unavailable: the layout has errors; fix them before generating files appears below.
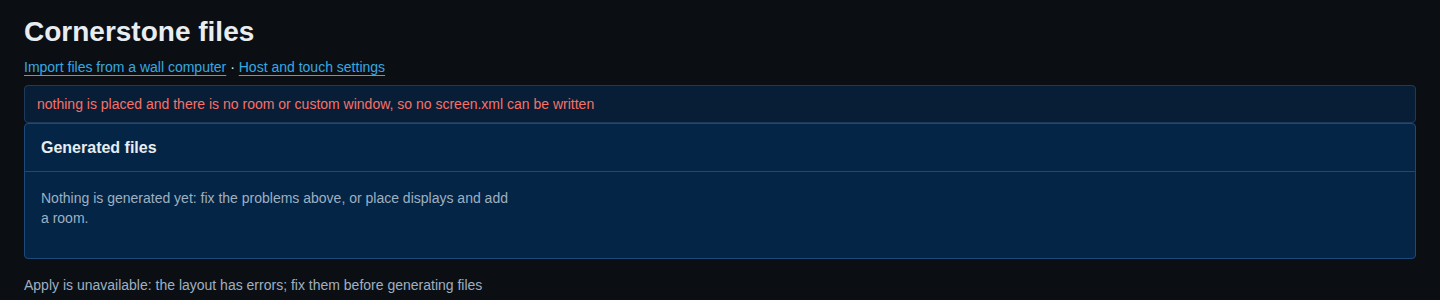
What it means: SiteManager writes a window into screen.xml for each GPU of a wall, and for each room. With no placed display, no room and no custom window, there is nothing to put in the file, so no files are generated at all. It happens on a new site, or after you added displays and did not yet put them on a wall, or took every display off its place.
How to fix it: make a wall (step 3) and place or bind at least one display on it (step 4). A wall with planned displays also counts, as long as it is bound before you apply. If you only work with a room, add the room instead (see Set up a room). A custom window is one SiteManager kept from a screen.xml you imported (see Bring in an existing wall).
Displays overlap on the canvas
Where it shows: on the Problems tab of the wall, as critical, and on the Cornerstone files page in red.
Message: planned display 1:4 and Teams screen overlap on the canvas.

What it means: two things claim the same pixels. It happens, for example, when you widen the grid while an extra output sits beside it: the new slots land under the extra output. In the screenshot the grid grew from three to four columns while the Teams screen sat on the right.
How to fix it: move the extra output. Select it and use Snap beside to choose a side and alignment again, or Place exactly. For two displays in one slot, drag one away. While you drag, SiteManager shows a refusal before you let go. Two overlapping video outputs, or a video output that overlaps something else, read video output <name> overlaps <other> on the canvas. (On the Cornerstone files page a planned display may be named by its internal id, planned:p7, where the wall page says planned 1:4.)
mt-canvus.ini not found
Where it shows: at the top of the Cornerstone files page, in orange.
Message: mt-canvus.ini not found at <path>; the output sections are not written, because creating it would hide the system-wide configuration. Point --canvus-ini at the file Canvus uses.

What it means: SiteManager never creates mt-canvus.ini, because a new file in a user's home could hide the system-wide Canvus configuration. It only edits the [output:...] sections of one that exists. The wall's other files are written as usual. Only extra outputs ticked Configure as Canvus video output are affected.
How to fix it: if you need video outputs, start the service with --canvus-ini pointing at the file Canvus really reads, or create that file as Canvus would. If you have no video outputs, ignore the warning.
A planned display is not bound
Where it shows: on the Problems tab of the wall as a warning: wall lobby-wall: 2 planned display(s) are not bound to a real display yet (planned 1:4, planned 2:4). The same sentence appears on the Cornerstone files page, where it names internal ids.
What it means: some slots still hold a placeholder. The files are generated so you can preview them, but they would carry a placeholder for a display that does not exist, so applying is refused.
How to fix it: bind every planned display (step 4), or select it and Remove planned display to commission part of the wall.
Other messages you may see
- Apply with planned displays still unbound is refused with
2 planned displays are not bound to a real display yet: bind them, or remove them to commission part of the wall(1 planned display is not bound ...for one). - A file changed on disk since you opened the page. The apply is refused with
<file> (<path>): the file changed on disk since it was read. Open the page again to get a fresh preview, then apply. - A target is a symbolic link.
<path> is a link to <real path>; configure the real path instead. SiteManager never writes through a link. Point--screen-xml,--config-txtand--canvus-iniat the real file. - The file is too big.
the file is larger than 4 MiB. - A refused backup restore.
no such backup, orbackup <id>: <file> does not match its recorded hashwhen someone changed a file inside a backup folder by hand. - Every slot is taken. Adding a planned display when the grid is full says
every slot of the grid is taken; make the grid larger in Layout settings. - A video output name that cannot be used.
video output <name> needs a unique name of 1 to 64 letters, digits, dots, colons, underscores, hyphens or inner spaces. - A model unknown to this build.
wall <id>: display model "<model>" is not in this build's catalogue (written by a later version?); it is kept and ignored. - A display with no address.
<serial> has no address yet, so config.txt has no NetBridge block for it; run discovery. Find the display again on Discover. - A wall mixed with another model.
<serial> is a MT556XNB; wall <id> is set up for MT557D.
If a message here is not clear, or you meet one that is not listed, open a case with MultiTaction support and include the diagnostics bundle.
Where next
- Day to day: watching the wall, alerts, profiles and drift.
- Bring in an existing wall: if the wall is already set up and you only want SiteManager to know about it.
- Tips and tricks.
- Walls and Cornerstone files: the full reference.