Video outputs
Canvus can send content from your canvas to an external monitor or projector, or, from Canvus 26.09.4, to a virtual output that streams over the network as an NDI source with no display attached. Any NDI receiver can show it: a vision mixer, a recorder, another Canvus or Showcase wall, or an NDI webcam tool that presents it as a camera to video-meeting software. This feature is useful for reaching audiences who cannot see the screens. For example, you may want to output screen content to a projector so that people sitting at the back of the conference hall, or in a different room, can see your presentation.
Supported output device types
Canvus video output sends a rendered region of the canvas to a physical display connected to the application computer's GPU, or to a virtual output streamed over the network. Supported output devices include:
- External monitors: any monitor connected to a spare GPU output, arranged as an extended desktop alongside the video wall.
- Projectors: connected via HDMI or DisplayPort to a spare GPU output.
- Any display accepted by the OS: Canvus treats the output as a standard desktop region; if the OS recognizes the display, Canvus can send video to it.
- Virtual outputs (NDI): from Canvus 26.09.4, a
virtualwindow inscreen.xmlrenders off-screen and streams over the network as an NDI source. It needs no monitor and no spare GPU output. Define the window with an<output type="ndi-output">element and pinlayer-sizeto your physical displays, as in the off-screen region recipe. Then point the[output:<name>]section inmt-canvus.iniat the virtual window's area, exactly as for a physical output. See Set up a virtual NDI output.
A physical output is configured by adding the display to the desktop (via Nvidia Control Panel on Windows, or xorg.conf on Ubuntu), then declaring its location and size in screen.xml and mt-canvus.ini. See How to set up a video output below for the full procedure.
Note
On Windows, Nvidia Mosaic installations require a separate GPU of the same model for video output, because Mosaic and non-Mosaic displays cannot share a single GPU. On Ubuntu, one additional GPU output is sufficient.
The video output feature is available at three levels. You can stream:
- The entire workspace
- A specific area of the canvas
- An individual widget
Note
The video output feature must be set up in advance before you can use it in Canvus.
Stream entire workspace
The video output menu lets you output the entire workspace. Because a typical Canvus installation has just one workspace, this feature effectively outputs the entire screen area to an external monitor or projector.
To output the entire workspace:
-
Open the video output menu
-
Select the receiving device, typically an external monitor or projector.
-
When the output status widget displays, tap the Show the Viewport output button to transmit a video stream of the entire workspace to this device.
-
To suspend the output:
Press the suspend output button.
Stream a region of the canvas
The video output area is the area of the canvas that you want to stream to an external monitor. To define your video output area:
- Open finger menu.
- Press the toolbox button.
- Press the video output button.
- When the capture frame appears, drag and resize it to cover the canvas area that you want.
- Tap the output button on the capture frame border and choose from the list of available output devices (monitors or projectors).
Note
Canvus continues streaming video from the video output area even if that area of the canvas is no longer visible on-screen, for example, because you have zoomed or moved the canvas to focus on a different area.
Stream the contents of a widget
Most widgets support the video output feature. To stream the contents of an individual widget:
- Press the more button in the sidebar
- In the widget submenu, tap the output button and choose from the list of available output devices (monitors or projectors).
Before an output device appears in these lists, an administrator must set it up. See How to set up a video output.
How to set up a video output in MT Canvus
To set up a video output in Canvus:
- Review your hardware requirements.
- Add the video output your desktop.
- Add the video output space to your screen.xml.
- Define your video output in mt-canvus.ini.
Review your hardware requirements
Ensure you meet the following requirements before proceeding further.
- Windows Per Nvidia support, Nvidia GPUs cannot support both Mosaic displays and non-Mosaic displays on the same GPU. If your video wall employs Nvidia Mosaic to create one seamless desktop, you will need a separate GPU of the same model to add another video output. If you don't use Nvidia Mosaic, then you will only need an additional GPU output.
- Ubuntu You will only need one additional GPU output.
Add the video output to your desktop
- Windows Use the Nvidia Control Panel or the native Windows desktop manager to add the new video output to your desktop. Confirm that the display receives video signal of the Windows Desktop.
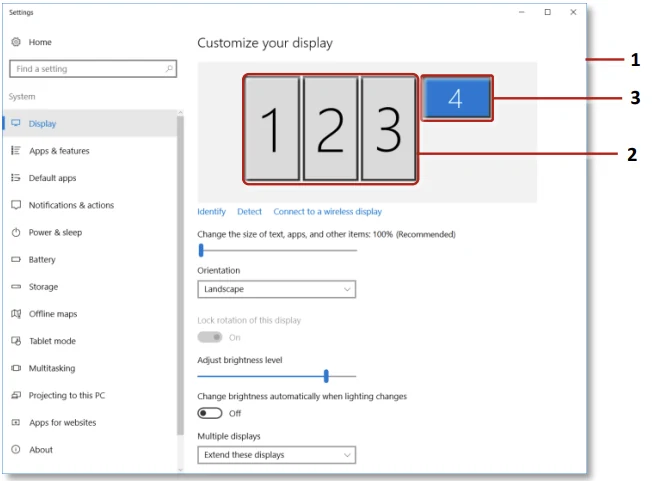
- Ubuntu Edit the file /etc/X11/xorg.conf per the video wall setup guide to add the new video output to your desktop.
Warning
Exercise caution when editing your xorg.conf file as a creating a syntax error could prevent Ubuntu from booting into its display manager. Contact MultiTaction support before making these edits.
Add the video output space to your screen.xml
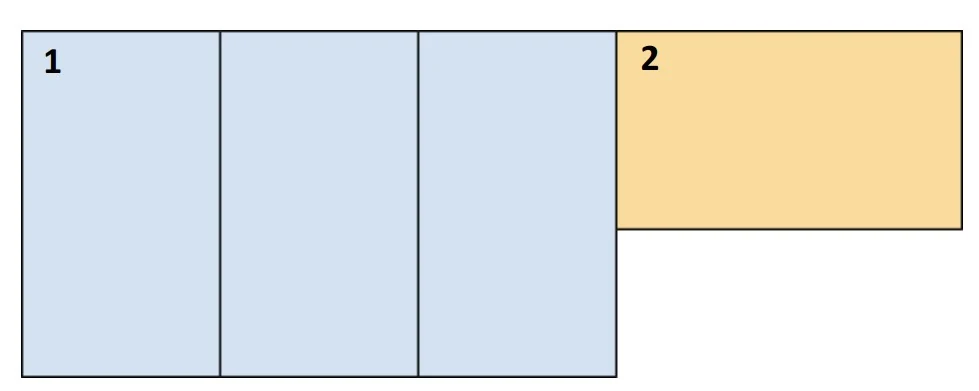
The screen.xml file defines the graphically rendered area for MultiTaction applications. Refer to the video wall setup guide for full details. Below is an example screen.xml for a 3x1 portrait wall of 1920x1080 MultiTaction displays plus a 1920x1080 external video output in landscape for Linux. The Windows setup is nearly identical, as explained below.
<!DOCTYPE mtdoc>
<MultiHead type="">
 <layer-size type="">3260 1920</layer-size>
 <GPU_1 type="window">
 <location type="">0 0</location>
 <size type="">5180 1920</size>
 <Area1 type="area">
 <location type="">0 0</location>
 <size type="">5180 1920</size>
 <graphicslocation type="">0 0</graphicslocation>
 <graphicssize type="">5180 1920</graphicssize>
 </Area1>
 <screennumber>0</screennumber>
</GPU_1>
</MultiHead>
- layer-size The layer-size element defines the main application area excluding the video output. In this case the x value is 1080 for each display + 10 pixels of bezel compensation between each display for a total of 1080+10+1080+10+1080=3260. The x is 1920 for the vertical pixel length of a 1920x1080 display in portrait orientation. If you don't use bezel compensation, when not using Nvidia Mosaic in windows for example, you will not add the 10 extra pixels for each bezel.
- window The window element type defines a single GPU's rendering area. In this case, there is one GPU, so there is one window. In this case, the window size, area size, and graphics size are all the same x value of 3260 in application area plus an extra 1920 added for the External output, and the same y value of 1920.
- screennumber In Linux setups, you must define what X Screen each window is assigned to render on. X Screens are separate screen areas as defined in the xorg.conf file corresponding to individual GPUs. For Windows installations, remove the \<screennumber> element.
Define your video output in mt-canvus.ini
Each video output needs a section in mt-canvus.ini named [output:<name>]. The name is what users see in the video output menu, so choose something they will recognise, such as Projector. Each name must be unique.
| Key | Default | Meaning |
|---|---|---|
location |
0 0 |
Top-left corner of the output area, in pixels, in the same coordinates as screen.xml. |
size |
0 0 |
Width and height of the output area, in pixels. |
For the 3x1 portrait wall in the screen.xml example above, the application area is 3260 px wide (layer-size), and the external monitor occupies the 1920 x 1080 px to its right. The matching output section is:
[output:Video Output]
location=3260 0
size=1920 1080
To add a second output, add another section with its own name, location and size.
Set up a virtual NDI output
From Canvus 26.09.4, a video output can be virtual: Canvus renders it off-screen and streams it over the network as an NDI source. It needs no monitor, no spare GPU output and no change to the desktop, so you can skip the hardware and desktop steps above. Any NDI receiver on the network can show the stream, for example a vision mixer, a recorder, another wall, or an NDI webcam tool that presents it as a camera to video-meeting software.
This example uses the same 3x1 portrait wall as above, with a 1920 x 1080 virtual output in place of the external monitor.
-
In
screen.xml, keep the wall's window at the size of the wall only, and add a second window withvirtualset to 1 and anndi-output. Place its area to the right of the wall, and keeplayer-sizeat the wall's size so the interactive area does not grow:<!DOCTYPE mtdoc> <MultiHead type=""> <layer-size type="">3260 1920</layer-size> <GPU_1 type="window"> <location type="">0 0</location> <size type="">3260 1920</size> <Area1 type="area"> <location type="">0 0</location> <size type="">3260 1920</size> <graphicslocation type="">0 0</graphicslocation> <graphicssize type="">3260 1920</graphicssize> </Area1> <screennumber>0</screennumber> </GPU_1> <NDI_1 type="window"> <virtual type="">1</virtual> <size type="">1920 1080</size> <Area1 type="area"> <location type="">0 0</location> <size type="">1920 1080</size> <graphicslocation type="">3260 0</graphicslocation> <graphicssize type="">1920 1080</graphicssize> </Area1> <output type="ndi-output"> <source-name type="">Canvus Output</source-name> <framerate type="">30</framerate> </output> </NDI_1> </MultiHead>On Windows, remove the
<screennumber>element, as for a physical output. The virtual window ignoreslocation,screennumberand the other on-screen settings. -
In
mt-canvus.ini, point an output section at the virtual window's area, exactly as for a physical output:[output:NDI Output] location=3260 0 size=1920 1080 -
Restart Canvus. NDI Output appears in the video output menus. Stream the workspace, a canvas area or a widget to it as described at the top of this page.
Receivers list the source as MACHINENAME (Canvus Output), where MACHINENAME is the name of the application computer.
Things to know:
- NDI runtime. The NDI runtime ships with Canvus. Nothing else needs to be installed on the application computer.
- Discovery on Ubuntu.
avahi-daemonmust be running for receivers to find the source on the network. - Frame rate.
frameratecaps how many frames per second are sent. It never slows down the wall.0sends every rendered frame. - Audio. The stream carries the application's full audio mix unless you add
<audio type="">0</audio>to the<output>element. - Several outputs. Add one virtual window and one
[output:<name>]section per stream, each with its own area, source name and output name.
See Output parameters for every <output> setting, and the virtual window parameter for what a virtual window ignores.
Restart Canvus after editing mt-canvus.ini. The output then appears in the video output menu, in the list on a video output area, and in the output list of each widget. See the configuration file reference for where mt-canvus.ini is and how to edit it.