Install Launcher
Install on Ubuntu application computers
If you installed the MultiTaction base image, Launcher is installed automatically on the application computer. You now need to configure MT Launcher; skip this chapter and continue directly to section 3.
If you did not install the base image, you can manually install Launcher from an installation package or by using the apt utility. These tasks are described below.
Install from an installation package
Skip this task if you installed the MultiTaction base image. To install MT Launcher from an installation package:
- Browse to launcher-downloads on the application computer.
- Download the Launcher installer onto the application computer. The installer filename is similar to this example: mt-launcher_26.09.0-build123_amd64.deb
- Run this command to install the package:
sudo apt install ./<installer>
Where \<installer> is the file you downloaded in the previous step. For example:
sudo apt install ./mt-launcher_26.09.0-build123_amd64.deb
Install with apt rather than dpkg so that apt resolves the package's dependencies for you.
Install using the apt command
Skip this task if you installed the MultiTaction base image.
This section describes how to install Launcher from the MultiTaction apt repository, using Ubuntu's apt command line utility.
-
Right-click the desktop on the application computer and launch a terminal emulator.
-
Run the following command to download the MultiTaction repository signing key:
sudo curl -fsSL https://apt.multitaction.com/keyring -o /usr/share/keyrings/apt-multitaction.gpg -
Run the following command to add the MultiTaction repository:
echo "deb [signed-by=/usr/share/keyrings/apt-multitaction.gpg] https://apt.multitaction.com noble-stable main" | sudo tee /etc/apt/sources.list.d/mt-noble.list -
Run the following command to set appropriate read permissions for the repository list file:
sudo chmod 644 /etc/apt/sources.list.d/mt-noble.list -
Run this command to update the list of available installation packages:
sudo apt update -
Run this command to install Launcher:
sudo apt install mt-launcher
Autostart on XFCE sessions
On Ubuntu, the package installs a desktop autostart entry scoped to XFCE sessions only (OnlyShowIn=XFCE). If the application computer's desktop session is XFCE, Launcher starts automatically at sign-in; other desktop environments are unaffected and Launcher does not start automatically for them.
Uninstall Launcher on Ubuntu application computers
If you installed Launcher from an installation package or from the apt repository, run:
sudo apt remove mt-launcher
This removes the Launcher application but leaves your configuration and log files (under \~/MultiTaction/launcher) in place.
Install on Windows application computers
To install Launcher:
-
Browse to launcher-downloads on the application computer.
-
Download the Launcher installer onto the application computer. The installer filename is similar to this example: mt-launcher-26.09.0.exe
-
Run the Launcher installer.
-
When the Launcher Setup Wizard launches:
a. Choose the installation folder. b. Step through the wizard screens and click Install.
-
A Launcher shortcut is added to the Windows desktop.
Note
The installer, mt-launcher.exe and the uninstaller are signed by Multitaction Inc., so Windows shows Multitaction Inc. as the verified publisher. To check a file, right-click it, select Properties, and open the Digital Signatures tab.
Uninstall Launcher on Windows application computers
Use either of the following methods:
- Open Settings > Apps > Installed apps (or Control Panel > Programs and Features), select MT Launcher, and click Uninstall.
- Run the uninstaller directly: unins000.exe in the installation folder (by default C:\Program Files\MT Launcher). The installer does not create a Start Menu entry.
Uninstalling removes the application but never removes the default launcher.ini (in %PROGRAMDATA%\MultiTaction\launcher) or any custom configuration you created in %APPDATA%\MultiTaction\launcher, so your configuration survives a reinstall.
Install on macOS application computers
Launcher for macOS requires macOS 13 (Ventura) or later on Apple Silicon (ARM64). No additional software needs to be installed. Launcher is distributed as a .dmg disk image, signed with a MultiTaction Developer ID and notarized by Apple, so it opens without a Gatekeeper override.
To install Launcher:
-
Browse to the macOS downloads page on the application computer.
-
Download the Launcher disk image onto the application computer. The disk image filename has the form mt-launcher-<version>.dmg
-
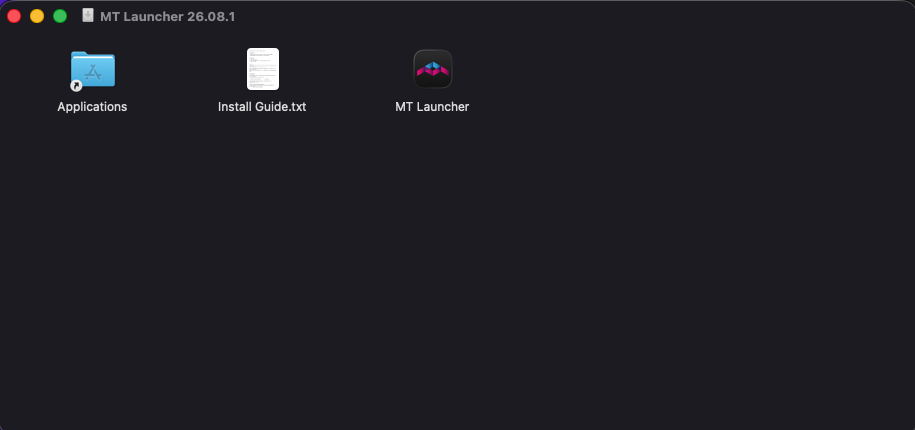
Open the downloaded .dmg file. A window appears containing the MT Launcher application, an Applications shortcut, and Install Guide.txt.
-
Drag MT Launcher onto the Applications shortcut. Launcher is installed to /Applications/MT Launcher.app.
-
Eject the disk image.
Never copy files into the application bundle
Nothing is ever written inside MT Launcher.app. Adding or changing files there breaks the code signature, after which macOS refuses to open the application. Configuration and log files belong in \~/MultiTaction/launcher; see where-is-launcher-ini.
Uninstall Launcher on macOS application computers
Quit Launcher, then drag /Applications/MT Launcher.app to the Trash. Launcher does not write anything else outside your home folder, so this fully removes the application. Your configuration and logs in \~/MultiTaction/launcher are not touched; delete that folder too if you want to remove them.
What you see on the first run
Double-click MT Launcher in the Applications folder. Launcher opens full screen and shows one touch tile per configured product, plus an Exit tile.
Launcher automatically detects installed MultiTaction applications (Canvus, Showcase, SiteManager) and creates a tile for each one, so a new installation typically shows more than just the Exit tile as soon as a product is installed. Auto-detection is on by default; you can disable it with auto-detect-apps in launcher.ini (see edit-launcher-ini). Only if no MultiTaction products are installed, or auto-detection is disabled and no pipelines are configured, does Launcher start with the Exit tile as its only tile. To add tiles for products that are not auto-detected, create a custom launcher.ini and one .pipeline file per product; see configure-mt-launcher.
Note
If nothing appears at all when you open Launcher, check the console log. There is no terminal when an application is launched from Finder, so anything that goes wrong before Launcher opens its own trace file is recorded here:
cat ~/MultiTaction/launcher/logs/mt-launcher-macos.log
Launcher's own trace file is \~/MultiTaction/launcher/logs/launcher-YYYY-MM-DD.log. Each product that Launcher starts writes into its own folder instead, \~/MultiTaction/\<product>/logs.
Control Launcher over its JSON API
Launcher runs a small TCP server that accepts newline-delimited JSON commands, so other software on the same computer can query or drive it. By default the server listens on loopback only, at 127.0.0.1:9399; you can change the address and port, or disable the server entirely, with the address and port settings in the [api] section of launcher.ini (see edit-launcher-ini).
Each request is a single-line JSON object terminated by a newline, containing a command field. Launcher replies with a single-line JSON object, also newline-terminated. Supported commands:
| Command | Purpose |
|---|---|
query-version |
Returns the running Launcher version. |
query-running-pipeline |
Returns the base name of the currently running pipeline, or none. |
query-pipelines |
Returns every available pipeline's base name and whether it is valid. |
start-pipeline |
Starts the pipeline named in the pipeline field. Fails if a pipeline is already running. |
terminate-running-pipeline |
Terminates the currently running pipeline, if any. |
edit-pipeline |
Edits settings (for example the follow-on pipeline) of the pipeline named in the pipeline field. |
For example, to ask Launcher which pipeline is currently running:
echo '{"command":"query-running-pipeline"}' | nc 127.0.0.1 9399
Do not expose the API beyond localhost
The API is intended for local automation and troubleshooting, not as a public network interface. It has no authentication, so anything that can reach the port can control Launcher. Leave it bound to 127.0.0.1 unless you have a specific reason to expose it more widely.
Next step
Launcher runs out of the box once installed. To customize tiles, pipelines, or behavior, continue to Configure Launcher.