3. Configure Launcher
Launcher is designed to operate out-of-the-box, with minimal configuration. But if you want to customize features or behavior, you can configure Launcher by editing custom versions of the main configuration file, launcher.ini, and the configuration file s for individual product pipelines (see What is a pipeline?).
3.1. Default and custom versions of the configuration files
Launcher supports default and custom versions of launcher.ini and pipeline configuration files. If you want to configure Launcher, you must create and edit custom versions of these files . (For the location of these files, see section 3.1.2 and section 3.1.3 .)
Default versions of these configuration files are installed with MT Launcher into a system folder. If you upgrade or reinstall Launcher, the default versions are overwritten.
If Launcher cannot detect any custom versions (see below), it uses settings in the default versions. If it does detect a custom version, it only uses the custom version and disregards the default version.
Warning
Do not edit these default versions!
Custom versions of these configuration files override the default versions. To create a custom version, copy the default version into your user folder. Then edit the new custom version. Settings in custom versions are retained, even if you upgrade or reinstall Launcher. Custom versions are also user-specific.
When you configure Launcher, you must always edit the custom versions!
Note
custom versions of launcher.ini and pipeline configuration files always take precedence. If Launcher cannot detect a custom version in your user folder, it will instead use the default version in the system folder.
3.1.1. Must a custom configuration file contain all the settings?
Yes. If you create a custom version of launcher.ini, Launcher ignores the default version completely and only refers to settings in the custom version. For this reason, the custom version of launcher.ini must contain all the settings that Launcher needs to operate. The same requirement also applies to pipeline configuration files.
For example, if you only want to customize the timeout setting, you must still include the full range of settings in your custom launcher.ini.
If you omit the other settings, Launcher will revert to using hard-coded default values for any missing settings.
3.1.2. Where is launcher.ini?
The main configuration file for Launcher is launcher.ini.
Ubuntu application computers
Default version: Find the default launcher.ini in this system folder: /etc/MultiTaction/launcher
Custom version: To create a custom launcher.ini, copy the default version to: ~/MultiTaction/launcher
Where ~ refers to the home folder of the runtime user. If the user logged on while Launcher runs is 'multi', the expanded path is: /home/multi/MultiTaction/launcher
You do not need to modify the file permissions when you copy the default launcher.ini . The default launcher.ini has a 644 permission.
Windows application computers
Default version: Find the default launcher.ini in this system folder: %PROGRAMDATA%\MultiTaction\launcher The expanded path is C:\Program Data\MultiTaction\launcher.
Custom version: To create a custom launcher.ini, copy the default version to: %APPDATA%MultiTactionlauncher
Where %APPDATA% refers to the runtime user’s profile. If the user logged on while Launcher runs is multi, the expanded path is: C:\Users\multi\AppData\Roaming\MultiTaction\launcher
You do not need to modify the file permissions when you copy the default version of launcher.ini.
3.1.3. Where are the pipeline configuration files?
Launcher uses pipeline configuration files to configure the launch of individual programs.
Ubuntu application computers
Default version: Find the default pipeline configuration file in this system folder: /etc/MultiTaction/launcher/apps
Custom version: To create custom versions of pipeline configuration files, copy the default versions into: ~/MultiTaction/launcher/apps Where ~ refers to the home folder of the runtime user.
If the user logged on while Launcher runs is 'multi', the expanded path is: /home/multi/MultiTaction/launcher/apps You do not need to modify the file permissions when you copy the default pipeline configuration files. The default pipeline configuration files have a 644 permission.
Windows computers
Default version: Find the default pipeline configuration file in this system folder: %PROGRAMDATA%\MultiTaction\launcher\apps The expanded path is C:\Program Data\MultiTaction\launcher\apps.
Custom version: To create custom versions of pipeline configuration files, copy the default versions into your user folder: %APPDATA%\MultiTaction\launcher\apps Where %APPDATA% refers to the runtime user’s profile.
If the user logged on while Launcher runs is multi, the expanded path is: C:\UsersmultiAppData\Roaming\MultiTaction\launcher You do not need to modify the file permissions when you copy the default pipeline configuration files.
3.2. Edit the custom version of launcher.ini
Launcher is designed to operate out-of-the-box, with minimal configuration. But if you want to configure Launcher operations, you must edit a custom version of launcher.ini.
3.2.1. Edit Launcher's general settings
Follow these steps:
Edit your custom version of launcher .ini; see Where is launcher.ini?.
Edit the following settings in the [ui] section:
[ui]
show-version=<true or false>
allow-exit=<true or false>
show-invalid-tiles=<true or false>
location=<x y>
width=<n>
expected-launch-duration=<n>
See below for settings descriptions.
After editing launcher.ini, restart Launcher for the changes to take effect; see Start or exit Launcher.
Where:
show-version specifies that Launcher displays its version number. By default, this setting is true.
allow-exit determines whether Launcher includes an Exit tile (see the picture Launcher menu. This example shows tiles for (1) Canvus, (2) MT Showcase and (3) Exit tile. If a product is configured to launch automatically when Launcher starts, a countdown timer (4) shows how long before the product launches.). This tile is for administrators and allows them to exit Launcher and access the OS desktop. By default, this setting is true.
If you want to disable the Exit tile to prevent end-users exiting to the desktop from Launcher, set the setting to false.
Note
If you installed Launcher as part of the MultiTaction base image, the Exit tile is disabled by default.
Whether the Exit tile is enabled or disabled, a keyboard shortcut is always available for administrators to exit Launcher; see Start or exit Launcher.
show-invalid-tiles specifies whether to show product tiles for invalid pipelines. By default, this setting is false.
In practice, you rarely need to edit this setting. For example, you may temporarily set the setting to true if instructed to do so by MultiTaction support staff or if you are developing and testing a new Launcher pipeline.
Note
An invalid pipeline refers to a product that still has a pipeline configuration file but which failed one or more validation tests. For example, a pipeline can be invalid if Launcher cannot find a valid executable file or if the specified working directory does not exist. Such conditions can apply to older, superseded versions of a product following an upgrade.
location specifies the location of the center point of the Launcher menu on the screen. Use this setting to relocate menu. For example, you may want to avoid a Cell bezel or, on a larger video wall, make the tiles easier to reach by moving Launcher lower down the screen.
<x y> are the horizontal and vertical coordinates of the menu’s center point. You can specify coordinates as percentages of the screen width and height, or in pixels, centimeters or inches. If you o mit the units, the values default to pixels. By default, the location is 50% 50%, locating MT Launcher in the center of the screen.
For example, to display Launcher in the lower left corner of the MultiTaction Meeting Room screen (comprising three Cells in portrait mode), you can specify any of the following:
location=16% 84%
location=540 1600
location=540px 1600px
location=34cm 100cm
location=13in 39in
Note
All measurements are from the top-left corner of the screen.

Example Launcher menu (1) in lower left corner of MultiTaction Meeting Room screen (2).
width specifies the width of the Launcher menu on the desktop, where <n> specifies a value in pixels, centimeters or inches. To specify the unit, add px, cm or in respectively. If you omit the units, the value defaults to pixels. By default, the width is 1000px, wide enough for 3 columns of product tiles.
For example, to restrict the Launcher width to 2 columns of tiles, you can specify any of the following:
width=600
width=600px
width=40cm
width=16in
Note
All measurements are from the top-left corner of the screen.
expected-launch-duration defines the launch period. This is the amount of time, in seconds, that your products need to successfully start up.
During a product 's launch period, all further user interaction is suspended, a "Running..." advisory displays above the tile, and the MT Launcher background animation continues to run. When the launch period ends, background animation freezes to minimize CPU usage.
The launch period applies to all product tiles and defaults to 3 seconds. You will never need to set a shorter launch period, but you may need to set a longer launch period if some products take significantly longer than 3 seconds to launch:
If you were to set a very short launch period (for example, zero seconds), the background animation would not cause high CPU usage but MT Launcher would appear to freeze before the product starts up. Users might find this distracting.
If you set a launch period that is longer than your products need (for example, 30 seconds), the background animation will continue to run after products start up, causing high CPU usage even though Launcher is not visible on-screen. This may affect product performance in the first few seconds. (The background animation will stop and CPU usage will return to normal when the launch period ends.)
Note
In previous versions of Launcher before this setting was available, when a user tapped a tile, there was no "Running..." advisory and the background animation froze immediately. If the product was slow to launch, users sometimes believed (incorrectly) that Launcher had crashed.
3.2.2. Specify how often log files are compressed
You can specify a maximum age for uncompressed log files. When Launcher starts, any log files older than this maximum age are compressed to .gz files.
Follow these steps:
Edit your custom version of launcher.ini; see Where is launcher.ini?.
Edit the log file compression setting in the [log] section:
[logs]
rotate-period=86400
Where rotate-period specifies the maximum age of uncompressed log files, in seconds. The default is 86,400 (equivalent to 24 hours).
After editing launcher.ini, restart Launcher for the changes to take effect; see Start or exit Launcher.
For details about where Launcher log files are saved, see Launcher log files.
3.2.3. Specify which product starts automatically
You can choose one of the available product tiles to launch automatically when Launcher starts. You can also set a delay before the tile starts.
Follow these steps:
Edit your custom version of launcher.ini; see Where is launcher.ini?.
Edit the following settings in the [autostart] section:
[autostart]
tile=<pipeline configuration>
timeout=<n>
Where
tile identifies the product tile that starts automatically. Set tile to the base name of the product’s pipeline configuration file (that is, the file name minus the .ini extension). For example, if the product's pipeline configuration file is mt-canvus-2.0.0.ini, set tile to:
tile=mt-canvus-2.0.0
If you do not want any product tile to start automatically, define this setting as empty:
tile=
Note
Only one product can start automatically! The tile setting must only specify a single product. It cannot specify a comma-separated list of products.
timeout specifies a delay, in seconds, before the specified product starts automatically. A countdown timer in Launcher shows how long before the product starts (see item 4 in figure Launcher menu. This example shows tiles for (1) Canvus, (2) MT Showcase and (3) Exit tile. If a product is configured to launch automatically when Launcher starts, a countdown timer (4) shows how long before the product launches.).
The default delay is 60 seconds, but you can set a shorter delay. For example, if you want the product to start 15 seconds after Launcher starts, enter:
timeout=15
If you want the product to start immediately when Launcher starts, either define this setting as empty:
timeout=
or set it to zero:
timeout=0
After editing launcher.ini, restart Launcher for the changes to take effect; see Start or exit Launcher.
Now edit the custom pipeline configuration files; continue to Edit the custom pipeline configuration files.
3.3. Edit the custom pipeline configuration files
Launcher is designed to operate out-of-the-box, with minimal configuration. But if you want to configure the launch of individual programs, you must create and edit a custom version of the relevant pipeline configuration files (Create a custom version of the pipeline configuration file).
You can then:
Configure the product tile in Launcher. You can customize the icon (image file) and the display name in a product tile. See Configure the product tile.
(Optional) Configure a 'follow-on' product to launch when the current product exits; see Launch a 'follow-on' product when the current product exits.
Configure the pipeline log file. You can specify where pipeline logs are saved and you can set custom log file names. See Configure the product log file.
Edit the process blocks. A process block specifies: which executable to run, the working directory for the process; arguments passed to the executable; and so on. See Edit the process blocks.
3.3.1. Create a custom version of the pipeline configuration file
To create a custom version of a pipeline configuration file, you must copy the default version into the home folder of the runtime user (Ubuntu) or the runtime user’s profile (Windows). For details about these file locations, see Where are the pipeline configuration files?.
Example: The user logged on while Launcher runs is 'multi'. To create a custom pipeline configuration file for Canvus 1.7.0, you therefore need to copy the default version to here:
Ubuntu: /home/multi/MultiTaction/launcher/apps/mt-canvus-1.7.0.ini
Windows: C:\Users\multi\AppData\Roaming\MultiTaction\launcher\mt-canvus-1.7.0.ini
Note
Pipeline configuration files are not the same as the product configuration files! For example, the Canvus configuration file mt-canvus.ini has a completely different purpose to mt-canvus-1.7.0.ini, the pipeline configuration file used by Launcher.
3.3.2. Configure the product tile
You can customize the icon (image file) and the display name in a product tile.
Launcher. Product tile icon (1) and display name (2).
Follow these steps:
Edit the custom pipeline configuration file; see Create a custom version of the pipeline configuration file.
Edit the following settings in the [ui] section:
[ui]
name=<name>
icon=<image file>
Where:
name is the display name of the product as it appears on the product tile in Launcher. For example:
name=Canvus 1.7.0
If you want a tile to have no name (for example, because the tile is identified by a distinctive icon), you can leave this setting empty.
icon specifies the path and image file for the product tile in MT Launcher. We strongly recommend that you specify an absolute path.
Ubuntu example
icon=/opt/mt-canvus-1.7.0/CanvusAssets/Icons/canvus-icon.png
Windows examples
icon=C:/Program Files/MT Canvus/CanvusAssets/Icons/canvus-icon.png
or
icon=C:\\Program Files\\MT Canvus\\CanvusAssets\\Icons\\canvus-icon.png
Note
Windows paths must use / forward slashes or \ \ double backslashes. They cannot use \ single backslashes.
If you do specify a relative path, the path is relative to the MT Launcher working directory.
Restart Launcher for the pipeline changes to take effect; see Start or exit Launcher.
3.3.3. Launch a 'follow-on' product when the current product exits
If required, you can specify a 'follow-on' product to launch automatically when a user exits the current product. For example, you can specify that a MT Showcase app always launches when Canvus exits.
By default, the transition to the next product is immediate, but you can specify a pause (for example, 10 seconds). During this pause, Launcher displays a countdown timer and Cancel button, allowing users to cancel the next product and return to Launcher.
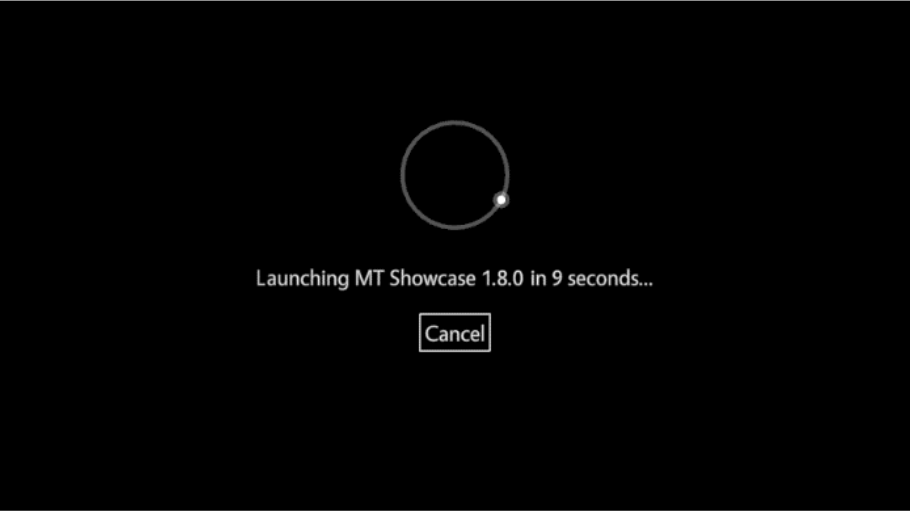
Optional countdown timer and Cancel button for follow-on product.
Follow these steps:
Edit the custom pipeline configuration file; see Create a custom version of the pipeline configuration file.
Edit the following settings in the [follow-on-pipeline] section:
[follow-on-pipeline]
tile=<pipeline configuration>
timeout=<n>
Where
tile identifies the product tile that launches automatically when the current pipeline exits. Set tile to the base name of the product’s pipeline configuration file (that is, the file name minus the .ini extension). For example, if the product’s pipeline configuration file is mt-canvus-2.0.0.ini, set tile to:
tile=mt-canvus-2.0.0
If you do not want any follow-on-product to launch, define it as empty:
tile=
Note
Only one product can start automatically! The tile setting must only specify a single product. It cannot specify a comma-separated list of products.
timeout specifies a n optional pause, in seconds, before launching the next product. The default is zero seconds so the next product launches immediately and users cannot cancel it. If you do specify a pause, a countdow n timer and Cancel button are displayed. For example, if you want the next product to launch after 15 seconds, enter:
timeout=15
Restart Launcher for the pipeline changes to take effect; Start or exit Launcher.
3.3.4. Configure the product log file
Log entries for an individual product are saved to a pipeline log file . Pipeline l og entries are generated each time a MultiTaction product such as MT Canvus o r Showcase runs. You can specify where pipeline logs are saved and you can set custom log file names.
Follow these steps:
Edit the custom pipeline configuration file; see Create a custom version of the pipeline configuration file.
Edit the following settings in the [logs] section:
[logs]
path=<folder>
basename=<name>
Where:
path specifies the folder where pipeline logs are saved. By default, these are saved below the home folder of the runtime user (Ubuntu) or in the runtime user’s profile (Windows). For example, if the user logged on while Launcher runs is multi then logs are saved here:
Ubuntu example
path=/home/multi/MultiTaction/launcher/logs
Windows examples
path=C:/Users/multi/AppData/ Local/MultiTaction/launcher/logs
or
path=C:\\Users\\multi\\AppData\\Local\\MultiTaction\\launcher\\logs
Note
Windows paths must use / forward slashes or \ \ double backslashes. They cannot use \ singe backslashes. For details about default folders for pipeline log files, see Pipeline log files.
basename specifies the base element of the pipeline log file name, where the full name is <basename>-<date>.log.
We recommend that basename matches the product name. For example, if you have a pipeline for Canvus 2.0, use this base element:
basename=mt-canvus-2.0
When the timestamp is added, this will generate log files like this: mt-canvus-2.0-2018-01-22.log
Likewise, if you have set up a pipeline to launch a specific Showcase app (see section XXX), set basename to match the app name:
basename=mt-showcase-1.8-my_app
If basename is undefined, it defaults to match the pipeline configuration file name. For example, if the configuration file is mt-canvus-2.0.0.ini, then the pipeline log files default to mt-canvus-2.0.0-<date>.log.
Restart Launcher for the pipeline changes to take effect; see Start or exit Launcher.
Now edit the process blocks in the custom pipeline configuration file; continue to Edit the process blocks.
3.3.5. Edit the process blocks
If you want to configure the launch of individual programs, you must edit the process blocks in your custom pipeline configuration files. A process block specifies: which executable to run, the working directory for the process; arguments passed to the executable; restart settings; library paths; the process mode; and so on.
Each pipeline confi guration file can include one or more process blocks, each with the settings described below.
Follow these steps:
Edit the custom pipeline configuration file; see Create a custom version of the pipeline configuration file.
Edit the following setting s in the [process] section:
[process-<n>]
exec=<executable>
working-directory=<path>
arguments=<executable arguments>
restart-on-crash=<true or false>
restart-limit=<n>
restart-period=<n>
required=<true or false>
library-paths=<path list>
invalid-config-exit-codes=<exit codes>
mode=<sync, async or daemon>
environment \ <name>=<value>
add-log-timestamp=<true or false>
See below for settings descriptions.
Restart Launcher for the pipeline changes to take effect; see section Start or exit Launcher.
Where:
[process-<n>] identifies a process configuration block and <n> determines the order in which process blocks are executed in the pipeline. For example, a [process-0] block is executed first and a [process-1] block is executed second.
exec specifies the executable to run, plus its path (relative or absolute). Relative paths are relative to the working directory of the process (not the working directory of Launcher). For example:
Example paths on Ubuntu systems
Absolute: exec=/opt/mt-canvus-<ver>/bin/mt-canvus-app
Relative: exec=mt-canvus-app
Example paths on Windows systems
Absolute: exec=C:/program Files/Canvus/bin/mt-canvus-app.exe
Relative: exec=mt-canvus-app.exe
Note
Windows paths must use / forward slashes or \ \ double backslashes. They cannot use \ singe backslashes.
working-directory specifies the working directory for the process. If the exec setting specifies:
An absolute path, then working-directory defaults to the path for the process executable, as specified by exec. If this default working directory is acceptable, you can omit working-directory from the process block (do not set it to empty). Alternatively, you can specify a custom working directory; this will depend on the requirements of the process.
A relative path, then working-directory must be explicitly set. For example, the typical working directory for Canvus is:
Ubuntu systems
working-directory=/home/multi/
Windows systems
working-directory=C:/ Program Files/MT Canvus/bin
Note
Windows paths must use / forward slashes or \ \ double backslashes. They cannot use \ singe backslashes.
arguments specifies any executable argument(s). Use a comma-separated list for multiple arguments. For example, the default arguments for Showcase are:
arguments=--minidump-upload-url, http://diagnostics/multitaction.com/crash-reports/upload-crash-dump, --cef-ignore-gpu-blacklist
You can also use the arguments setting to open a specific Showcase app and include an Exit button in the welcome screen; see Showcase customizations.
restart-on-crash determines whether to restart the process if it crashes. By default, this setting is false.
restart-limit specifies the maximum number of permitted restarts within the restart period (see below) before the process is marked as a failure. By default, 3 restarts are permitted.
restart-period specifies the restart period, in seconds. If the number of restarts during this period exceeds the restart limit (see above), the process is marked as a failure. By default, the restart period is 10 seconds.
required determines whether the process is required by the pipeline. If a required process is marked as a failure (it fails to restart; see above), the entire pipeline is marked as a failure and terminated. By default, this setting is false.
library-paths specifies a comma-separated list of library paths for the process. These will modify the library path for the process. (PATH on Windows systems; LD_LIBRARY_PATH on Linux systems) This setting overwrites any system library path.
invalid-config-exit-codes specifies a comma-separated list of exit codes that are interpreted as invalid configuration settings by the pipeline. The default code for this setting is 100.
mode specifies the process mode . This mode determines how the pipeline handles the process. The following options are available:
sync - The pipeline waits for the process to finish before starting the next process in the pipeline.
async - The pipeline immediately starts the next process without waiting for this process to finish. The pipeline waits for the process to finish before the pipeline terminates.
daemon - The pipeline immediately starts the next process without waiting for this process to finish. All daemon processes are terminated when there are no sync or async processes still running.
The default mode is daemon.
environment\<name>=<value> specifies a set of environment variables for the process as key/value pairs. The syntax is environment\ then key=value assigment. For example:
environment\\USER=multi
add-log-timestamp determines whether Launcher prefixes all lines of output from the process with a timestamp. By default, this setting is false.
3.4. Log files
Launcher generates its own log files and log files for each pipeline (see What is a pipeline?).
3.4.1. Launcher log files
Log entries are generated when Launcher starts, and each time a MultiTaction product such as Canvus or Showcase starts and exits.
Ubuntu application computers: Find the log files here: ~/MultiTaction/launcher/logs Where ~/ refers to the home folder of the runtime user. If the user logged on while Launcher runs is 'multi', the expanded path is: /home/multi/MultiTaction/launcher/logs
Windows application computers: Find the log files here: %LOCALAPPDATA%\MultiTaction\launcher\logs Where %LOCALAPPDATA% refers to the runtime user’s profile. If the user logged on while Launcher runs is multi, the expanded path is: C:\Users\multi\ AppData\Local\MultiTaction\launcher\logs
Note
The rotate-period setting in launcher.ini defines the maximum age of uncompressed log files. When Launcher starts, any log files older than this are compressed to .gz files. See Edit the custom version of launcher.ini.
3.4.2. Pipeline log files
Log entries for MultiTaction products such as Canvus or Showcase are saved to a pipeline log file. Pipeline log entries are generated each time a product is launched from Launcher. Log entries record the individual start-up processes, product activity (that is, conventional log entries for Canvus or Showcase), and processes when the product exits back to Launcher. You can configure a product's log file name and folder in the product's pipeline configuration file; see Configure Launcher.
Ubuntu application computers: By default, pipeline log files are here: ~/MultiTaction/launcher/logs Where ~/ refers to the home folder of the runtime user. If the user logged on while Launcher runs is 'multi', the expanded path is: /home/multi/MultiTaction/launcher/logs
Windows application computers: By default, pipeline log files are here: %LOCALAPPDATA%\MultiTaction\launcher\logs Where %LOCALAPPDATA% refers to the runtime user’s profile. If the user logged on while Launcher runs is 'multi', the expanded path is: C:\Users\multi\AppData\Local\MultiTaction\launcher\logs