Configure MT Showcase
The following sections describe how to:
Enable Ubuntu clients to access the MT Showcase database; see Enable Ubuntu Clients to Access the MT Showcase Database below.
Control access to the MT Showcase Editor; see Control Access to the MT Showcase Editor below.
Enforce secure connections to the Editor; see Enforce Secure Connections to the Editor below.
Enable Ubuntu Clients to Access the MT Showcase Database
(Applies to Ubuntu application computers only)
This configuration task is mandatory for Ubuntu application computers.
The MT Showcase client runs as the current user. To enable the client to
access the MT Showcase database, you must therefore add the current user to
the mt-showcase-server user group.
Follow these steps:
Right-click the desktop and launch a terminal emulator.
Run this command to add the current user to the
mt-showcase-servergroup:$ sudo adduser <user> mt-showcase-server
Where
<user>is the current user on the application computer. For example, if the current user ismulti, run:$ sudo adduser multi mt-showcase-server
The change to the user group takes effect when a new user session starts. Restart the application computer to start a new session.
Control Access to the MT Showcase Editor
The MT Showcase Editor is a web-based tool for creating custom MT Showcase apps. No coding is required. The Editor allows designers to choose the content for their app (including images, videos, web sites, PDFs and a background) and to specify how menus look and behave. The Editor also supports administrative tasks, such as exporting or importing apps, managing the media library, and setting up services (such as the Email Sending service and Twitter Connection service).
No specific setup is required for the Editor. The Editor web server is installed automatically with MT Showcase on the application computer, and app designers launch the Editor by browsing to the application computer. However, you may want to consider access to the Editor. For example, do you want to allow remote access to the Editor? Do you want to restrict access by password-protecting the Editor? These security issues are discussed in the following sections.
Note
An app is an individual MT Showcase application. It defines the actual content available to users on the screen (images, videos, PDFs, and so on), plus the appearance and behavior of screen items such as finger menus and the background.
Instructions for using the Editor to create apps are in the MT Showcase Editor Manual. Registered users can download this manual from https://cornerstone.multitouch.fi/mt-showcase-manuals.

MT Showcase Editor, example screen. 1 App designers launch the Editor by browsing to the IP address of the MT Showcase application computer.
Access Considerations for the Editor
App designers access the Editor by browsing to the IP address of the application computer. After deploying MT Showcase on your video wall, you may need to consider access to the Editor and resolve any issues that arise before you announce the Editor's availability to your app designers.
For example, is the application computer on a subnet that users cannot normally access? If app designers need remote access to the Editor, do you need to set up a VPN? Do you want to restrict access to the Editor? You can password-protect the Editor (see below), but you cannot password-protect individual apps. In fact, we recommend you remind app designers that their apps are always saved on the application computer (not on their laptop!) and that any app can potentially be edited by any other designer with access to the Editor.
Conversely, if a designer has installed MT Showcase on their laptop, then access to the Editor is clearly not an issue. Also, these apps are stored locally on the laptop, so unauthorized changes are unlikely. (Typically, these locally-stored apps are subsequently imported onto a different MT Showcase installation, such as a video wall.)
Password-Protect the Editor
This configuration task is optional.
You can password-protect the Editor to prevent unauthorized changes to apps,
structures, themes, and so on. When the Editor is protected, any app designer who wants
to open the Editor must enter the correct user name and password. The user name is
hard-coded to admin but you can define your own password.

MT Showcase Editor authentication dialog
To enable password protection:
Edit the
production_users.yamlfile. For the file location, see Where Are My Files?.Using your preferred editor, set
admin_passwordto the password you want. In the example below, the Editor password is set toMT55sr.admin_password: MT55sr
You must include a space between
admin_password:and the password! This is a syntax requirement ofproduction.yaml.There are no complexity requirements for this password. The password can be any length and include any combination of characters.
Shut down and restart the MT Showcase server for this change to take effect; see Start or Stop MT Showcase.
Note
If you enable password protection, it is your responsibility to inform app designers of the user name and password needed to access the Editor.
Enforce Secure Connections to the Editor
If you want your app designers to use secure connections to the MT Showcase Editor, you can use a web server as a proxy server to rewrite connections between the Editor and remote browsers so they use HTTPS.
The following sections describe how to reconfigure the Editor to only accept local connections and how to set up a proxy server.
Note
The following sections assume that the web server is only used by MT Showcase and does not process requests for other clients.
MT Showcase supports Apache, nginx and IIS web servers only. Other web servers have not been tested.
Configure the Editor to Only Accept Local Connections on Port 9292
First, you must reconfigure the Editor so that it is only accessible locally, through port 9292. This prevents remote connections to the Editor.
Follow these steps:
Stop the MT Showcase server if it is running; see Start or Stop MT Showcase.
Edit the server configuration file,
puma_config.rb. Find this file here:Ubuntu:
/etc/MultiTaction/mt-showcase/serverWindows:
C:\Program Files\MT Showcase\server
In
puma_config.rb, set the bind address tolocalhost:9292. In the example below, the default bind address has been commented out:#bind 'tcp://0.0.0.0:80' bind 'tcp://localhost:9292'
Note
This configuration change is retained if you upgrade MT Showcase.
Now create the SSL certificates that you will need; continue to the next section.
Create Your SSL Certificates
Create the SSL certificate that will be used to authenticate communication between the web server (acting as a proxy server) and the user's browser when they start (ie, browse to) the Editor.
Save this certificate to a folder on the MT Showcase application computer. You will edit the web server configuration file to reference this folder. If using:
An Apache web server, continue to Set Up an Apache Proxy Server below.
An nginx web server, continue to Set Up an nginx Proxy Server below.
An IIS web server, continue to Set Up an IIS Proxy Server below.
Set Up an Apache Proxy Server
Applies to Ubuntu application computers only.
Follow these steps on the application computer:
Run the following commands to install Apache and the required modules:
$ sudo apt-get update
$ sudo apt-get install apache2 apache2-doc apache2-utils libapache2-mod-proxy-html
Run the following commands to enable the required modules:
$ sudo a2enmod proxy
$ sudo a2enmod proxy_http
$ sudo a2enmod rewrite
$ sudo a2enmod proxy_wstunnel
$ sudo a2enmod headers
$ sudo a2enmod ssl
(This step is mandatory!) Using an editor such as nano or vim, you must now overwrite the contents of the Apache configuration file
000-default.confwith the contents of the supplied rule template file,apache.conf.This template file was installed with MT Showcase. It has been optimized for Apache web server operations with the Editor. Find the template file here:
/opt/mt-showcase/server/templates/apache.confAdd your certificate locations and (if not using port 9292) the server port to the
000-default.confconfiguration file.Edit the Apache configuration file. Find this file here:
/etc/apache2/sites-enabled/000-default.confFor example, run this command:
$ sudo vim /etc/apache2/sites-enabled/000-default.conf
Edit the following lines in the configuration file:
# Configure your certificate paths here
SSLCertificateFile <path to your signed certificate>
SSLCertificateChainFile <path to intermediate certificate>
SSLCertificateKeyFile <path to your private key>
For example:
# Configure your certificate paths here
SSLCertificateFile /home/multi/certificates/server.crt
SSLCertificateChainFile /home/multi/certificates/server.csr
SSLCertificateKeyFile /home/multi/certificates/server.key
If, when you edited
puma_config.rb, you configured the Editor to listen on a different port to 9292, you must add the new port number to the configuration file.For example, if the Editor is listening on port 9200, edit these lines:
RewriteRule /(.*) ws://localhost:9292/$1 [P,L]
ProxyPass / http://localhost:9292/
ProxyPassReverse / http://localhost:9292/
To use the new port number:
RewriteRule /(.*) ws://localhost:9200/$1 [P,L]
ProxyPass / http://localhost:9200/
ProxyPassReverse / http://localhost:9200/
Run this command to restart Apache:
$ sudo service apache2 restart
Set Up an nginx Proxy Server
Applies to Ubuntu application computers only.
Follow these steps on the application computer:
Run the following commands to install Nginx and the required modules:
$ sudo apt-get update
$ sudo apt-get install nginx
(This step is mandatory!) Using an editor such as nano or vim, you must now overwrite the contents of the configuration file,
default, with the contents of the supplied rule template file,nginx.This template file was installed with MT Showcase. It has been optimized for nginx web server operations with the Editor. Find the template file here:
/opt/mt-showcase/server/templates/nginxAdd your certificates folder and, if not using port 9292, the server port to the
defaultconfiguration file.Edit the configuration file:
/etc/nginx/sites-enabled/defaultFor example, run this command:
$ sudo vim /etc/nginx/sites-enabled/default
Edit the following lines in the configuration file:
# Configure your certificate paths here
ssl_certificate           <path to your signed certificate>
#ssl_trusted_certificate <path to intermediate certificate>
ssl_certificate_key       <path to your private key>
For example:
# Configure your certificate paths here
ssl_certificate           /home/multi/certificates/server.crt
ssl_trusted_certificate   /home/multi/certificates/server.csr
ssl_certificate_key       /home/multi/certificates/server.key
Note
You only need to uncomment and specify
ssl_trusted_certificateif you are using an intermediate certificate.If, when you edited
puma_config.rb, you configured the Editor to listen on a different port to 9292, you must add the new port number to the configuration file.For example, if the Editor is listening on port 9200, edit this line:
# Set the port number to match the server port
proxy_pass    http://localhost:9292;
To use the new port number:
# Set the port number to match the server port
proxy_pass    http://localhost:9200;
Run this command to restart nginx:
$ sudo service nginx restart
Set Up an IIS Proxy Server
Applies to Windows application computers only.
Follow these steps on the application computer:
Install the IIS URL Rewrite module: https://www.iis.net/downloads/microsoft/url-rewrite
Install the IIS Application Request Routing (ARR) module: https://www.iis.net/downloads/microsoft/application-request-routing
Enable the WebSocket Protocol feature:
In the Windows Control Panel, open the Programs and Features applet.
In the Programs and Features applet, click Turn Windows features on or off.
In the Windows Features dialog, browse to Internet Information Services > World Wide Web Services > Application Development Features.
Select the WebSocket Protocol check box.
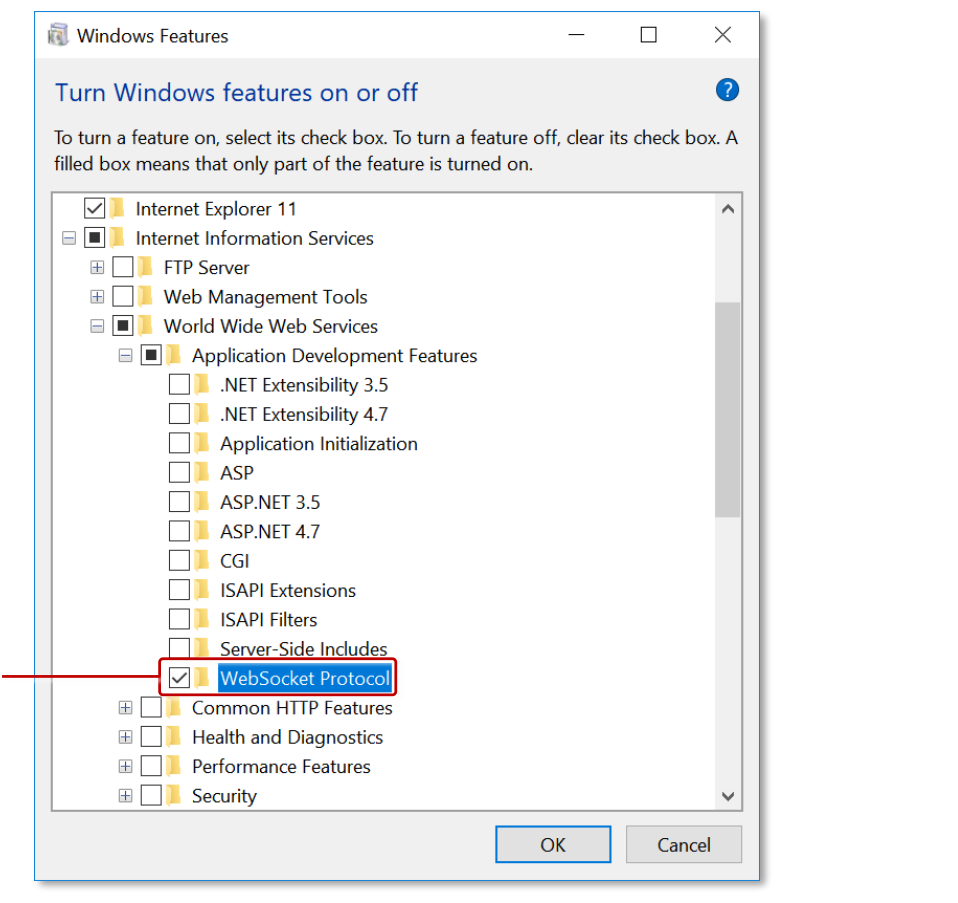
Windows Features dialog. Open this dialog to turn Windows features on or off. 1 WebSocket Protocol check box.
Import the SSL certificate into IIS. This is the certificate you created earlier. Follow these steps:
Open IIS Manager.
In the left-hand Connections pane, click the root node.
In the Home page, click the Server Certificates feature.
In the Server Certificates page, go to the right-hand Actions pane and import your SSL certificate.
The imported certificate is listed on the Server Certificates page. It is also added to the drop-down certificate list in the Add Site Binding dialog; see step 5.d.
IIS Manager. 1 Connections pane, root node. 2 Default Web Site. 3 Server Certificates page. 4 Actions pane. 5 Imported and created certificates are listed here.
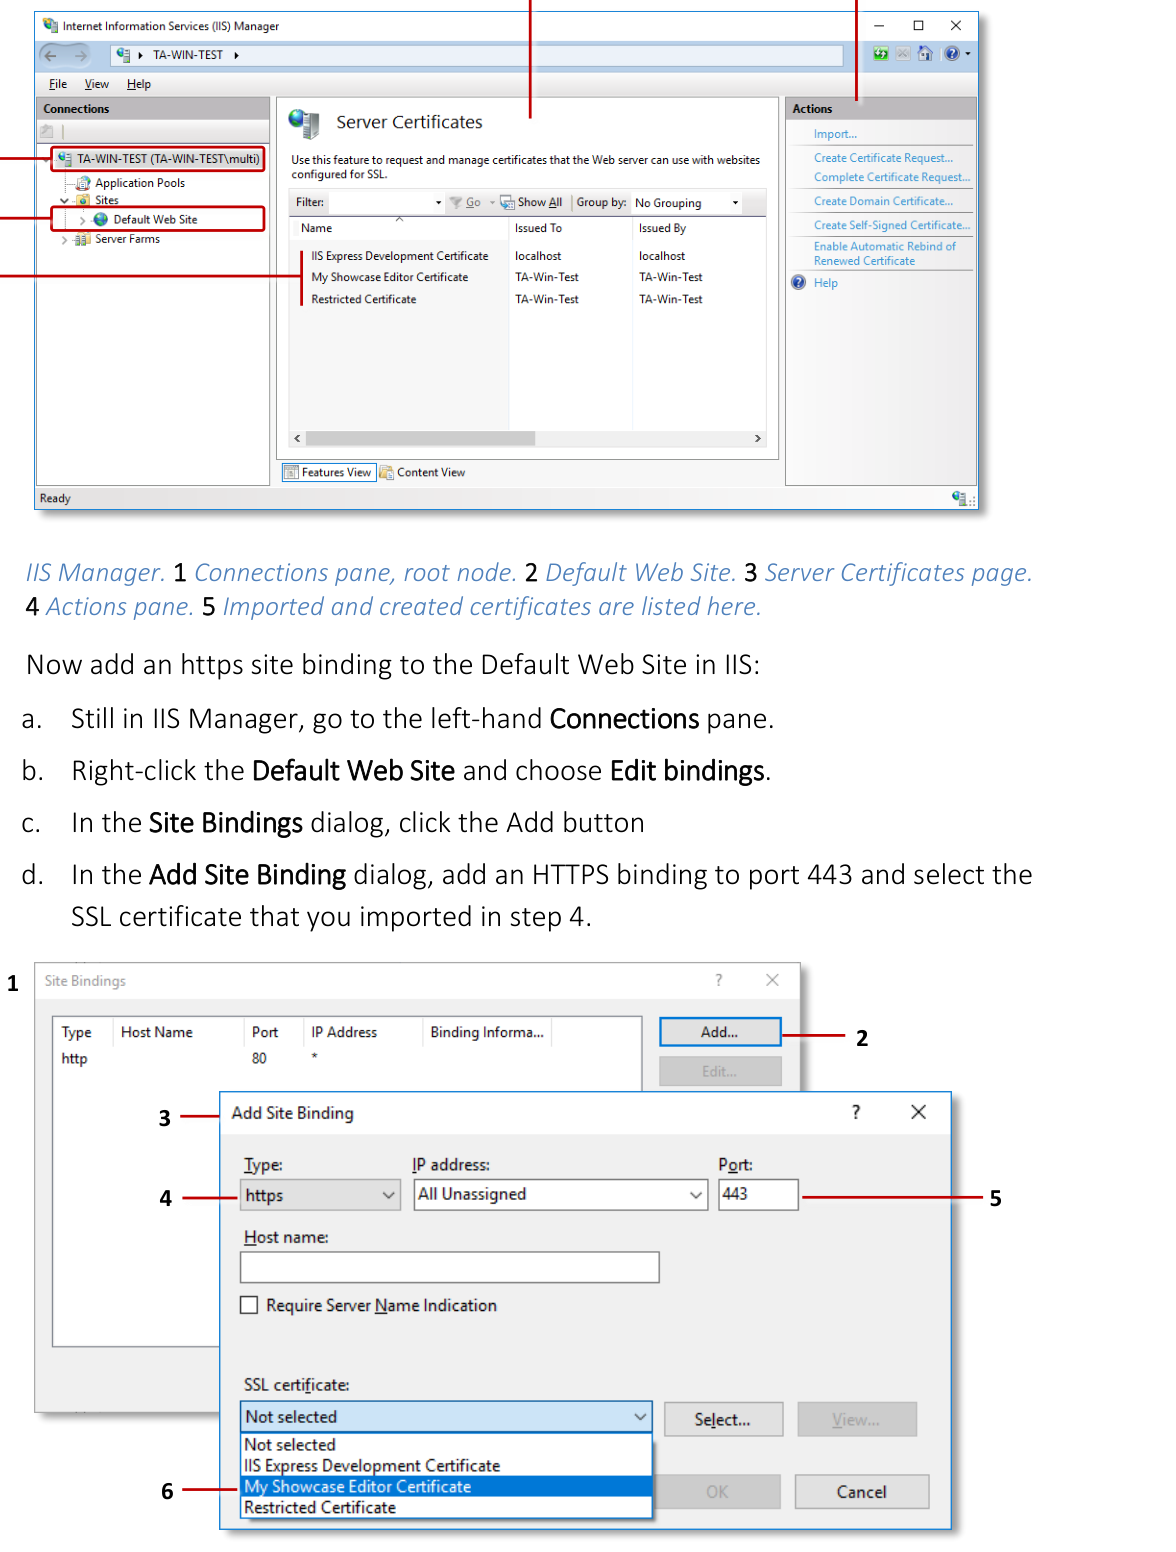
Now add an https site binding to the Default Web Site in IIS:
Still in IIS Manager, go to the left-hand Connections pane.
Right-click the Default Web Site and choose Edit bindings.
In the Site Bindings dialog, click the Add button.
In the Add Site Binding dialog, add an HTTPS binding to port 443 and select the SSL certificate that you imported in step 4.
You must now induce IIS to download software needed for the ReverseProxy rules that you will copy to
web.configin step 7. Follow these steps:Still in IIS Manager, select the Default Web Site.
In the Default Web Site Home pane, double-click the URL Rewrite feature.
In the right-hand Actions pane, click Add Rule.
In the Add Rule(s) dialog, double-click the Reverse Proxy rule template.
When prompted if you want to enable the Reverse Proxy rule, click OK.
IIS now installs the required software. You can now cancel the Add Rule(s) dialog.

Add Rule(s) dialog. 1 Reverse Proxy rule template.
(This step is mandatory!) Overwrite the contents of the configuration file
web.configwith the contents of the supplied rule template file,iis.config.This template file was installed with MT Showcase. It has been optimized for IIS web server operations with the Editor. Find the template file here:
C:\Program Files\MT Showcase\server\templates\iis.config(Applies only if you are not using port 9292) If, when you edited
puma_config.rb, you configured the Editor to listen on a different port to 9292, you must edit the IIS configuration file to include the correct port number.Edit the IIS configuration file
web.config. Find this file here:C:\inetpub\wwwroot\web.configReplace the two references to port 9292 with the correct port number:
Go to the
ReverseProxyInboundRule1rule and edit the port number specified for theurlsetting in the<action>element:<action type="Rewrite" url="http://localhost:9292/{R:1}" />
Go to the
ReverseProxyOutboundRule1rule and edit the port number specified for thepatternsetting in the<match>element:<match filterByTags="A, Form, Img" pattern="^http(s)?://localhost:9292/(.*)" />
Restart the Default Web Site in IIS Manager.