Service Sets
A service set defines a specific administrative setup for an MT Showcase app. Each MT Showcase installation can support multiple service sets. In the current version of MT Showcase, service sets can include for example the Email Sending service and Data Gathering service.
Email Sending Service
The Email Sending service is used for sending screen content from a user's personal space to a specified email account. When you add the Email Sending service to a service set, you must define the SMTP host, credentials for an SMTP user, the sender's email address, plus the subject and body text.
What Do Emails Sent from MT Showcase Contain?
Emails sent from MT Showcase can contain attachments of images, videos, and PDFs. Or they can include URLs to these items or a web site. The emails also include a configurable sender, subject and body text.
Sender, subject and body text
The Email Sending service has attributes for configuring:
Sender: Use the Email Sender Name and Email Sender Address attributes to identify the sender to the recipient.
Note
Some email services, including Gmail, will use the SMTP Username attribute for the sender's address instead of the supplied Email Sender Address.
Subject: The Email Subject attribute is self-explanatory.
Body text: The Email Template attribute defines the body text of any emails sent by MT Showcase. The template can include variables to customize the text content.
Attachment and URL rules
To avoid sending very large videos or PDFs as email attachments, you can set up MT Showcase emails to include the URL to an item instead of sending the actual item as an attachment.
MT Showcase uses simple rules to determine what is included in the email:
Images: An image file is always sent as an attachment. If a URL to the image has been defined, the URL is always included in the body text. If a user has annotated (drawn on) the image using an infrared pen, the annotated image is always attached, not the original image.
PDFs: If a URL to the PDF has been defined, only the URL is included; the PDF file is not sent. If a URL has not been defined, the PDF file is sent as an attachment.
Videos: The email rules depend on the video source. If the video source is a file such as an MP4 movie:
If a URL has been defined, only the URL is included; the video file is not sent. If a URL has not been defined, the video file is sent as an attachment.
If the video source is a video stream, the stream URL is included.
If the video source is a video capture device such as a web cam, the URL for the device is included.
Web page: The web page URL is always included in the body text.
Set Up the SMTP Server
If you add the Email Sending service to your app's service set, you must set up the SMTP server that MT Showcase uses to send screen content.
Follow these steps:
Click Service Sets in the left-hand pane.
Either click an existing service set, or create a new service set:
In the Service Sets screen, click the Create New button.
Enter the name of the new service set. For example, My Service Set.
Click the Create New button.
In the Editing service set screen, go to the Add new service section:
Select Email Sending from the Select Service drop-down menu.
Enter a name for the new email sending service.
Click the Add button.
Still in the Editing service set screen, go to the Email Sending section.
Edit the email attributes, as required. You will need to supply details about your SMTP server, host, port and password. You will also need to specify the email accounts (sender and from) that this service will use.
If required, you can also increase the timeouts for sending emails (for example, there is a 60 second timeout for attempts to connect to the SMTP server), although it is unlikely that you will need to change the default timeouts.
Finally, you can choose to ignore SSL errors. By default, MT Showcase does not send an email if it detects an SSL error (such as an invalid certificate) when connecting to the SMTP server. If you trust the connection, you can instruct MT Showcase to ignore SSL errors and send the email anyway.
Click the help button for details.
Click the Save button to add the Email Sending service to your service set.
Now set up the email template that this service will use.
Set Up an Email Template
An email template defines the body text of any emails sent by MT Showcase. The template can include variables to customize the email's text content.
Follow these steps:
Click Service Sets in the left-hand pane.
Click the service set you want. For example, My Service Set.
In the Editing service set screen, go to the Email Sending section.
Go to the Email subject attribute and enter text for the email's subject field. For example, Content exported from MT Showcase.
Go to the Email template attribute and enter the text that appears in the body of the email message.
You can include these variables:
<name>--- Adds the user name associated with the registered Codice card.<links>--- Adds URL hyperlinks to the body text. If you omit this variable the URL hyperlinks are added at the end of the message.
For example:
Hi <name>
Follow these links to find the MT Showcase items that interested you:
<links>
For information about other MultiTaction products, visit
www.multitaction.com.
Click the Save button to update the service set with the changes to the Email Sending service.
If you have not already done so, remember to add the service set containing the Email Sending service to your app.
Now confirm that the personal space collection mode is set to 'email'.
Set the Personal Space Collection Mode
MT Showcase supports two methods for collecting screen items: content can be sent as an email (this is the default method) or it can be sent to a media server. To determine which method is used, you edit the personal space collection mode.
This mode is an attribute of the Personal Space widget. The Personal Space widget is only available in themes; you cannot add this widget directly to your app's structure.
To set the personal space collection mode, follow these steps:
Ensure your app is using a theme.
Edit the theme.
In the Editing a theme screen, go to the Personal Space component.
Confirm that the Personal space collection mode attribute is set to Email contents to user.
(Recommended) Configure the remaining Personal space attributes. For example, you can set a title and caption to provide guidance on how to save screen content.
Click the Save button to save any changes to the theme.
(Optional) You may now want to define URLs for certain media items to avoid sending them as very large email attachments.
Define URLs for Large Items in Media Library
To avoid sending very large videos or PDFs as email attachments, you can set up MT Showcase emails to include the URL to an item instead of sending the actual item as an attachment.
The following rules apply:
Images are always attached to an MT Showcase email. If a URL has been defined for the image in the media library, the URL is also included.
Note
If an image has been annotated with an infrared pen, the annotations are preserved on the image when it is sent as an email attachment.
Other items, especially videos and PDFs, are attached to the email only if no URL has been defined for them. If a URL has been defined, only the URL is included in the MT Showcase email.
To set up MT Showcase emails to include the URL to an item, you must define the URL in the media library.
Follow these steps:
Click the media library button to open the media library pane.
In the media library, click the item you want.
Click the Codice URLs tab at the bottom of the media library pane.
Enter the URL for the item in the Codice URL input box.
Click the Save button.
Data Gathering Service
The Data Gathering service collects content usage data that can be imported into third party data visualization tools such as Tableau Desktop. Usage data is stored in a PostgreSQL database as event records.
Example events include touch events (finger, hand, infrared pen, or Codice marker), opening or closing a widget, playing a video, viewing a PDF, browsing to a URL, adding items to a personal space, and emailing items from a personal space.
The Data Gathering service also records when an app starts and closes, when a media library asset (image, video or PDF) is opened in a widget, and when idle widgets are timed out and close automatically.
Enable Data Gathering
To enable data gathering, you simply add the Data Gathering service to your MT Showcase app's service set.
Follow these steps:
Click Service Sets in the left-hand pane.
Either click an existing service set, or create a new service set.
In the Editing service set screen, go to the Add new service section:
Select Data Gathering from the Select Service drop-down menu.
Enter a name for the new data gathering service. We recommend you choose a name that identifies the video wall that MT Showcase runs on.
Click the Add button.
Still in the Editing service set screen, go to the Data Gathering section.
Edit the following attributes:
Site name: The site name is included in each event record and enables analysts to identify which video wall an event record is associated with. For example, if you run Showcase on video walls in multiple locations but store event records in a central database, you can create a Data Gathering service for each location.
Enable input tracking: By default, data gathering includes any user inputs detected on the video wall, including finger, pen or Codice touch events. Tracking these inputs can generate a lot of data and adversely affect app performance. You can disable this attribute to exclude input tracking from the data gathering service.
Note
When this attribute is disabled, the data gathering service only collects 'widget data' (for example, when widgets open or close).
Click the Save button.
If you have not already done so, remember to add the service set containing the Data Gathering service to your app.
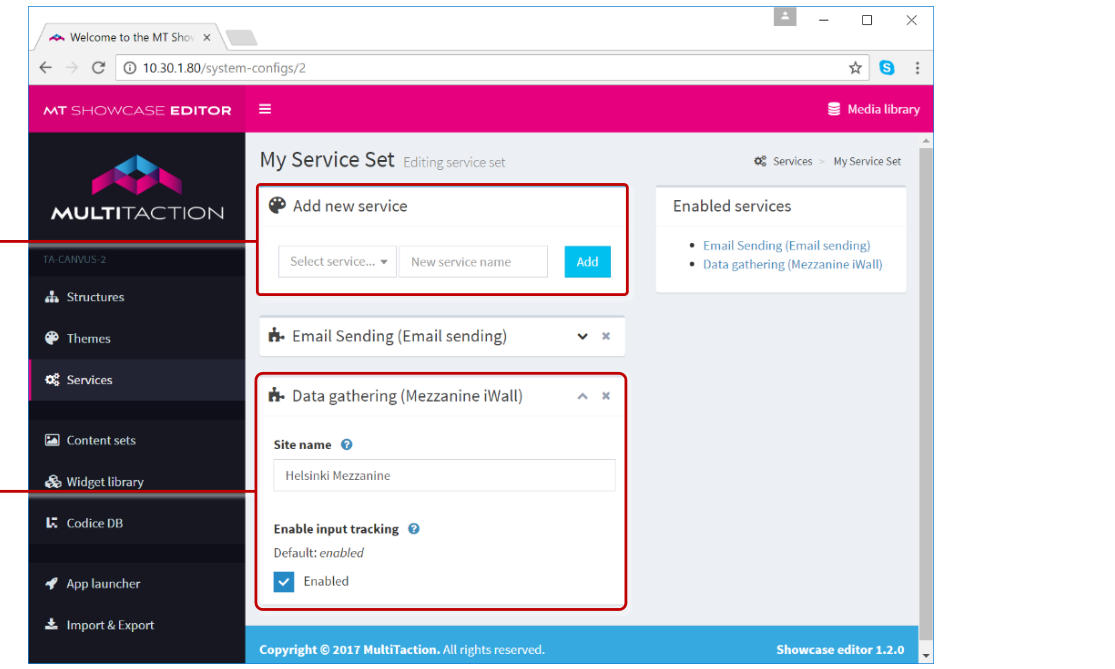
Editing a service set screen, Data gathering service. 1 Add new service pane. 2 Data Gathering section with attributes for the data gathering service.
Twitter Connection Service
The Twitter Connection service allows you to add Twitter feeds to your MT Showcase apps, with tweets displayed either in a cloud widget or finger menu. This service uses a Twitter app to retrieve the tweets from Twitter. You only need one Twitter Connection service to supply multiple Twitter feeds in your MT Showcase apps.
After setting up the Twitter Connection service, remember to add the service set containing the Twitter Connection service to your app.
Note
You must already have created a Twitter app before you set up the Twitter Connection service. For details, see the MT Showcase Installation Manual.
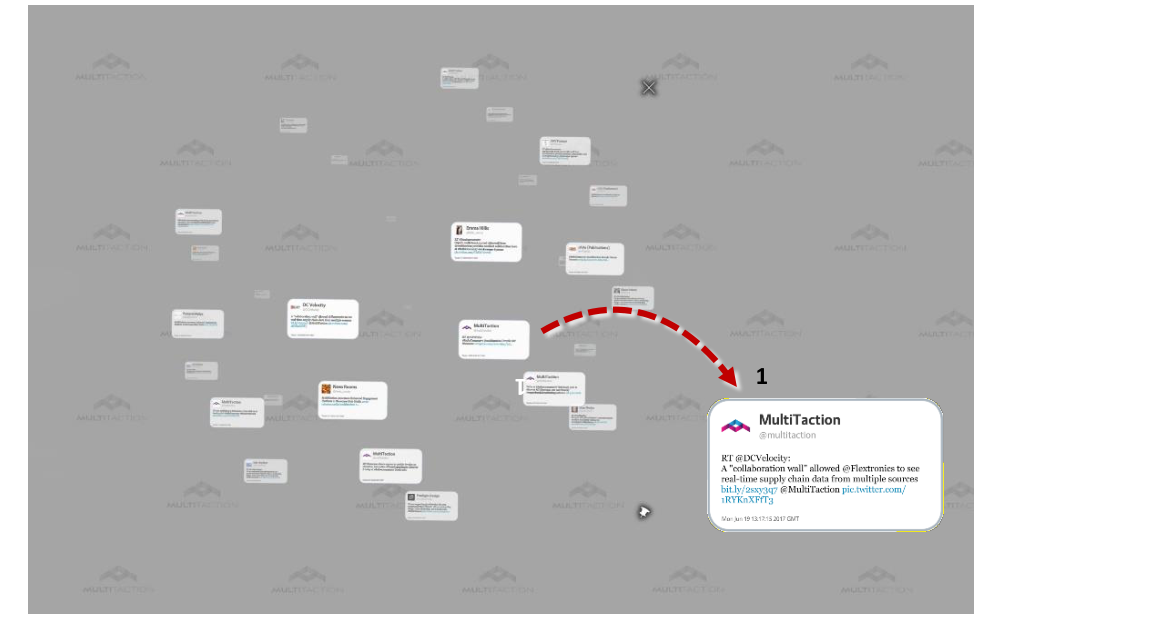
Example Twitter cloud. 1 Tap an individual tweet to detach and enlarge it.
- align
center
- alt
Twitter cloud detail
Twitter cloud detail.
- align
center
- alt
Individual tweet in Twitter cloud
Individual tweet in Twitter cloud.
Media Server Service
The Media Server service is used for saving screen content from a user's personal space to a personal web page. This service is an alternative to the Email Sending service and has the advantage that it does not require a user's email address. Also, this web page can include screen items collected by the user from multiple video walls.
From the end-user's viewpoint, they can drag screen content into their personal space in MT Showcase and then use a QR code reader on their mobile device to download screen content they have collected on any video wall.
Note
The URL for the user's personal web page is determined by the media server. The media server creates a unique web page for each Codice code detected by MT Showcase when users present their personal markers.
Prepare the Media Server
As its name suggests, this service uses a media server to host screen content collected by users. Before you add the Media server service to your app, you will need to prepare the media server. In addition, you must copy to the media server any images, videos or PDFs that are collectable in your MT Showcase app.
For full details, see the MT Showcase Installation Manual.
Set Up the Media Server Service
After preparing the media server, you can set up the Media server service. You must specify which web server to use and the personal space collection mode.
Follow these steps:
Click Service Sets in the left-hand pane.
Either click an existing service set, or create a new service set.
In the Editing service set screen, go to the Add new service section:
Select Media server from the Select Service drop-down menu.
Enter a name for the new Media server service.
Click the Add button.
Still in the Editing service set screen, go to the new Media Server section.
You need to supply details about your media server. Specify the Server address (or name) and Server port number.
You also need to specify a System name. This name identifies the video wall that MT Showcase is running on. This name appears on the user's web page where they can download screen content. If a user collected content from multiple video walls, each video wall would have its own system name.
Click the help button for details.
Click the Save button to add the Media Server service to your service set.
Now specify the personal space collection mode.
This mode is an attribute of the Personal Space widget. It determines how users collect the screen items in their personal space.
Ensure your app is using a theme.
Note
The Personal Space widget is only available in themes; you cannot add this widget directly to your app's structure.
Edit the theme.
In the Editing a theme screen, go to the Personal Space component.
Now edit the Personal space collection mode attribute and select Upload contents to web server from the drop-down list.
(Recommended) Configure the remaining Personal space attributes.
Click the Save button to save the change to the theme.
If you have not already done so, remember to add the service set containing the Media Server service to your app.
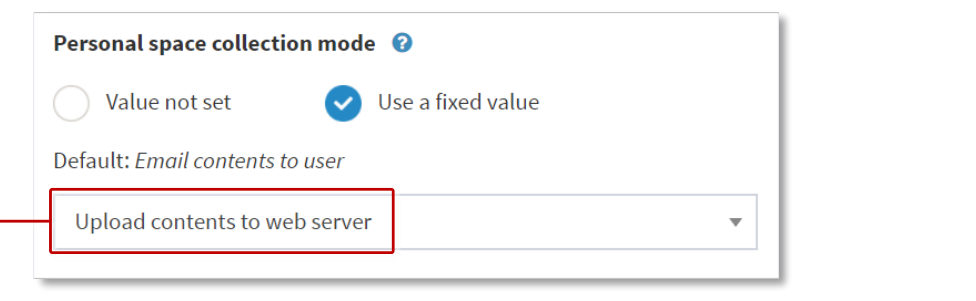
Editing a theme screen. 1 Personal space collection mode set to 'Upload contents to web server'.
Snippets Service
The Snippets service allows you to add predefined text snippets to on-screen keyboards in your MT Showcase apps. Users can tap a text snippet item to easily enter the text into a text field without manually typing it in. This is useful when you need to repeatedly enter the same text string such as a web site URL or email address.
After setting up the Snippets service, remember to add the service set containing the Snippets service to your app.

Showcase on-screen keyboard. 1 Tap an item to enter text in the text field.
Add a Service Set to Your App
After setting up any services that you want to use, you must add the service set that contains these services to your app.
Follow these steps:
Click Apps in the left-hand pane.
Click the Edit button for your app.
In the Service set column, choose the service set you want from the drop-down list.
Click the Save button for your app.

App launcher screen. 1 Service set drop-down list. 2 Edit and Save buttons.