Codice Cards
A Codice is simply a 2D barcode (or marker). A Codice card is simply a Codice printed on paper or card. You designate the actions associated with each Codice.
When MT Showcase runs in table mode, Codice cards are often attached to the underside of a tangible user interface, such as a physical object like a handheld plastic block or even a whiskey glass.
There are four types of Codice card:
Personal markers: A user has their own Codice card to access their personal space. A user's personal Codice card is more commonly referred to as a personal marker.
Note
With a personal marker, a user can access their personal space from any app running on your MT Showcase server.
Codice content markers: A Codice card can be used to open Codice content. Any user can use a designated card to launch Codice content.
Markers that ban tweets: A Codice card can be used to permanently remove specific tweets from a Twitter cloud or menu.
Erasers: You can also designate a Codice as an eraser. Any user can use an eraser card to erase pen or finger annotations from an MT Showcase app.
Before your users can start using Codice cards, you must:
Add a Codice detector to your app. This widget allows the app to detect when Codice cards are held against the screen.
Register each Codice before it can be used in an MT Showcase app.
You register Codices for individual users and designate erasers in the Codice DB screen.
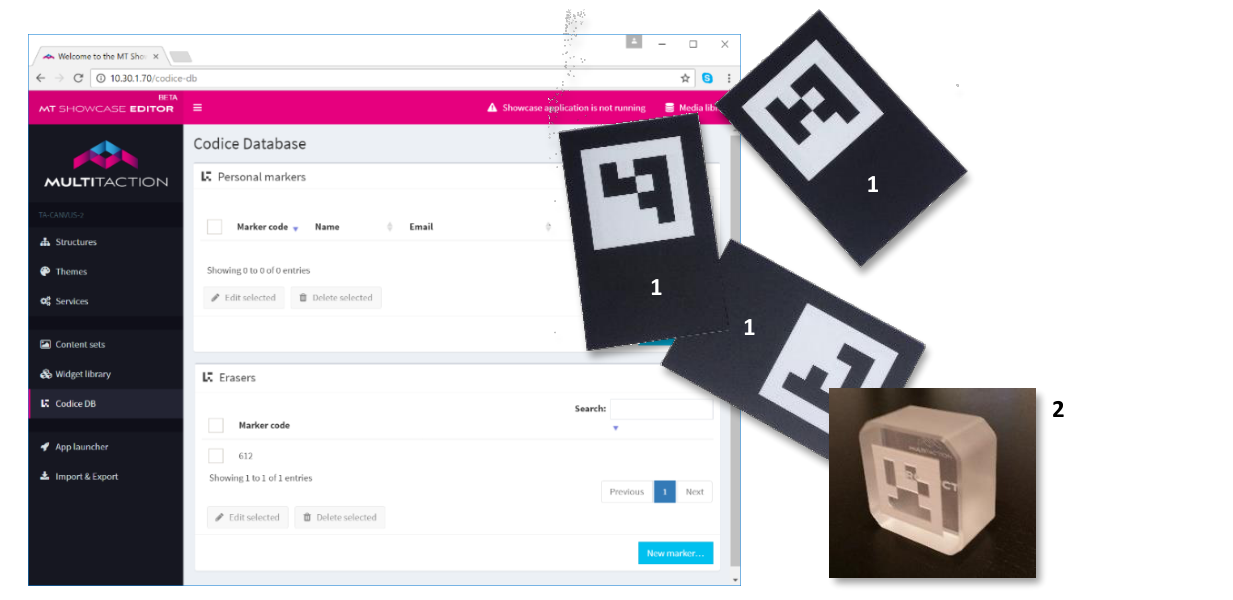
Codice Database screen with example Codice cards.
- align
center
- alt
Example Codice cards
Example Codice cards.
- align
center
- alt
Codice used as a tangible user interface
Codice as a tangible user interface.
Identify Codice Codes with the Input Visualizer
Before you can register individual Codices, whether as personal markers or erasers, you need to know the Codice's code number. This section describes how to identify these codes if you do not know them already.
It is possible to manually calculate the code from the binary value of the 2D barcode. However, it is far easier to use the Input Visualizer widget. Follow these steps:
Add the Input Visualizer to the Overlay layer of your app's structure.
Click Structures in the left-hand menu.
Click the structure you want to use. The Editing a Structure screen appears.
Go to the Overlay section and click the Add a new widget to Overlay hyperlink.
Add the Input Visualizer widget.
Save the changes to the structure.
Tip
The advantage of adding the Input Visualizer to the Overlay layer is that you do not need to edit any widget attributes; all screen touches are visualized, anywhere on the screen. Conversely, if you added the Input Visualizer to the Main layer, you would then need to edit its attributes to make the Input Visualizer easier to locate.
In the app, hold a Codice card against the screen over the Input Visualizer widget. The display now reveals the Codice code. Make a note of the code.
When you have finished identifying Codice codes, delete the Input Visualizer from the structure of your app. In the Editing a Structure screen, right-click the Input Visualizer and click Delete.

Input Visualizer example. With the Input Visualizer in the overlay layer, you can hold the Codice card anywhere on the screen to see the Codice code. 1 Codice code number. 2 Marker visualization.
Add a Codice Detector
The Codice detector is a special widget that enables your app to detect when a user holds a personal marker or an unregistered Codice card against the screen:
Personal markers: If a user presents a registered personal marker, the app opens a personal space or launches Codice content.
Unregistered Codice cards: If a user presents an unregistered card, the app opens a temporary personal space that allows the user to self-register (the user can gather items, enter an impromptu email address, and send the items to this address). The user also has the option to permanently register their Codice card and email address.
If your app does not include a Codice detector, it will only recognize erasers. It will ignore all other Codice cards. (Erasers are always recognized and do not need the Codice detector.)
Follow these steps:
Click Structures in the left-hand pane.
Click your structure to open the Editing a Structure screen.
Go to the Main section and click Add a new widget to Main.
Add the Codice detector widget.
In the Codice detector attributes pane, edit these attributes:
Rotate personal space towards Codice and Codice rotation offset: These attributes are used when MT Showcase runs in table mode.
Allow unregistered Codice markers?: This attribute determines how your app handles unregistered Codice cards. If this attribute is enabled, the app opens a temporary personal space that allows the user to self-register. If it is disabled, the app ignores the Codice card.
To enable this attribute, select Use a fixed value and then select the Enabled check box.
Collect widgets with Codice: Users can place a Codice marker on a widget to add it to their personal space. This attribute determines what happens to the widget. Choose the option you want from the drop-down list. Click the help button for details.
Note
If you want to add a toolbar to a personal space, you must edit the Personal Space widget.
Click Save to save the changes to the structure.

Codice detector attributes in the Editing a Structure screen.
Personal Space
A personal space (also called a personal folder) provides a simple method for exporting screen content out of MT Showcase. It opens automatically when a user presents their personal marker against the screen.
Register Personal Markers
To enable an individual user to access their personal space in an MT Showcase app, you must assign a personal marker to that user. A personal marker is a Codice card that has been registered in the Codice database.
To register a personal marker, follow these steps:
Click Codice DB in the left-hand pane.
In the Codice Database screen, go to the Personal Markers pane.
Click the New Marker button.
Enter the following details:
Marker Code: Enter the code for Codice assigned to the user.
Name: Enter the user's name. This name can be formal or informal. It is used as a greeting when the user opens their personal space in an MT Showcase app.
Email: Enter the user's email address. If the user sends items to themselves from their personal space, the items will be sent to this address.
Click the Save button.
Print and distribute the new personal marker to the user.
The user can now access their personal space.
Codice Database screen, Personal markers pane. 1 Registered Codices. 2 Create codice content hyperlink. 3 New Marker button.
Configure the Personal Space Widget
The Personal Space widget opens when a user holds their personal marker against the screen. You configure the widget by editing its attributes. For example, you can set the personal space collection mode. You can also specify a title and caption to provide the user with guidance on how to export screen content from the MT Showcase app.
The Personal Space widget is only available in themes; you cannot add this widget directly to your app's structure. To configure the widget, follow these steps:
Ensure your app is using a theme.
Edit the theme.
In the Editing a theme screen, go to the Personal Space component.
Edit the attributes, as required.
Personal space collection mode: This attribute determines which method is used for collecting screen content. Users can send content to their email address (this is the default method) or they can send content to a personal web page on a media server. If you choose:
Email contents to user: The personal space includes an envelope button that users tap to send items to their email address.
Upload contents to web server: The personal space includes a QR code that links to the user's personal web page on the media server.
Personal space title: Specify a title for the widget. For example, Welcome to your personal space.
Personal space info text: The info text is a caption that displays in the personal space. For example, you can add text that provides guidance on how to email or upload screen content.
The info text can include a
<link>variable. If the collection mode is set to:Email contents to user:
<link>adds the user's registered email address.Upload contents to web server:
<link>adds the URL for the user's personal web page where they can download screen items.
Rotate widget towards hand: This attribute is used when MT Showcase runs in table mode.
Toolbar: You do not need to add a toolbar to the Personal Space widget, but users may find it convenient if it has a toolbar with Pin and Close buttons. Select Use a fixed value and then select an existing toolbar or create a new one.
Click the Save button to save any changes.
Title and Info Text Examples
In the examples below where the personal space collection mode is set to
Email contents to user, the info text is customized with the <link> variable to display
the email address registered to the user's personal marker.
- align
center
- alt
Empty personal space with title and info text for email mode
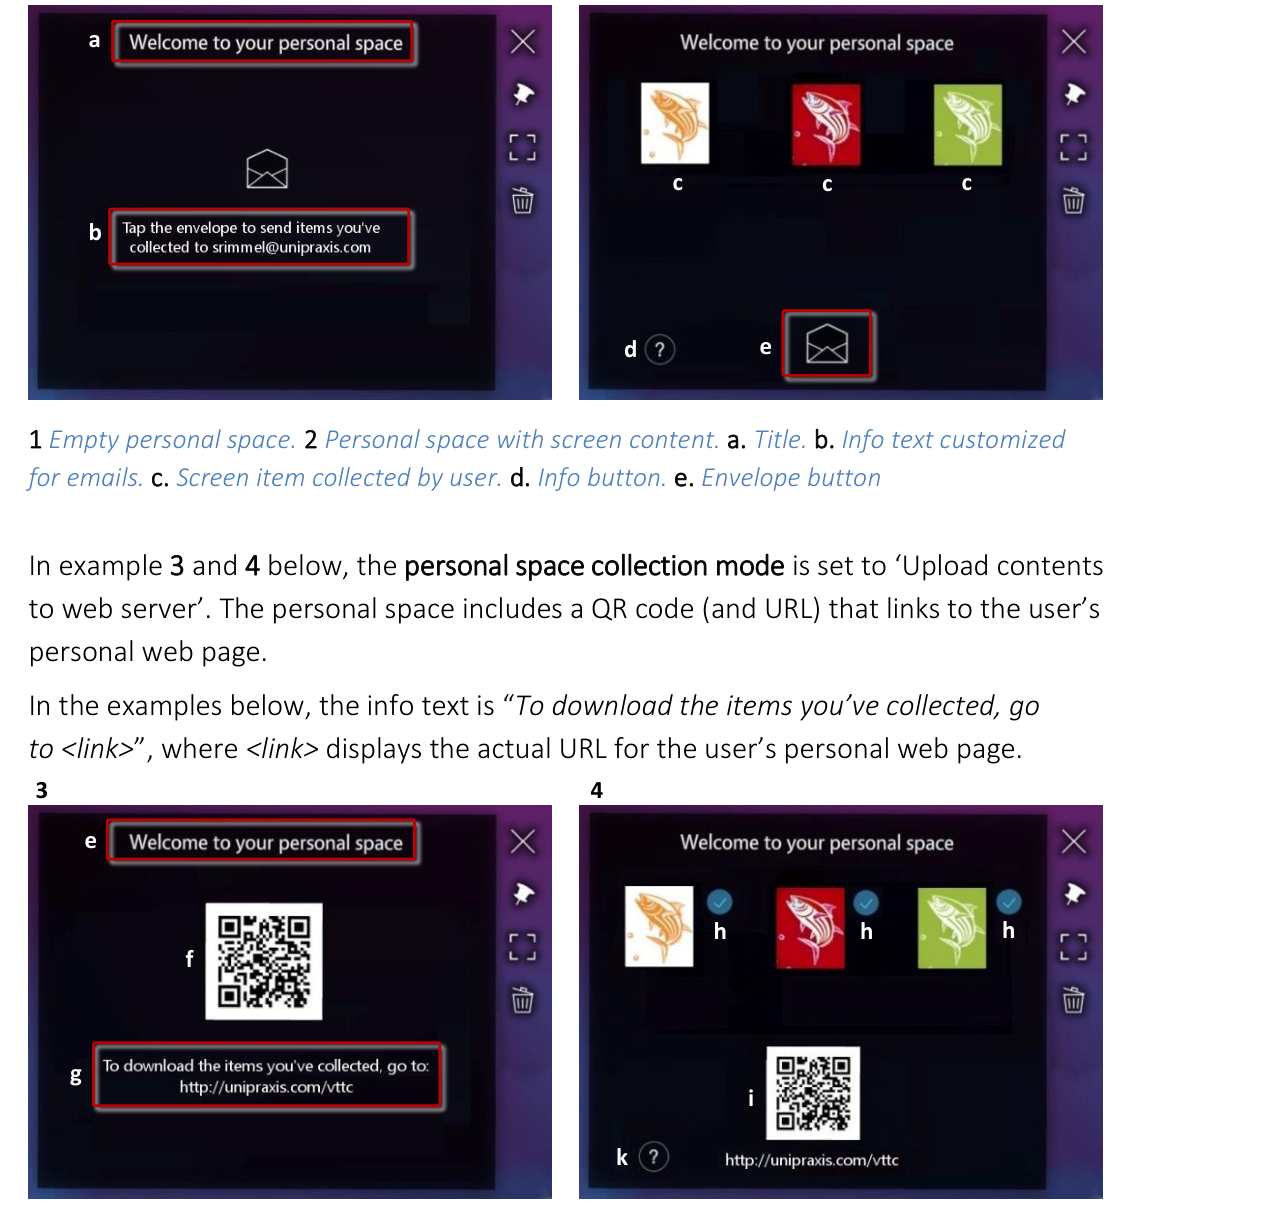
Empty personal space. a. Title. b. Info text customized for emails.
- align
center
- alt
Personal space with screen content collected by user showing email mode
Personal space with screen content. c. Screen items collected by user. d. Info button. e. Envelope button.
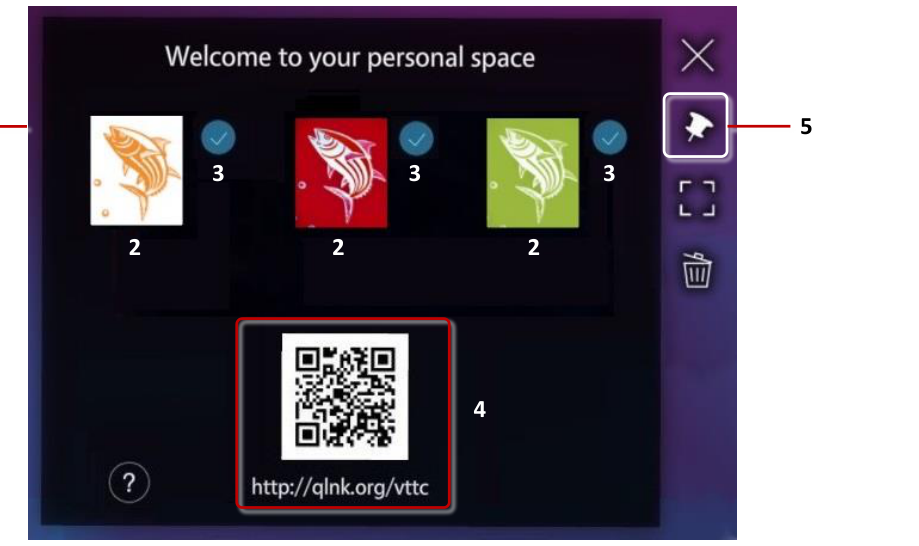
In the examples below where the personal space collection mode is set to Upload contents to web server, the personal space includes a QR code (and URL) that links to the user's personal web page.
- align
center
- alt
Empty personal space with QR code for upload mode
Empty personal space. e. Title. f. QR code for the user's personal web page. g. Info text customized for uploads.
Personal space with screen content. h. Upload status indicator. i. QR code and URL for the user's personal web page. k. Info button.
Drag Items into a Personal Space
The user simply holds their personal marker against the screen to open their personal space. They can then drag any screen items into this folder from the MT Showcase app. To remove an item, the user simply drags it out of their personal space.
Note
With their personal marker, a user can access their personal space from any app running on your MT Showcase server.
- align
center
- alt
Using a personal space with personal marker and screen items
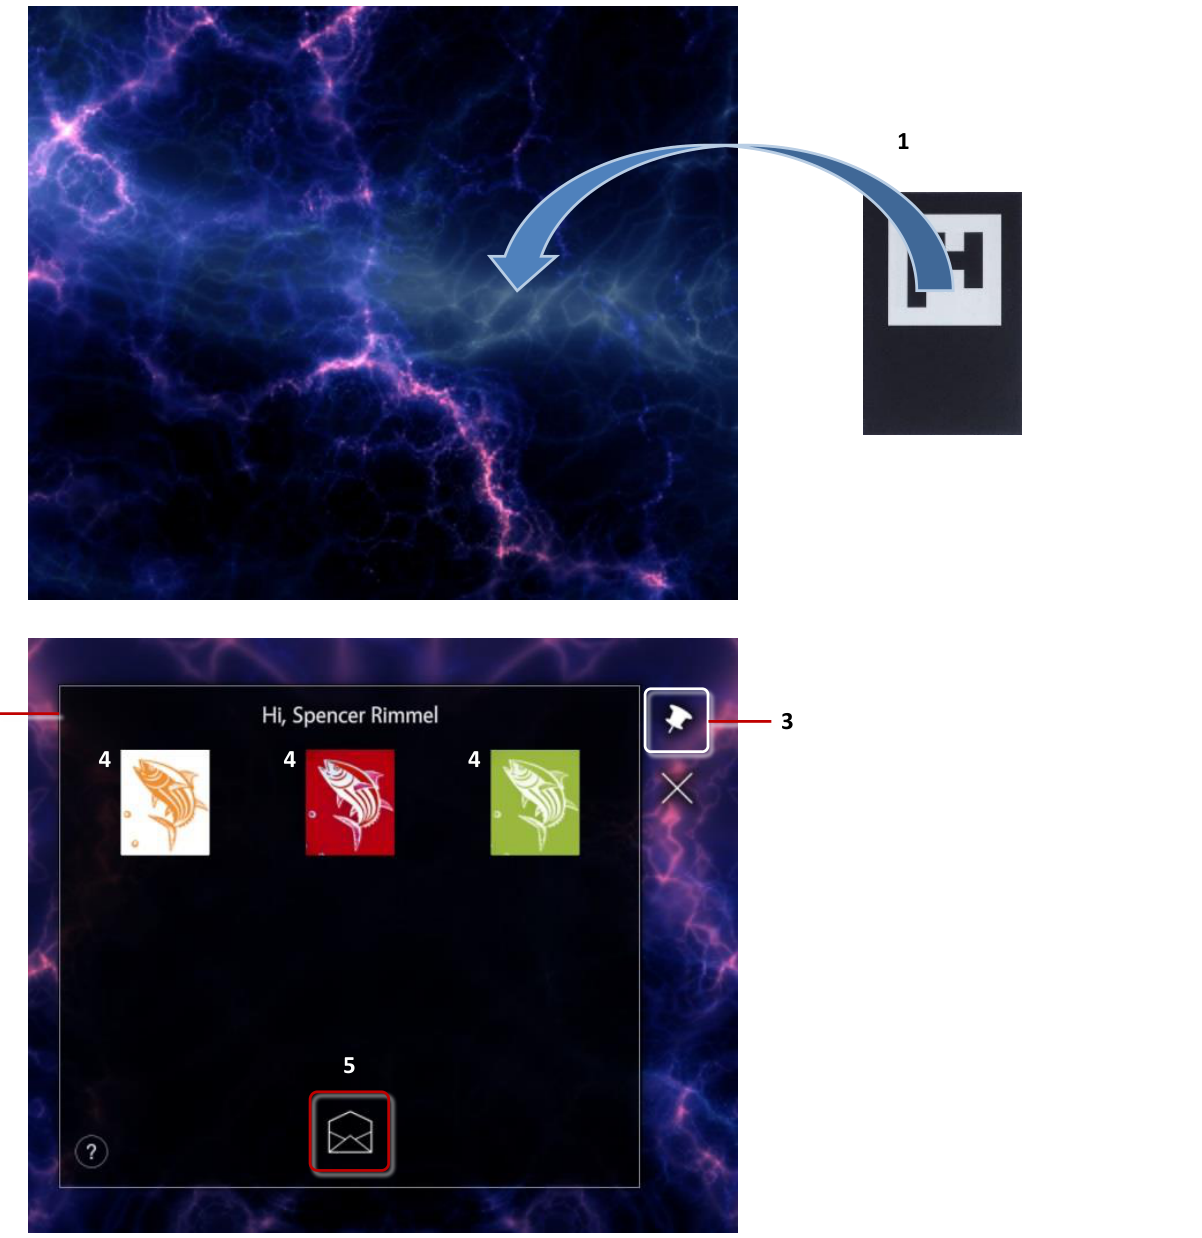
Using a personal space. 1 The user holds their personal marker face down as shown. 2 Personal space. 3 Pin button in personal space toolbar. 4 Screen items collected by the user. 5 Email button (only appears if 'Personal space collection mode' is set to Email).
- align
center
- alt
Personal marker held face down
Personal marker held face down against the screen.
Send Email Attachments (or URLs)
Users can send items in a personal space to a registered email address.
Note
For very large videos or PDFs, the email can include a URL instead of an attachment.
The user must follow these steps:
The user holds their personal marker against the screen to open their personal space.
In the personal space, the user taps the email button and then waits while all items are sent as email attachments (or URLs).
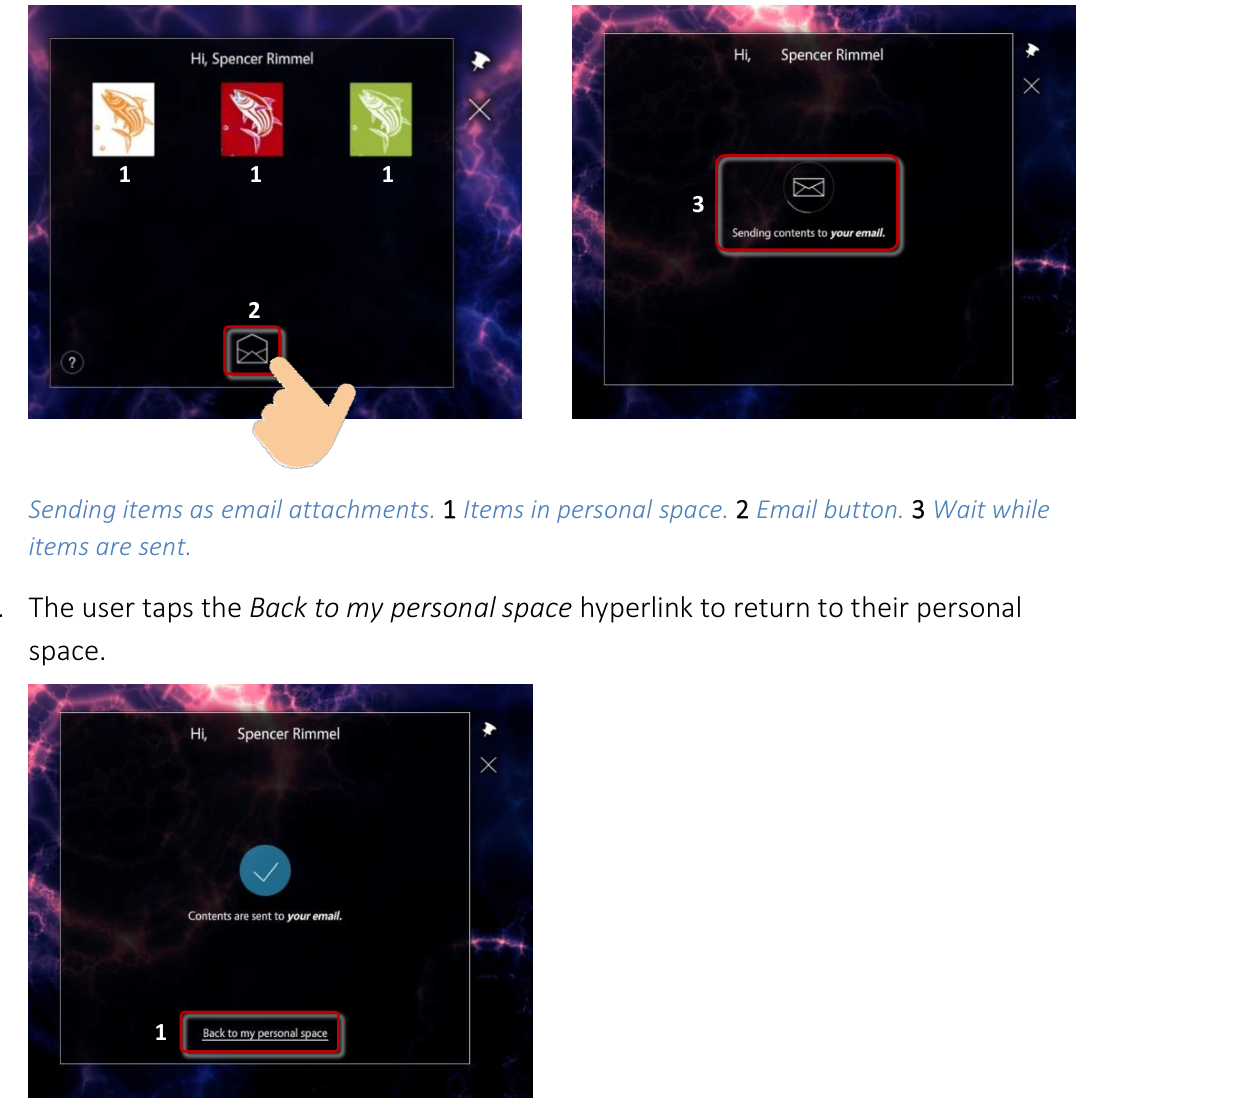
Sending items as email attachments. 1 Items in personal space. 2 Email button. 3 Wait while items are sent.
- align
center
- alt
Email sending progress screen
Email sending progress.
The user taps the Back to my personal space hyperlink to return to their personal space.
- align
center
- alt
Back to my personal space hyperlink after sending email
Sending items as email attachments. 1 'Back to my personal space' hyperlink.
Save Items to a Personal Web Page
Users can save items to a personal web page. When a user drags a screen item into their personal space, the item is automatically added to the user's personal web page on your media server. The user can use a QR code reader to download the item to their mobile device or personal computer.
This method is an alternative to sending screen items as attachments and has the advantage that it does not require a user's email address. Also, the user's personal web page can include screen items collected from multiple video walls.
Note
The URL for the user's personal web page is determined by the media server.
The user must follow these steps:
The user holds their personal marker against the screen to open their personal space.
The personal space includes a QR code that links to the user's personal web page on the media server. Using a QR code reader on their mobile device, the user can open this web page and download any items in their personal space. (The personal space also displays the URL for this web page, allowing the user to browse to the web page directly.)
Saving screen items to a personal web page. 1 Personal space. 2 Screen items collected by the user. 3 Upload status indicators. 4 QR code and URL for the user's personal web page. 5 Pin button in personal space toolbar.
Codice Content
Codice content refers to the item that opens automatically when a user presents a personal marker (holds it against the screen). This item could be an image, video or even a web site. In fact, all the main 'content widgets' are supported, such as image viewers, web browsers, or cloud widgets.
Codice content is assigned to a specific Codice code. The content is available to anyone who presents a Codice card with the correct code.
You set up Codice content in the Codice Database screen. Follow these steps:
Click Codice DB in the left-hand pane.
In the Codice Database screen, go to the Personal Markers pane.
Specify the marker that you want to associate with Codice content. For example, if you want to use Codice 99 to open a finger menu, add a new marker with these details:
Marker code: 99
Name: Special menu
Email: You do not need to provide an email address.
Click the Create codice content hyperlink. This opens the Editing a structure screen.
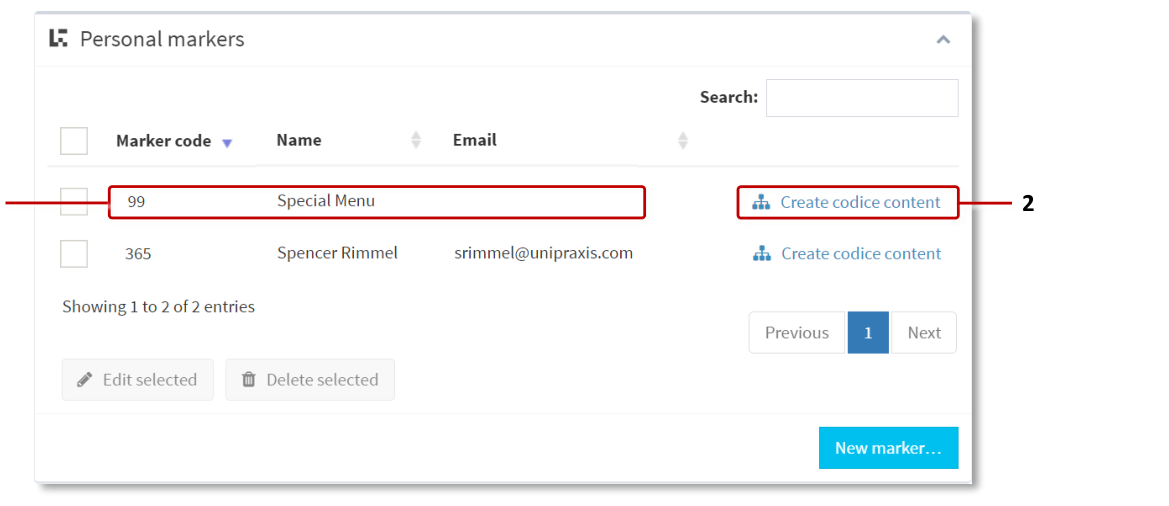
Codice Database screen, Personal markers. 1 New 'Codice content' marker. There is no need to assign an email address to this marker. 2 Create codice content hyperlink.
Edit the Codice content attributes as required.
Move contents with the Codice: Enable this attribute to control the launched content widget by moving and rotating the Codice. For most widgets this means that when a user moves a Codice, the widget follows it. Some widgets have special interaction with Codices. If you launch a menu with a Codice, you can rotate the Codice to highlight and select menu nodes.
Note
Codice control only applies to widgets launched around the Codice marker. It does not affect widgets launched at absolute screen locations.
Dismiss content when Codice is lifted: Enable this attribute to automatically close the content when the Codice is removed from the screen.
Reverse mode: Normally content is launched when a Codice is placed on the screen, and optionally closed when the Codice is lifted. Enable this attribute to reverse the behavior, so content is launched when a Codice is lifted from the screen, and optionally closed when the Codice is replaced.
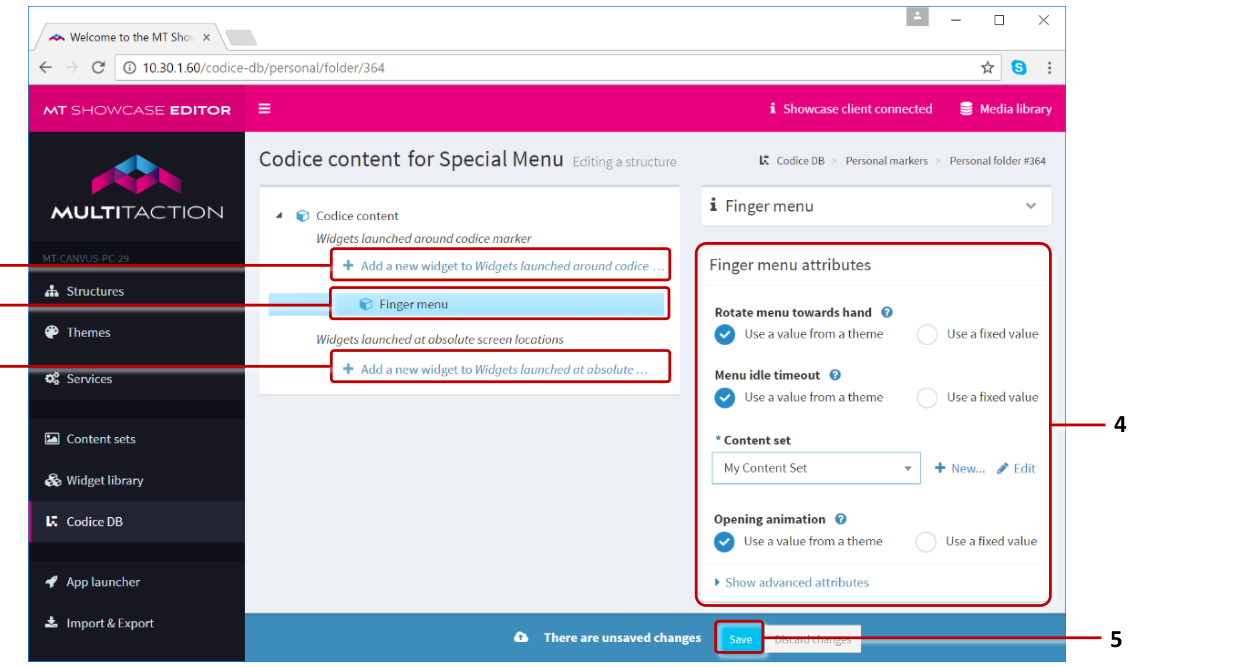
Example Codice content in the Editing a structure screen. 1 Hyperlink to add 'widgets launched around Codice marker'. 2 Launched widget. 3 Hyperlink to add 'widgets launched at absolute screen locations'. 4 Attributes for the launched widget. 5 Save button.
Now define the Widgets launched lists. These widgets open when a user presents the relevant marker. They can be any item normally found in the Main or Menu layers of an app's structure. You typically only launch a single widget but, if required, you can launch multiple widgets.
There are two widget lists, each with its own interpretation of the widget Location attribute:
Widgets launched around Codice marker: For a widget in this list, the Location attribute is relative to the position of the marker on the screen. Use this list if you want a widget to open below or next to the marker.
Widgets launched at absolute screen locations: For a widget in this list, the Location attribute is relative to the top left corner of the screen. Use this list if you want a widget to always open at the same location on the screen.
In the Editing a structure screen:
Click either of the two Add a new widget hyperlinks.
Add the widget you want.
Set the Location attribute. See above for details of how this location is interpreted.
Set the remaining attributes for the new widget.
Click the Save button.
Markers That Ban Tweets
If your app includes a Twitter feed, either in a Twitter cloud or finger menu, there may be occasions when the feed retrieves and displays tweets that are inappropriate. To remedy this, you can designate a Codice as a 'tweet blocker'. This enables users to remove such tweets from the app by simply tapping them with the tweet blocker card.
You can designate any Codice as a tweet blocker. Follow these steps:
Click Codice DB in the left-hand pane.
In the Codice Database screen, scroll to the Markers that ban tweets pane.
Click the New Marker button.
In the Marker Code column, enter the code for the Codice you want to designate as a tweet blocker.
Click the Save button.
Print and distribute the new tweet blocker card.

Codice Database screen, Markers that ban tweets. 1 New 'tweet blocker' marker code. 2 New marker button.
Are Tweets Permanently Removed?
No. If you restart the MT Showcase client, a banned tweet can potentially reappear in the Twitter feed if it has not been supplanted by more recent feeds.
Note
The client displays MT Showcase on your video wall. Instructions for restarting the client are in the MT Showcase Installation Manual.
Erasers
You use eraser cards to erase pen or finger annotations from an MT Showcase app.
By default, Codices 612 and 614 are designated as erasers. You simply print either of these Codices onto paper or card to create eraser cards. You then distribute these cards to your users. Any user can use an eraser card to erase on-screen annotations.
You do not normally need to change the default eraser numbers but, if required, you can designate any Codice as an eraser. Follow these steps:
Click Codice DB in the left-hand pane.
In the Codice Database screen, scroll down to the Erasers pane.
Click the New Marker button.
In the Marker Code column, enter the code for the Codice you want to designate as an eraser.
Click the Save button.
Print and distribute the new eraser card.
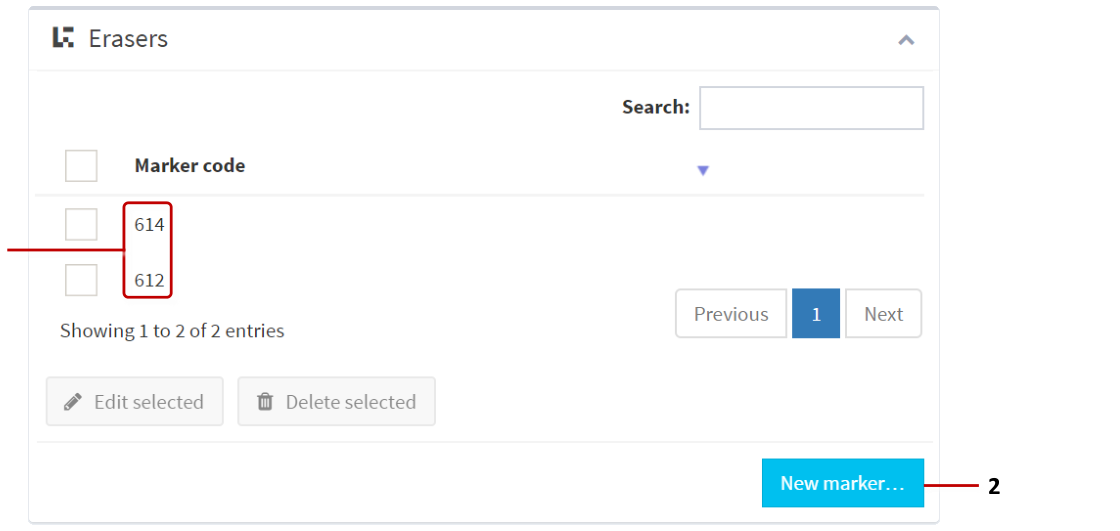
Codice Database screen, Erasers. 1 New eraser marker codes. In this example, Codice 612 and 614 are designated as erasers. 2 New marker button.
Create Your Own Codice Cards
If required, you can download ready-made sets of Codice markers in PDF format. Alternatively, you can generate your own Codice markers in PNG format using the MultiTaction MarkerFactory application. In either case, you can then print the markers onto paper or card and distribute to your users.
For full details about creating your own Codice markers, see the MultiTaction Cell User Manual, available at https://cornerstone.multitouch.fi/