Schedules
You can control when apps and widgets run by creating a schedule of events.
The app schedule is a collection of app events. Each app event defines when a specific app runs (the start and stop times). For example, you can schedule a specific app to run every Monday morning. When a scheduled app starts, it will replace any app currently on the screen. You can display a countdown to alert users when a scheduled app is due to start. You can also allow users to cancel the scheduled app.
Note
While a scheduled app is running, users can still use App Switcher widgets or the Editor's App launcher to switch to a different app.
The widget schedule is a collection of widget events. Each event defines a period, or a recurring period, when a widget is active. You can assign events to a widget when you edit your app's structure. For example, you can assign an event to a video viewer widget to play a movie at a specific time each day.
Create an App Event
An app event defines when a specific app runs. An event can only be assigned to one app; you cannot assign the same event to multiple apps. The event defines the app run period (e.g., 2--3pm) and repeat interval (e.g., daily or weekly). You create app events in the App schedule screen.
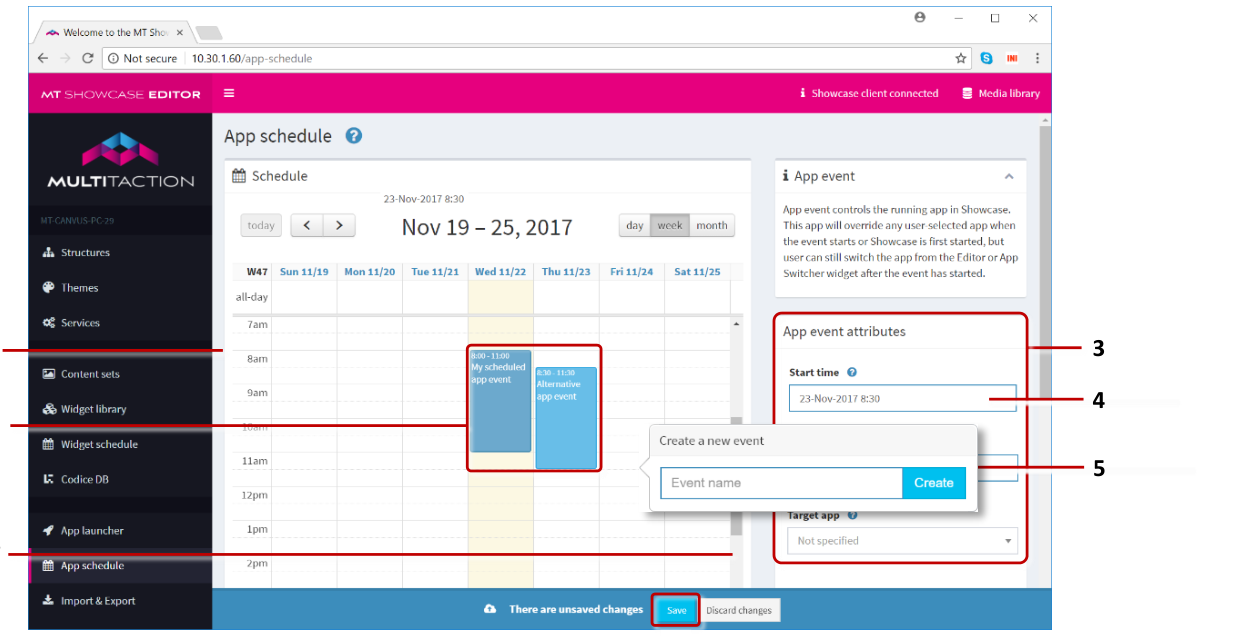
App schedule screen. 1 Calendar. 2 Example app events. 3 App event attributes pane. 4 Start Time attribute. 5 Create new event pop-up. 6 Save button. 7 Scroll down the screen to see the event list.
Follow these steps:
Click App Schedule in the left-hand pane.
In the App schedule screen, click a timeslot in the calendar to create a new event. (You will be able to edit the times and dates in step 4.)
In the pop-up dialog, enter a name for the new event and click the Create button.
In the right-hand App event attributes pane, edit the following attributes:
Start Time and End Time: Specify when the app starts running and the end of its scheduled runtime. Click the input box to display a pop-up date and time picker.
Note
A scheduled app will continue running after the End Time elapses unless a user switches to a different app or it is replaced by another scheduled app.
The End Time only takes effect if MT Showcase starts up midway through a scheduled app event. If so, the Editor uses the Start Time and End Time to calculate each event's runtime and so launch an event if it is supposed to be running "now".

Date and time picker.
Event recurrence: Specify how often the app runs.
Tip
If you choose a weekly repeat, you can specify which days of the week the app runs on.
Target app: Choose which app runs when the current schedule starts.
Warning duration: By default, a warning countdown appears on-screen before a scheduled app starts. You can set how long the countdown is, or you can set the countdown to zero so that the scheduled app starts with no warning.
Allow cancel: By default, the warning countdown includes a Cancel button, allowing users to cancel the scheduled app. But if required, you can disable this attribute to hide the Cancel button.
Click the Save button to save the app event. The target app will run automatically at the scheduled time(s).
Create a Widget Event
A widget event defines when a widget is visible (or active). The event defines the active period (e.g., 2--3pm) and recurrence (e.g., daily).
An individual widget can only have one event assigned to it, but you can assign the same event to multiple widgets. For example, you can assign the same event to a video viewer widget and background widget to play a specific movie, and display a specific background, at fixed times each day.
Follow these steps:
Click Widget Schedule in the left-hand pane.
In the Widget schedule screen, click a timeslot in the calendar to create a new event. (You will be able to edit the times and dates in step 4.)
Tip
The Widget schedule screen has the same layout as the App schedule screen.
In the pop-up dialog, enter a name for the new event and click the Create button. For example, Monday morning event.

Create new event pop-up.
In the right-hand Widget event attributes pane, edit the following attributes:
Start time and End time: Specify when the widget becomes active or visible on screen, and when it stops or closes. Click the input boxes to display a pop-up date and time picker.
Event recurrence: Specify how often the widget is active.
Tip
If you choose a weekly repeat, you can specify which days of the week the event occurs on.
Click the Save button to save the widget event.
Now assign the new event to a widget in your app; continue to the next section.
Assign a Widget Event
You can now assign your new widget event to a widget. For example, to assign the event to the web browser in My First Structure, follow these steps:
Edit the widget attributes:
Click Structures in the left-hand menu.
Click the My First Structure hyperlink.
In the Main section, click the Web browser widget.
Assign the widget event to the web browser widget.
In the Web browser attributes pane, go to the Schedule attribute.
Choose an event from the drop-down list. For example, Monday morning event.

Schedule attribute. 1 Drop-down list of widget events.
Click the Save button to assign the event.
Scheduled widgets are identified in the structure.
Manage App and Widget Events
You can easily edit app events and widget events. For example, you can edit the start and stop times, or the recurrence. You can also rename events. Follow these steps:
Click App Schedule or Widget Schedule in the left pane.
In the Schedule screen, scroll down to the event list. (The event list is shown below the calendar.)
Click the event name to edit the event attributes or click the rename button. To delete an event, select its checkbox and click the Delete Selected button.