Set Up Positional Audio
Note
This feature is also called 'audio panning'.
MT Showcase apps can play sounds (.wav files) when a widget opens and closes, and when a user touches a widget with their hand or infrared pen. Apps can also loop sounds continuously while a widget is open. By default, these sounds are directed equally to all speakers attached to your video wall.
But you can configure MT Showcase to support positional audio. This means that widget sounds are directed to the nearest speaker. This is useful on large video walls where multiple users may be interacting with an app at the same time. If a widget moves away from one speaker towards an adjacent speaker (for example, if it is dragged by a user), audio output smoothly shifts from the first speaker to the second.
For example, consider a long video wall with five evenly spaced speakers. A video playing in the center of the wall outputs audio to the central speaker, but a video playing on the left side of the wall outputs audio to the leftmost speaker. Similarly, if a video is drifting across the screen from left to right (because it is configured as a teaser visualization widget), its audio output follows the teaser, panning across the speakers from left to right.
Note
Widget sound effects and video soundtracks can both use positional audio. Conversely, browser sounds cannot. For details, see Sound Effects, Video Sound and Browser Sound.
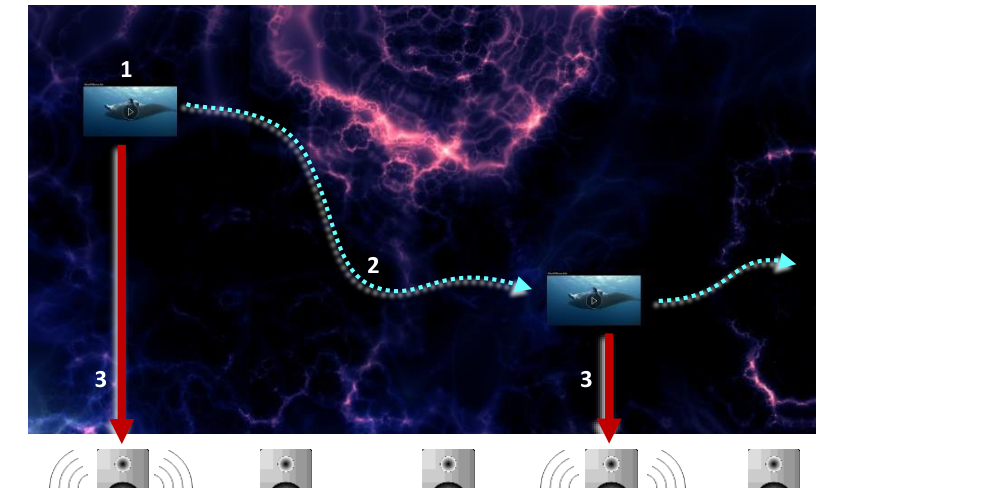
Positional audio example. Here, a teaser uses a video as its visualization widget (1). As the teaser drifts across the screen from left to right (2), audio output smoothly transitions through the channels from left to right (3). For users, the sound appears to follow the video's progress across the screen.
Audio Requirements and Considerations
Sound Card
We do not currently recommend any specific sound cards. To set up audio panning, your application computer simply needs a multi-channel sound card that supports speaker configurations such as 5.1 surround sound.
Sound Effects, Video Sound and Browser Sound
It is important to distinguish between sound effects, video sound and browser sound.
Sound effects are configured in the MT Showcase Editor. They include short sounds played when a user touches a widget, or when a widget opens or closes. They also include sounds looped continuously while a widget is open or an app is running. To set up these sound effects, you edit the Widget Sounds and Interaction Sounds widgets in the MT Showcase Editor.
These widgets include an attribute to enable (or disable) positional audio. This task is described in the MT Showcase Editor Manual.
Video sound (the audio track for a video) is not configured in the MT Showcase Editor. Video sound can be muted in the Video Viewer widget, but volume levels are controlled using your speakers or application computer.
If positional audio is enabled on your application computer (see Set Up Positional Audio Steps), video sound always uses positional audio. It cannot be disabled in the MT Showcase Editor. But see the note below.
Browser sound refers to any audio output generated by the browser content. This typically means the audio track for a video running in the browser. Like video sound, browser sound is not configured in the MT Showcase Editor. Browser sound cannot be adjusted in MT Showcase (the Web Browser widget has no mute button), but volume levels are controlled using your speakers or application computer.
Also, browser sound never uses positional audio. Even if positional audio is enabled on your application computer, browser sounds are always directed to all available speakers, regardless of the browser widget's screen position. But see the note below.
Note
The positional audio limitations described above for video sound and browser sound only apply to the video content or browser content! If Interaction sounds (when a user touches the widget) or widget sounds (when a widget opens or closes) are configured for a Video Viewer widget or Web Browser widget, these sounds do use positional audio!
Channel Index Numbers
You need to know the channel index for each speaker. You will reference these index numbers when you create your audio configuration file. For advice on how to obtain channel index numbers, see step 1 in Set Up Positional Audio Steps.
For example, a 5.1 surround sound system typically uses these channel index numbers:
Front Left: 0
Front Right: 1
Front Center: 2
Rear Left: 3
Rear Right: 4
Note
Left and Right mean the user's left and right when they face the screen.
The subwoofer has no channel index and can be ignored when setting up positional audio for MT Showcase.
- align
center
- alt
Channel index numbers diagram
Audio Configuration Files
You configure positional audio in an XML audio configuration file that is passed to MT Showcase at runtime. The audio configuration defines:
Speaker zones on your video screen. Each zone is rectangular and has two audio channels, on its left and right edges. The size, location and number of speaker zones matches the position and number of speakers attached to your video wall.
Fade borders at the edges of each speaker zone. If the sound source (such as a video widget) moves out of a speaker zone and into a fade border, audio output smoothly attenuates to zero.
Stereo panning within each speaker zone. This controls audio attenuation on a zone's left and right channels. For example, as the sound source moves away from the left speaker towards the right speaker, audio output falls on the left channel and rises on the right channel.
Audio Configuration Elements
An audio configuration contains the following elements:
<!DOCTYPE mtdoc>
<pan2d>
  <mode>1</mode>
  <rectangles>

    <SoundRectangle>
      <left-channel>n</left-channel>
      <right-channel>n+1</right-channel>
      <location>x y</location>
      <size>w h</size>
      <stereo-pan>sp</stereo-pan>
      <fade-width>w</fade-width>
    </SoundRectangle>

    <!-- Insert extra sound rectangles here -->

  </rectangles>
</pan2d>
Where:
modespecifies the type of positional audio. Always set this to1for rectangular speaker zones.SoundRectangledefines a single rectangular speaker zone. Its child elements define the zone's size and location, and the speakers assigned to the zone's left and right channels. You must add a separateSoundRectangleelement for each speaker zone in your audio configuration. Typically, you need s-1 speaker zones, where s is the number of speakers attached to your video wall.left-channelsets the channel index for the speaker on the left edge of the speaker zone; n is the channel index.right-channelsets the channel index for the speaker on the right edge of the speaker zone; n is the channel index.locationdefines the screen location of the speaker zone; x y define the horizontal and vertical coordinates of the zone's top-left corner, in pixels.sizedefines the size of the speaker zone; w h define the width and height of the zone, in pixels.stereo-pancontrols audio attenuation on the zone's left and right channels. Audio output changes on each channel dynamically as the sound source moves. Permitted values range from 0 to 1. The default is 0.3, meaning that when the sound source is fully on the right, audio output on the left channel falls by 30%. (That is, when the right channel audio is 100%, the left channel is 70%. Likewise, when the left channel audio is 100%, the right channel is 70%.) For more about stereo panning, see Stereo Panning.fade-widthdefines the width, in pixels, of the fade borders. These lie outside the left and right edges of the speaker zone. Within the fade border, audio output falls to 0% or rises to 100%, depending on whether the sound source is leaving or entering a speaker zone. For more about fade borders, see Fade Borders.
Example audio configuration files are shown in Example Audio Configuration Files.
Where to Save the Audio Configuration
We recommend you save your audio configuration file in the same folder as the
MultiTaction Cornerstone configuration files, screen.xml and config.txt. By default, these
files are saved in the following locations:
Ubuntu application computers: The files are in the
~/.MultiTouchfolder, where~/refers to the home folder of the MT Showcase runtime user. If the user logged on while MT Showcase runs is 'multi', the expanded path is:/home/multi/.MultiTouch/Windows application computers: The files are saved in the MT Showcase runtime user's profile:
%APPDATA%\MultiTouchIf the user logged on while MT Showcase runs is 'multi', the expanded path is:C:\Users\multi\AppData\Roaming\MultiTouch\screen.xml
Instructions for passing the audio configuration to MT Showcase are in Set Up Positional Audio Steps.
Stereo Panning
Stereo panning is best illustrated in a simple two-speaker stereo setup. In the example below, the video wall has two speakers, with a single speaker zone extending across the entire screen. The left and right edges of the speaker zone correspond to the left and right audio channels. As the sound source (such as a video widget) moves left to right across the screen, audio output also pans left to right, fading from the left channel and gaining on the right channel.
You use the stereo-pan setting to control the level of attenuation. Permitted values
range from 0 to 1. The default is 0.3, meaning that when the sound source is fully on the
right, audio output on the left channel falls by 30%. (That is, when the right channel audio
is 100%, the left channel is 70%.)
Audio attenuation is linear. For example, if stereo-pan is 0.3, then output on both the
left and right channels falls by 15% when the sound source is in the center of the speaker
zone (i.e., midway between the left and right edges).

Stereo panning example. A single speaker zone extends across the entire screen. As the sound source (1) moves from the left edge of the speaker zone to the right edge of the speaker zone: if stereo-pan=0.3, audio output on the left channel (L) falls from 100% to 70%, while audio output on the right channel (R) rises from 70% to 100%. If stereo-pan=0.5, audio output on the left channel (L) falls from 100% to 50%, while audio output on the right channel (R) rises from 50% to 100%.
Note
Stereo panning is more noticeable with wider speaker zones. If you have very narrow speaker zones (one Cell width or less), your users are unlikely to notice the stereo panning effect.
Fade Borders
Fade borders enable you to configure smooth audio transitions from one speaker to the next. Fade borders are vertical strips of screen space either side of a speaker zone. When a sound source (such as a video widget) approaches a speaker zone, it first passes through the entry fade border and its audio output rises from zero to 100%. When it leaves a speaker zone, it passes through the exit fade border and its audio output fades from 100% to zero.
By default, fade borders are 100 pixels wide and automatically configured outside the left and right edges of a speaker zone. For smoother audio transitions, try experimenting with wider fade borders (say, 200 or 300 pixels).

This example video wall has a three-speaker setup (0-2), with two speaker zones. The sound source is a video widget (3), moving left to right across the screen. Total audio output (4) remains constant, switching smoothly from channels 0 and 1 to channels 1 and 2.
- align
center
- alt
Fade borders audio output levels
Audio output levels as the sound source passes through fade borders and speaker zones: (a) The entry fade border for zone 1 is off-screen and has no effect on audio output. (b) While the sound source is in zone 1, zone 1 audio output is 100%. (c) As the sound source enters the entry fade border for zone 2, zone 2 audio output rises from zero to 100%. (d) As the sound source exits zone 1 into the exit fade border, zone 1 audio output falls from 100% to zero. (e) While the sound source is in zone 2, zone 2 audio output is 100%. (f) The exit fade border for zone 2 is off-screen and has no effect on audio output.
Note
For simplicity, the diagrams above do not show the effect of stereo panning within each speaker zone.
Set Up Positional Audio Steps
Follow these steps:
Confirm that the speakers are connected to the application computer and recognized by the operating system. Also, note the channel index for each speaker.
Ubuntu application computers: Run the
pavucontrolcommand to launch the PulseAudio Volume Control app. In the app's Configuration tab, select the setup that most closely matches the speaker configuration on the application computer. Then obtain the channel index numbers from the Playback tab; this tab lists the satellite speakers in index order. So the first speaker is channel 0, the second is channel 1, and so on. (PulseAudio is a Linux sound server included with Ubuntu distributions.)Windows application computers: Use the Sound applet to select your speakers from the list of playback devices. Then use the Speaker Setup wizard (launched from the Sound applet) to select and test the setup that most closely matches the speaker configuration on the application computer. When you test the setup, the Speaker Setup wizard test plays output on each satellite speaker in index order. So the first speaker is channel 0, the second is channel 1, and so on.
Using your preferred XML editor, create an audio configuration file. For example,
MyAudioSetup.xml. For syntax details, see Audio Configuration Files. For examples, see Example Audio Configuration Files.Pass the audio configuration file to the MT Showcase client at runtime. For more about starting the MT Showcase client, see the Start or Stop MT Showcase section.
If starting MT Showcase from MT Launcher: This is the usual method for starting MT Showcase. You must edit MT Showcase's pipeline configuration file to include the following argument:
arguments=--audio-config <config file>
Where
<config file>is the XML file you created in step 2. Enclose the file name in double quotes if it contains spaces.MT Launcher is introduced in the Start or Stop MT Showcase section. For full details about the
argumentssetting and pipeline configuration files, see the MT Launcher Installation Manual. Registered users can download this manual from https://cornerstone.multitouch.fi/mt-launcher-manuals.If starting MT Showcase directly on Ubuntu computers: Run the following command when you launch MT Showcase directly:
mt-showcase --audio-config <config file>
Where
<config file>is the XML file you created in step 2. Enclose the file name in double quotes if it contains spaces.If starting MT Showcase directly on Windows computers: Customize an MT Showcase desktop shortcut to specify the audio configuration file. Edit the shortcut properties and set the Target field to:
"C:\Program Files\MT Showcase\bin\mt-showcase.exe" --audio-config <config file>
Where
<config file>is the full path to the XML file you created in step 2. Enclose the file name in double quotes if it contains spaces.
Configure your MT Showcase app to use sound effects (widget sounds and interaction sounds) and enable relevant instances of the Positional audio attribute. Instructions for adding sounds to an app are in the MT Showcase Editor Manual. Registered users can download this manual from: https://cornerstone.multitouch.fi/mt-showcase-manuals
Example Audio Configuration Files
Two Speakers and a Single Speaker Zone
Here, the video wall comprises three MultiTaction Cells in portrait mode with two speakers (one at each end of the video wall). The wall is approximately 2m wide, with a total display area of 3260 x 1080 pixels, where 3260 is three Cell widths (3 x 1080) plus two 10 pixel bezels.
The audio configuration defines a single speaker zone, with a left and right channel. Default stereo panning is enabled and fade borders are not relevant (because only one speaker zone is defined.) The left channel index is 0, and the right channel index is 1.

Single speaker zone with stereo speakers. Pixel coordinates are shown above. 0 Left channel. 1 Right channel.
This setup requires the following XML audio configuration:
<!DOCTYPE mtdoc>
<pan2d>
  <mode>1</mode>
  <rectangles>
    <SoundRectangle>
      <left-channel>0</left-channel>
      <right-channel>1</right-channel>
      <location>0 0</location>
      <size>3260 1080</size>
      <stereo-pan>0.3</stereo-pan>
      <!-- fade-width is not relevant in this setup -->
    </SoundRectangle>
  </rectangles>
</pan2d>
Five Speakers and Four Speaker Zones
Here, the video wall comprises 4x3 MultiTaction Cells in landscape with five speakers arranged evenly along the wall. The wall is approximately 4.8m wide, with a total display area of 7710 x 3260 pixels, where 7710 is four Cell widths (4 x 1920) plus three 10 pixel bezels.
The audio configuration defines four speaker zones, each with a left and right channel. Adjoining zones 'share' a speaker. Default stereo panning and default fade borders are both enabled. From left to right, channel index numbers are 0 through 4.
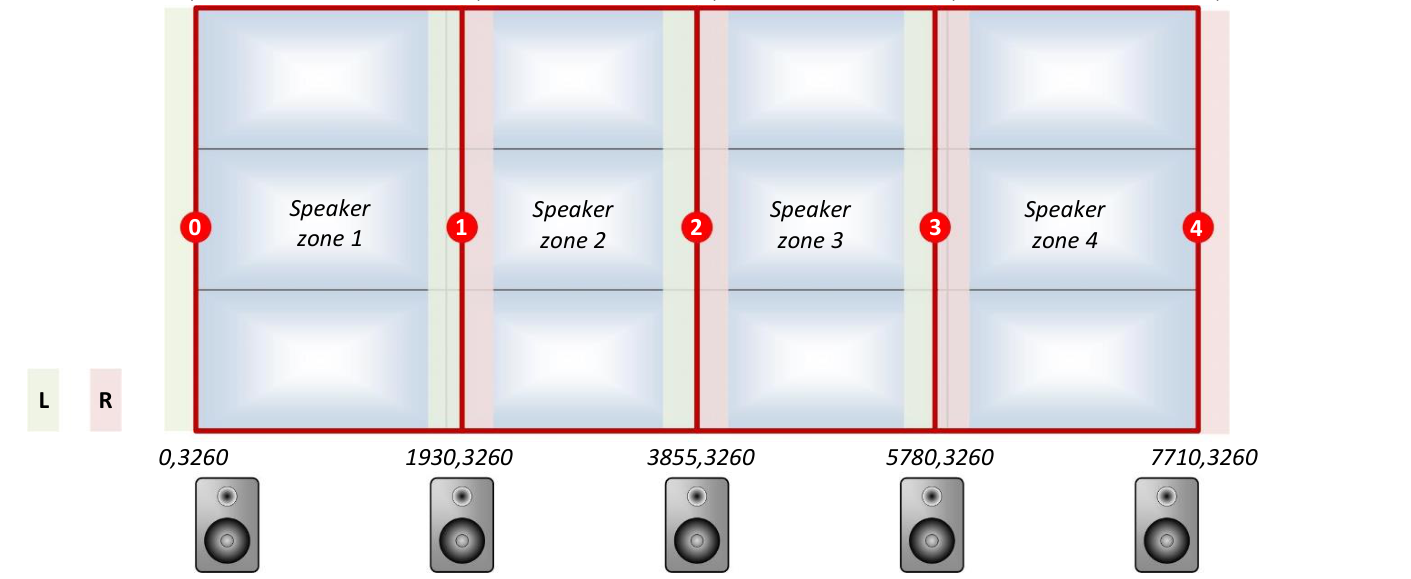
Four speaker zones with five speakers. Speaker zone coordinates are shown above. Note that outer zones 1 and 4 are 1930 pixels wide; inner zones 2 and 3 are 1925 pixels wide. 0 Left channel. 1 Inner left channel. 2 Center channel. 3 Inner right channel. 4 Right channel. L Left fade border of speaker zone. R Right fade border of speaker zone.
This setup requires the following XML audio configuration:
<!DOCTYPE mtdoc>
<pan2d>
  <mode>1</mode>
  <rectangles>

    <!-- Speaker Zone 1 -->
    <SoundRectangle>
      <left-channel>0</left-channel>
      <right-channel>1</right-channel>
      <location>0 0</location>
      <size>1930 3260</size>
      <stereo-pan>0.3</stereo-pan>
      <fade-width>100</fade-width>
    </SoundRectangle>

    <!-- Speaker Zone 2 -->
    <SoundRectangle>
      <left-channel>1</left-channel>
      <right-channel>2</right-channel>
      <location>1930 0</location>
      <size>1925 3260</size>
      <stereo-pan>0.3</stereo-pan>
      <fade-width>100</fade-width>
    </SoundRectangle>

    <!-- Speaker Zone 3 -->
    <SoundRectangle>
      <left-channel>2</left-channel>
      <right-channel>3</right-channel>
      <location>3855 0</location>
      <size>1925 3260</size>
      <stereo-pan>0.3</stereo-pan>
      <fade-width>100</fade-width>
    </SoundRectangle>

    <!-- Speaker Zone 4 -->
    <SoundRectangle>
      <left-channel>3</left-channel>
      <right-channel>4</right-channel>
      <location>5780 0</location>
      <size>1930 3260</size>
      <stereo-pan>0.3</stereo-pan>
      <fade-width>100</fade-width>
    </SoundRectangle>

  </rectangles>
</pan2d>